Retro Computing - Retrobrighting

 I’ve recently tried Retrobrighting for the first time.  This is the process of restoring yellowed plastic to its like-new appearance.  There are many videos online showing this, including The 8-Bit Guy and others.

The technique relies on immersing yellowed plastic parts in Hydrogen Peroxide while exposing them to UV Light.

Finding Hydrogen Peroxide during the pandemic was a bit of a challenge, but the 8-Bit Guy recommended Sally Beauty supply for #40 Developer, that seems to work well, as it’s more concentrated than what you’d get from the pharmacy, which is normally 2% concentration.

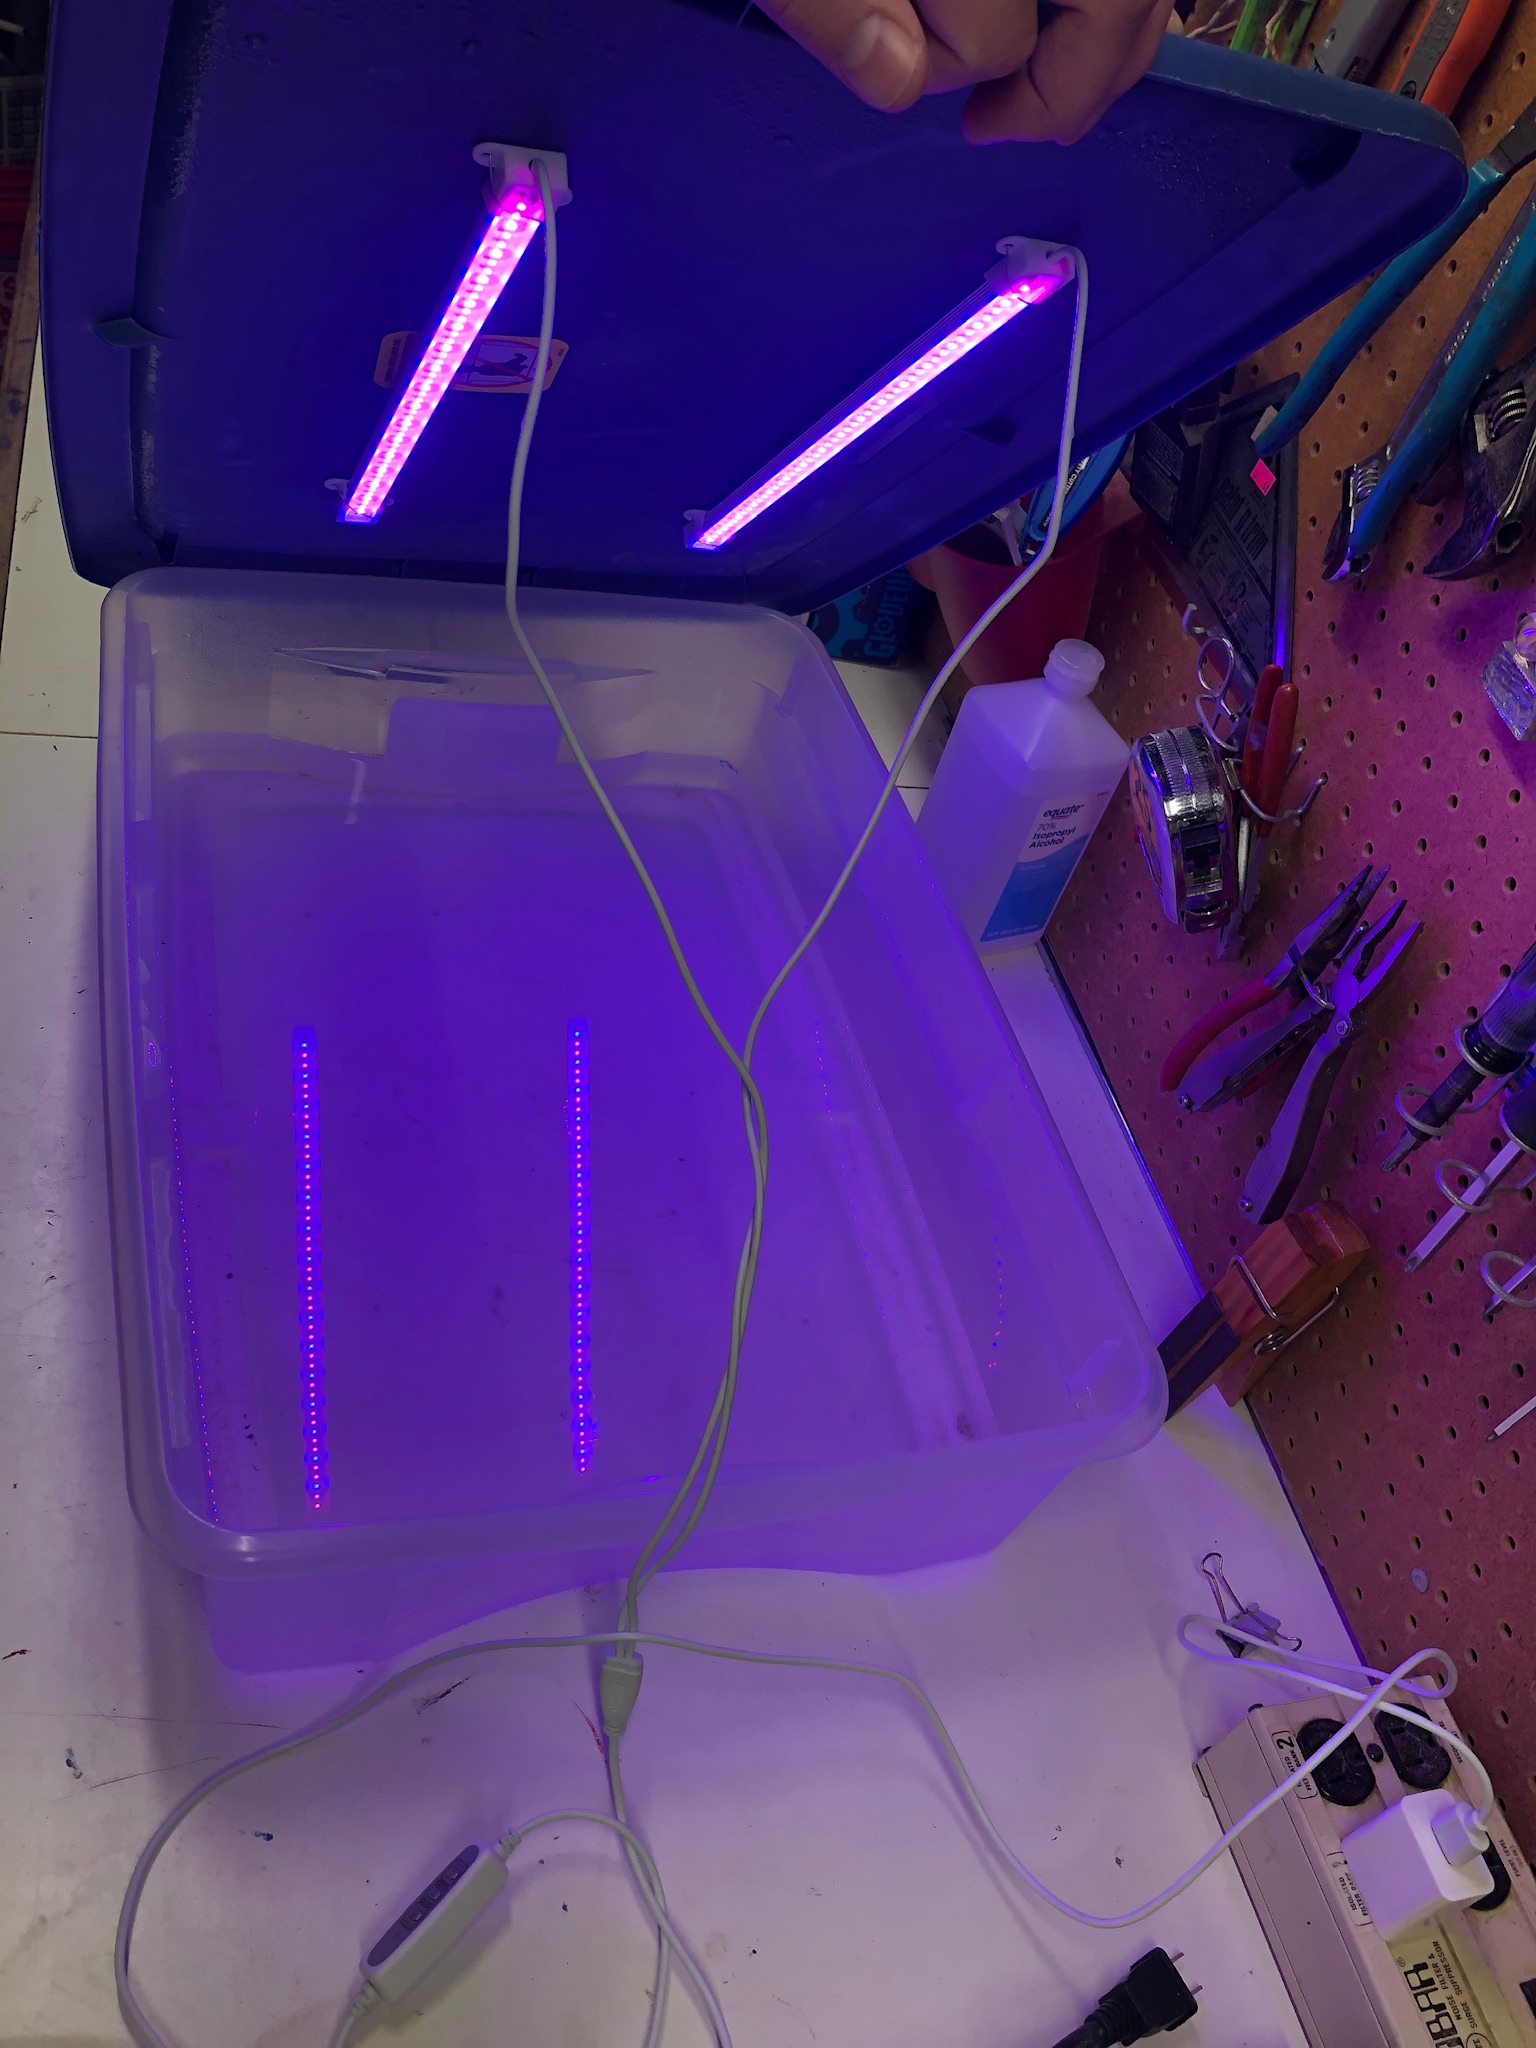
I was able to re-use some LED based grow lamps that we had here already.  Since my first item was a Keyboard I was able to use a shallow tote for this first experiment, and installed the UV LED strip lights on the lid of the tote, as shown here...


The most yellowed item in my collection at this point is a classic Apple ADB keyboard M0116, with lovely Apls switches.  Here’s what the keyboard looked like before... 


And After...


This is very gratifying result, as the keyboard looks fantastic with the early 90s platinum macs, like this Classic II...


It looks like they were made to go together, I’m really happy with the result.

A few weeks later, I tried the Cream method on some larger items, the housing of an Apple Portrait Monitor and an Macintosh IIsi.  This was on a sunny summer Saturday, so this time I did the treatment outside.  It only took a couple of hours.

Unfortunately, the first time around the finish looked a bit splotchy.  I redid the treatment again a second time an it came out quite nicely...


So, the retrobright activities will continue.  I may need to find brighter lights and a bigger tank, as winter is coming in Minnesocold and the outdoor retrobrighting activities will have to come to an end.

Let me know in the comments if you’ve ever tried retrobrighting, and what has worked for you?


How to Price Vintage or Retro Computers for Sale on Craigslist and Facebook Marketplace

 Hi All,

As readers of my bLog will know, I buy and sell Retro computers on Craigslist and Facebook Marketplace in the Minneapolis / St. Paul Metro area.  I see a common mistake being made by people listing computers for sale on these sites, and I want to offer a bit of education.  I think an informed buyer and seller create better outcomes for both parties.

The most common error I see is people asking too much for their Vintage or Retro computers.  One common reason for this is not doing basic searches online to determine what type of computer you have.  Do not assume that all grey IBM PCs are the original IBM 5150 computer.  Do not assume that all beige all-in-one Macintosh computers are the original Macintosh computer, look for model numbers on the back of the computer and do some web searches to figure out what you are selling.  As with all antiques the value is related to the rarity, condition, and completeness.

Another common reason for overpricing comes from the practice of looking up items to sell on eBay first, then asking the same or slightly less than the “Buy it Now” price of the highest active auctions on eBay.  This is not a realistic price, you want to find out what eBay buyers are paying, not what hopeful sellers are asking.

As an example, I will describe the latest computer I have sold, a Macintosh Classic from 1991.  At the end, I will tell you what I got for the computer.

When I do a search on eBay for this computer, the first match for a currently eBay listing is asking $240 and another one is listed for $350.  However, if you look one level deeper, the real value of this computer, what eBay sellers have actually paid, is not hard to find.  This information is available by scrolling down the main eBay search results page and finding the “Sold Items” checkbox on the left side near the bottom, as shown here...

As we browse this, we see that one Macintosh Classic sold for $200, another for $96, and another for $80.  The difference in the price was mainly due to condition.  The highest price system looked really clean in the pictures, was in working condition, and was more complete included the keyboard, mouse, and cords.  The others were sold for parts / not working without a keyboard and mouse.

Once you know the value of the item on eBay, how does that apply to local market selling like Craigslist or Facebook Marketplace?  I believe that asking more than 50% of what the item could be sold for on eBay means that you may have to wait a long time to find a buyer, or may not find a buyer at all.   People expect the local market to be cheaper than eBay, and if you want to sell your item quickly, this price point is important.

Using the example of the Macintosh Classic, if we apply the below 50% rule, we should be asking below $100 at the top end and below $40 for this computer in less than ideal condition on Craigslist or Facebook Marketplace, again primarily based on condition and completeness.

I was able to sell my Macintosh Classic recently on Craiglist for $75 without a keyboard and mouse.  It was listed for about 1 week before it sold.

What do you think about this?  Do you have experience buying and selling Retro and Vintage Computers, or other antiques?  I’d love to hear if you have other thoughts or ideas about how to value these old machines, so leave a comment below, or send me an email.


Apple IIe Card for Macintosh LC Continued...

As I've mentioned in this previous post, I'd been able to acquire a Macintosh LC system on Craigslist that included an Apple IIe card.  The card was missing it’s Y-cable, Apple Part Number 590-0703-A.  This is a custom cable only used for this card so if you buy the card without the cable it’s quite hard too find.  There was someone building and selling replacements, but they haven’t been available for some time.

As I’ve already mentioned, I built some adapters using point to point wiring.  Since my use case is for the FloppyEmu, not an authentic Apple II drive (which I do not have to test) I have not connected the 12 volt supply lines.

After making this adapter...


I decided I really wanted a joystick connector, so I built this adapter...


Neihther of these adapters are very reliable, and honestly I’ve been a bit afraid of a short causing damage to the card, which is something I would not be able to replace, so the project continues.

I've never designed a PCB before, and I've always assumed that it would be difficult and that the software tools were out of reach but after seeing multiple YouTubers not only advertising for PCBWay, but also actively building little problem solving boards, I decided that I should not be afraid to try my hand at building a circuit board to solve this problem.  I started out by downloading and installing KiCad, and watching several of the. “Getting Started” Videos on YouTube.  With a few evenings of learning  and working on this, I was able to get a design created that was acceptable to PCBWay.  Finding the right angle connectors on DigiKey was a challenge, but finding the footprint files that KiCad needed for those connectors was surprisingly easy.

Waiting for the boards to arrive from China was the hard part, I live in Minnesota so order from DigiKey usually arrive in a couple of days.  I couldn’t wait to solder up the first one and do some testing.  Had I done it right, or would rework be required on the circuit board after?


Well, the circuit board worked, I was able to read the FloppyEmu, and I was able to play games with the Joystick.  All in all a very gratifying experience.

This is a simple circuit and a simple design, but I’ve decided to share it with the community.  The files are here...
I've decided to go Open Source Hardware on this as a way to give back.

I’ve so appreciated how generous people are with their time, and this is a way that I can give back a little bit too the very small portion of the retro computer community for which this board may be of use.

It’s my hope that every Apple IIe card that still exists out there will be able to be put back into service with FloppyEmu and a Joystick.

As always, I appreciate any and all feedback, leave a comment below.  Thanks!

Using Bootable Floppy Disk Images from the Internet to make Actual Floppy Disks

I’ve recently made some interesting discoveries that I thought may be valuable to other fans of the early Apple Macintosh Computers.

I had an interesting conversation about running some old Macintosh software that was pre System 6.  This era of Mac was before my time and so an interesting challenge.  Of all the early Mac system software disks out there, I think the best organized collection is currently on Winworld, here.  These files work great with the vMac Mini emulator running on a modern Mac, but when you move the files back onto a “Rosetta Stone” Mac in order to build boot floppies, the files are not associated with Disk Copy (the resource fork is missing, and Disk Copy does not recognize the files as disk images).

In the past, I have had some limited success in finding StuffIt (SIT) archives and bringing them onto the bridge machine before un compressing them, that way if the resource fork was intact it will be maintained, but unfortunately a lot of the files on Winworld are missing that information.  Up to this point I had been deleting these versions of the files and moving on to try to locate different sources of the files.

Today I learned that there is another good option.  The vMac Mini folks have created a set of utilities that can be used on OS9 and early versions of OSX to recreate the resource fork for a disk image if that information is missing.  The part of the tool that’s most relevant to vMac Mini is used to indicate that the file should be opened in vMac Mini, but they also created a tool too associate files with Disk Copy.  This utility is called SetFType and is avaliable here.

Normally I used OS 8 or OS 7 for disk imaging activities, but unfortunately this utility requires OS9, so the process I used was this:
Put the files I wanted to use on ZIP drive using the modern Mac, 
Boot my Bridge Mac up in OS9
Run the SetFType utility on the files on the Zip drive
Reboot to OS8 and copy the files over onto the Bridge Mac
Create Floppies using Disk Copy 6.3

Using this technique, I’ve been able to create boot floppies for System 3, the earliest version that will boot on the Macintosh Plus, and to get my Macintosh Plus running System 4, which is the earliest version that will support large 2GB SCSI partitions.

Other than running some very old versions of software that will crash on System 6, I’m not sure how much use I’ll get out of System 4, but it will be interesting too understand more of the history of these early systems.

Macintosh Classic I and II Repair

I’ve so enjoyed the Macintosh Classic Repairathon Series on Adrian Black’s YouTube channel, Adrian’s Digital Basement, if you haven’t seen that I've created a YouTube playlist here...

So, when I saw an add on Facebook marketplace for a Macintosh Classic and Classic II, I couldn't resist making an offer.  I probably paid too much knowing that one computer was working and the other was not, but I'm always in this tension of not wanting to insult sellers with low offers and wanting to keep my retro computer spend to a manageable hobby level and not a lifestyle.

Machine #1, Macintosh Classic

Upon inspection, the Macintosh Classic was booting and running off the hard drive.  I don't want to get my hopes up about this, since all of my vintage macs have had failed hard drives, but this one is a Connor and I haven't had one of this brand.  Maybe it will survive long after all the Quantum Fireball drives have died?

Other than that, the Classic isn't too remarkable on the outside, one of the ideas I got from Adrian was using an external drives to test all the ports, I was able to confirm all the ports are working (Floppy, SCSI) except the Serial ports, since I don't have a Printer or Modem to use for test.  On the inside, I'm happy to report that although the clock battery had not been changed and still have the 1991 date code, it had not leaked.  Also, the electrolytic capacitors on the Logic board appear to be intact.  So with a simple battery change, this computer is back up and running.


Machine #2, Macintosh Classic II

The non-starting Classic II posed more of a challenge, and knowing from the video series that most of the parts were interchangeable is what really got my excited about this project.  By opening both machines and swapping known good parts from the first machine, I was able to determine that the HDD (yet another failed Quantum Fireball), and the Logic Board had problems.  Usually on power up, I'd get a black screen, but occasionally, I'd see this...


Upon inspection, the Logic Board had leaking electrolytic capacitors, but once again the battery from 1991 was intact.

Another YouTube channel that's been helpful is Bruce from Branchus Creations.  He's prepared many Recapping guides on his website, the one for the Classic II is linked here.  I ordered the parts and prepared for a recap of this motherboard to bring it back.  As I desoldered the pads, I lifted one, and another was close to failing.  I was pretty discouraged because I've already failed in one recapping project, but I kept going.  Thankfully I was able to find schematics for this computer linked here, so even if I couldn't identify the nearby via, at least I had a chance to figure out where the pad should be attached.

Anyway, cleaning was a bit of an adventure, and there seem to be alot of cookbooks out there about how to do this.  Let me share what I believe to be the best way:

1.    Remove old Caps first (hot air appears to be the best way, but I don't have a heat gun yet), Clean the old solder pads with wick, but do not do any repair yet.
2.    Use Vinegar to clean the board, be liberal with the amount you use, you pretty much want to bathe the board in it to get under the chips and sockets where possible.
3.    Use Isopropyl Alcohol to neutralize the vinegar and remove any visible residue from the boards, paying close attention to the pins around the surface mount chips, the finer the pitch of the pins, the easier it is for the junk to short them out.
4.    As a final step, wash the board out by itself in the dishwasher.

At this point, if inspection reveals that the board is clean, the sticky residue is gone, and the finest pitch pins don't have any white material between them, then you are ready to move one.

I didn't do these steps in the correct order, and ended up having to repeat steps 2 and 3, but I do know from previous experiences cleaning with vinegar that you don't want to leave it for hours, only minutes because it can do to much damage, so better to repeat steps 2 and 3 than to loose the board.

Anyway, I'm happy to report that after cleaning and recapping the board, I was able to get the system back to life, it was a very exciting moment for me, my first successful recap of a board.


After testing, there is one nagging issue that remains, the sound for this machine isn't working.  Since I have the schematics, I've been able to use those to do troubleshooting, I assumed the problem was with my recap, but the circuit is intact now from the speaker output pin (which I know is working with the other board) all the way back to the DFAC but not further, so the adventure continues.
Enclosure Ideas for SCSI2SD

Well, it may come as no surprise, but I've had multiple SCSI HDD failures with my Classic Macs over the last months.  The internal drive in the Macintosh LC, a 40MB Quantum drive was a survivor, it functioned well for another couple of hundred hours after I acquired it on Craig's List last year, but it started reporting errors.  The failures of these old drives is an issue that people have known about and have been talking about for years, but it's still sad because that was the last internal mechanical drive I had from the early 90s.

I also bought an external Syquest 44 MB drive that was still functioning from that same lot, and now that has failed as well.  I was telling myself that since this was a more rugged version of the technology it should last longer, but that was not the case.

So, as I have done a couple of times before, I purchased a SCSI2SD to replace the defective drive(s).  As I started to work with the new device, I was having trouble getting it to work in the Macintosh LC's Internal Drive bay.  Lido was reporting a termination error, but the device has internal termination.  I know the SCSI2SD was working because I tested it in another 90's Macintosh.  After swapping cables and trying many different settings, I decided that it's likely that the internal SCSI bus on the Mac LC may have gotten damaged somehow.  Perhaps when I was using it to test other SCSI drives that I got in a lot from Craig's List.

Anyway, since I had the external SCSI enclosure available from the dead Syquest drive, I decided to transplant the SCSI2SD device inside of that enclosure.  It's certainly not the most compact solution, but it does maintain the period look, and since it's configured with 2 GB of storage I could load a very large portion of the 68K software library from the early 90s onto this machine!

Here's a picture I took partway through this project...


The computer boots up fine from the SCSI2SD inside of the enclosure when connected to the external SCSI port on SCSI ID 0.  I'm no longer using the External termination device, but I left it on there for looks.  I ran without the fan for a short time, but I do think the power supply generates enough heat, so I turned the fan back on.  I ran with the SD card inaccessible for a couple of weeks, then I decided that I'd be willing to trade the "clean" look on the front and sacrifice a blanking plate to have access to the SD card.  Now, the SCSI2SD looks like this...
As you can probably tell, I used a Dremel tool to create this opening, not a CNC machine, so it doesn't look perfect, but it is perfectly functional with both the SD card and the USB port accessible without taking the device apart.

Vintage Computing in 2020 - Overview

During the past year and a half as we've settled into our new home in Suburban St. Paul, MN, I've continued to enjoy Retro Computing, AKA Vintage Computing.  I enjoy the process of fixing old computers more than using them, although I have spent quite a few hours playing some of the old games. I used to think that I had a unique interest in installing and configuring old versions of Windows and Mac OS.  I now realize that there are quite a large group of retro computing enthusiasts with a wide variety of interests, even within the Twin Cities.  We have Free Geek MN, and we even have our own YouTuber, Collin of This Does Not Compute.

My interest in Retro Computing started with a desire to relive some of my own experiences from around the time I first became interested in computing, but I’m also interested in the history in general and the history of technology, so I soon became interested in the computers that came before my time, for example the 1983 Compaq Portable and 1986 Apple Macintosh Plus shown at the top left and top center of this image...


Three of the computers have mismatching faceplates, these are my “Bridge” computers that have various flash based boot drives or a mismatch of modern and older drives.  Since I’m more interested in the functionality, this doesn’t bother me, just another opportunity to keep an eye out for some low-cost upgrades should they become available.

I’m equally interested in Apple and IBM PC Compatible products, having used both as a young person.  My first computer was a Commodore Vic-20 that was a hand me down from my Uncle, but that computer was quite out of date, and although I read the manual and did some simple BASIC programming, I didn’t really stick with it long enough to become comfortable with that platform.

I have “only” one rack full of computers and as with most collectors storage space is at a premium.  I have some computers in storage that are less interesting too me that I’m ready to sell, and I have my project computers that are not yet working stored out in the garage.

If you are interested in specifics, I have detailed articles about each computer on this blog.  Thanks for your interest, and please leave a comment if you have questions!


Original Compaq Portable

It has been one of my goals in vintage computing to move “back in time” to the early days of the personal computer, I’ve been intrigued by the story behind the original IBM PC, the 5150, a fascinating story of the tension between one of the classic engineering trade offs (make vs buy), and the unforeseen consequences this can have in a product development, but I’m no longer interested in collecting IBM in particular after reading this book “IBM and the Holocaust”.  So, I’ve been on the lookout for another brand XT class machine, and I was very intrigued when a damaged Compaq Portable I popped up at my local Free Geek store.  This was one of the first IBM PC clones, but they did something really different by creating a “Portable”.  I won’t rehearse the development of the machine here as it’s been covered well elsewhere.

My Compaq is an early unit, with the plastic parts stamped 1983, and a Rev. B BIOS.  When I purchased it, there was an error code at boot, so I knew that the processor and RAM were working.  The case was in rough shape, cracked and dirty, but a carrying case was included.

Once again, the Vintage Computer Forum was one of the best sources for information.  Also, the 8-bit guy did a restoration video series  on this machine, having seen these resources gave me the confidence to give this repair a shot.  There was a long list of issues with the machine, but with knowledge of how to take the machine apart, clean and lubricate floppy drives, replace the defective foam and foil pads in the keyboard, upgrade the BIOS, install an XT-CF adapter so I could boot from Flash, and upgrade the RAM to the maximum 640K, I now have a fully functional first generation PC running at 4.7Mhz.


Not shown in the picture, I moved the CF slot up to the front of the machine in the middle of the unused floppy drive bay that was opened up by removing the non-functional drive.

Update:  March 2021

I found a Tecmar Captain card and installed that in this PC, so it has a functional Real Time Clock, a working Microsoft Serial mouse.  I've installed Windows 2.0 on this machine, and that's been alot of fun to poke around with, since that version predates my first PC ownership.

Let me know if you have any questions for me about the Compaq, or other Vintage Computing topics in the comments below.

Vintage Computing - Pentium 75

In mid 2019, I became interested in vintage PCs again, or perhaps still.  I was feeling nostalgic about the era around 1993 when I got my first PC, a Gateway 2000 486DX 25.  If memory serves, that PC came with 4 MB of RAM, a 170 MB hard drive, and an. upgrade to the 15” CrystalScan monitor.

I started to look around a bit on Craigslist, but I didn’t know yet that because of the popularity of YouTubers like the 8-Bit Guy and LGR, I’m not the only one feeling nostalgic.  The cost of retro computers has started to go up significantly in the last few years.  The fact that most of these computers have already been recycled by now makes even systems that used to be very common more rare.

So, after finding only computers that were too new, I reached out to a Craigslist seller who mentioned that they had other computers for sale that were not yet listed.  This seller did not have a 486 on offer at the time, but recommended a Pentium 75 system that was nicely equipped.  I remember being amazed by the Pentium systems when they were new, and for me one of the most enjoyable aspects of retro computing is being able to purchase systems that I could not afford back in the day.  The computer had been carefully gone over by the seller and parts had been changed out to get it in good working order.  I was immediately able to use and enjoy the machine for retro gaming.

One of my longtime interests has been alternate operating systems, so one of the first upgrades I performed on this machine was to get it booting from a compact flash card slot on the back of the machine.  This allows me to load multiple operating systems on different CF cards.  The included hard drive still works, and it’s in the case if I ever want to go back to it, but the compact flash cards have so many benefits.  They provide an easy way to move files onto the retro computer, make backups easy, and run faster.  The compact flash card upgrade is kind of a no brainer, especially for DOS retro PCs where the costs are only $10-15 dollars for the circuit board that adapts the IDE cable to a CF card, and the OS doesn’t use the drive for virtual memory.

Shortly after purchasing the machine, I bought and installed Planet X3, the excellent top down strategy game by David Murray, the 8-bit guy.  I realized that I was interested in the idea of traveling further back in time to before I was interested in computing, before I even owned a computer, but the Pentium 75 really started me back on the path for retro computing in the PC world.

As I started getting interested in XT class machines, this computer has morphed into a bridge computer through adding a 360K floppy disk drive, which I was able to find at the local Free Geek here.  I took the drive apart enough to clean the heads, tested, and install it in this PC, which now serves as a disk imaging workstation with Dave Dunfeild’s IMD program.

So, the mid 90s being pretty well represented by this hardware, I have moved onto other projects, but this system still remains setup and will retain pride of place in my collection, receiving new software, making new 360K floppy disks, and perhaps even the occasional hardware upgrade.


My current wish list for this computer includes:
Epson branded VGA Monitor from the period
Epson PS/2 Keyboard from the period (or an older, clicky beige AT keyboard)
Adaptec PCI SCSI card
360K Floppy Drive w/ Beige Faceplate