Showing posts with label PC Compatible. Show all posts

Project Updates - Dealing with the Backlog

It's been a busy year for me and so I haven't got as much retro computing done this year.  That being said, I have been able to sell four computers and give away a couple more this year so I am still having success with thinning out the collection.  For quite a few years I've been building a backlog of interesting broken machines.  I keep this hardware out in the garage and have a list going for each of these potential projects.  When I'm feeling inspired to take on a new project I can go find one any time by looking at the list to see what I'm interested in taking on next.  I've had a bit more time as of late and I've repaired a series of PCs since I kind of like working on groups of similar vintage hardware at the same time.

The first repair is an interesting Zenith 386 PC that came from Free Geek Twin Cities in the spring of last year.  This machine was badly rusted from water damage in and around the power supply.  The Free Geek team handled this machine well, they knew that it should not be powered up, but the machine included a nice matching keyboard and a full box of documentation and software so it was worth some effort to fix it up.  

I started repairing this machine last year right after I got the machine.  I took it all apart and cleaned it up.  It's model number ZBF-3340-EK, an early 386 machine built on a passive backplane.  The backplane is based on ISA but extended to 32 bits.  It was a very good thing that Free Geek didn't power the machine up because there were pieces of rust floating loose inside the power supply.  I took all the metal pieces apart and cleaned the power supply up. I spray painted the rusty pieces to stop further rust, but this wasn't a full restoration, just trying to halt the deterioration enough to get some basic testing done and decide if the PC would be salvageable or not.  To my great surprise after cleaning up the machine and some basic repairs the PC was able to Post!  I got video working with an old VGA card which had been paired with the machine later in life (It originally had a proprietary monitor and video card which are missing now).  It took quite a few hours of effort to reach this point so I set the project aside.  I thought I'd come back to it soon but it ended up being a year till I came back to it.

After moving this PC around in the garage for the 3rd or 4th time I decided it was time to finish this project.  I took the machine apart enough to get a look at the four drives.  It had two 1.2MB 5 1/4" Floppy Disk Drives, and two Full Height MFM Hard Drives.  I cleaned and tested both of the Floppy Drives.  One of them was working and the other was not.  I replaced the non-working drive with a 3 1/2" drive I had in my spares and set the bad drive aside.  Once I figured out the BIOS settings which were needed for the two Hard Drives I was pleased to see that both of them worked (after a few seek errors, which makes alot of sense if the heads had not moved for a decade or more).  It's very cool to have a machine with Dual MFM drives, although I may just leave one in there and keep the second one as a spare.

Adding a clock battery was the final step.  After adding the clock battery the PC still wasn't holding time and BIOS settings.  It turns out there was a bit more corrosion on the board around the battery area so I replaced a few corroded components, some diodes and resistors, and added a bodge wire for a damaged trace.  After that the clock battery worked and it is holding the BIOS settings.  The machine looks nice...


Due to the solid construction, large chassis, and dual full heigh MFM drives, this computer is very heavy.  It's great to have the documentation and a matching keyboard with lovely mechanical switches.

The next PC up on the bench is an XT class machine.  The seller let me know that it had bad tantalum capacitors which had blown.  They didn't want to do a recap on the machine so they sold it to me as a project machine.  This is machine sat on my project intake queue for even longer than the Zenith.  I have several XT PCs so I knew this would be a PC that I wouldn't hold onto for my collection.  It turns out that it had one bad tantalum (which failed short on the +12 volt rail), when I removed that, the computer came up to the BIOS Post screen.  After a few minutes of operation, another tantalum failed (this time on the -12 volt rail), but again that was easily removed after some basic troubleshooting probing around with the multimeter on the board.  I didn't have 4.7 uF Tantalums in stock so I ordered some of those and did the recap when those arrived.

Other than that my main tasks were to take the machine all apart and clean it.  It was quite dusty.  I cleaned the mainboard with my ultrasonic cleaner.  After it dried I cleaned and tested the 360K 5 1/4" Floppy Disk Drive.  It was working good.  Sadly, the MFM hard drive inside the machine was not working.  I set that aside for further troubleshooting.  The faceplates for this machine were incomplete.  I was able to find a second half-height black Floppy Disk Drive to cover the gap in the front panel of the machine and I 3D printed a Full-Height Hard Drive blanking plate for the other drive bay, which completes the cosmetics of the front panel.  The machine is fully functional and I'm happy with how it looks...


The last PC in this group was an original PC, the IBM 5150.  I already have one IBM 5150 that came from a pickup of Facebook Marketplace some years back.  But over the last couple of years I've been making an effort to find a second machine if I can find one at a good price.  I'd been collecting bits and pieces for a second IBM PC for well over a year now and I finally came back to this project since I was already working on the XT Clone from that era.

The IBM PC also had bad tantalums on the main board and that was the reason why the seller sold it to me as a project machine.  I was able to locate the shorted capacitor and replace it.  I also tested the power supply with a load but disconnected from the PC, the power supply voltages were all in range.  I was able to find a VGA card that would works in an 8-bit slot, most VGA cards only work in a 16-bit slot.  This VGA card enabled me to do testing with a more modern monitor and I also left the original Monochrome MDA card in the machine as well, since the IBM PC does support two different types of video cards at the same time.  The machine has 256K of memory (the maximum capacity on that mainboard) and it Posts and comes up as expected.  The next order of business was to clean the two floppy disk drives.  After cleaning they were both working.  I had two cases and so I was able to put together the best cosmetic version of the case.  It's got some rust spots on the top, but as a spare machine it will be just fine and I'm happy to have it in the collection...


Of these three machines, I'll be moving the first two on too new owners, either here locally or at VCF Midwest in the fall.  The IBM PC 5150 will go back into storage to be used as a spare.  Given how long it took me to get to these repairs I probably won't be seeking out more machines of this type to repair, but it is always gratifying to get a broken computer fixed and to have more projects off my to-do list.

If you have any memories of using a Zenith 386, an Ameridata XT PC, or an IBM 5150, please post in the comments below or drop me an email (my email address is in my profile).

My Personal Personal Computer History - 100th bLog Article

For my 100th bLog article, I thought I'd do something nostalgic and go back and outline my own history with personal computing.  When I started in the hobby 6 years ago I didn't know if it would be possible for me to collect the computers I'd previously owned but it has been possible, and I've written bLog articles about all but one machine, an omission which I will remedy in this article.

I started out with the VIC-20 that my Uncle gave me in the last 80s when he upgraded to the C64.  I've already written about my new VIC-20.  Since that article I've been able to get a Penultimate II Cartridge which has alot of fun games on it.  I've also found a good deal on a "PET Keys" VIC-20 and added that to the collection, so now I have a good running machine and a parts machine if needed.  When I was a kid I tinkered with the expansion port on my VIC-20 and ended up destroying the computer, at the time I didn't know how to repair computers so we were without a computer at home for a while, a gap in my Personal Computing resume.

Of course all throughout this time I used computers at school.  We had Apple II computers at school.  We had mostly Apple IIe but also a couple of IIgs machines.  I don't recall using a Mac during my High School years although there must have been a couple of them around in the early 90s.

After High School I moved to college at the Milwaukee School of Engineering.  When I first started school there I didn't have my own computer and was reliant on the computer labs.  At this point in time some of the programming courses were still being taught on DEC VAX hardware.  I think the school may have been running 11/780s.  One lab had VT220 terminals and another had 320s.  The school also had Macintosh labs and PC Labs for the students to use, but in my electrical engineering course we were encouraged to use PCs.  Shortly after I started school during my freshman year I got a Slimline Gateway 2000 486 PC, that would have been in 1993.  It was my first new computer.

After college I moved to Minneapolis for work.  I continued to use the 486 until 1999 when I got an Apple Power Macintosh G3 Blue and White.  I was starting to get into shooting and editing Digital Video as a hobby at that time and the G3 was a necessary tool for that hobby.  I paired the Mac with a 17" Sony Trinitron CRT, it was a great setup, although I do recall how painful it was to use the Puck Mouse.  I ended up buying an accessory to change the shape of the Puck Mouse and make it more ergonomic.

That machine worked well for quite a few years, I think we used it up till 2004 or 2005.  At that point we purchased a Power Mac G5.  This was the last of the Apple professional computers I purchased new.  I have re-acquired a 2005 dual processor G5 for my collection. This is a computer I have not blogged about before, so here's a picture of the setup...


We used the G5 till 2009 when I bought our first Intel Mac Mini. Since then we've used a string of Mac Mini machines, up to and including an M4 Mac Mini I bought earlier this year.  These are great value for money but I not nearly as interesting.

Thanks for following along with my bLog!  The retro community is a really amazing group of people and I hope I can give back just a little bit here on the bLog by sharing about my experiences restoring computers regardless if they are nostalgic like the machines listed above or projects built to learn about the history of technology.

What about you?  Let me know about your personal computing history in the comments below, or find my email address in my profile.  Did you have any of the same computers?  What are your "grail computers" for your collection and why?

Vintage Computer Festival Midwest 2024 Recap

Vintage Computer Festival Midwest 2024 is in the Review Mirror.  I was happy to be there for my third in-person visit, and my second time as an exhibitor.  This year I had a busy summer, so I wanted to show a display that was easier to setup with no large projects required in order to prepare a hands on exhibit.  So I decided on the topic of "Laptop Evolution: 1988 to 1999".  I prepared 8 laptops to bring down and show off, but because of demo gremlins, I ended up with 6 working computers, then when the Mac Portable's HDD died, I was down to 5 computers on the demo table.

This year for the first time some of my family members expressed interest in tagging along for the roadtrip to Chicago and this made the event more fun for me.  One of my daughters is selling Retro-Computer themed art made out of e-waste.  She almost sold out at the show, but a few items are left on her etsy shop here...
Burbots

Here is what the booth setup looked like...


From left to right on the top of the table; my daughters art, then my interactive display.  Down below on the floor I setup computers that I'd repaired and that were for sale.  I only brought home 3 of the 9 computers I brought to sell, so I was quite happy with that result.

So far the only coverage I've seen online of the event that showed my booth was this video from Chris DeHut.  Chris is absolutely right about the screens, I wanted folks to experience how great the keyboards where and how poor the screens were.  Everyone knows about Moore's law and those of us who are old enough remember when our computers were doubling in speed every time we replaced them but there were a few cool things about the old hardware, including the amazing keyboards and the creative form factors that we used to have before all laptops started looking the same.

I unloaded about 8 parts machines or project machines onto the Free Pile.  This year the Free Pile was a happening place and I don't think anything that I put out there sat for more than a few hours.  The only thing I got off the free pile was a diskette holder for 5 1/4" disks, but since one of my goals for the event was to come home with less material than I left with, I was OK with that.

The only complete "new to me" computer that I brought home was a Sun Ultra 5 machine that I had been offered by a generous donor who is downsizing their collection.  I'm very happy to have this machine and it comes with a special surprise, but I will save that for a future bLog article.

As always, the highlight of the festival is the conversations.  I had many conversations with people I already knew from here in Minnesota or from YouTube but I also met many interesting people, some of who walked into the show because they were in the hotel for a different conference.  I heard many interesting stories from people about their experiences with computers and that is really what makes the show so much fun.  Here's a few of the stickers and cards that I collected, my daughter had an even larger collection...


The new show venue was excellent.  It was so much less stressful not having to worry about the power situation and having space for people to stand and talk and also move around instead of being crapped into tight aisles.  This also helps with the interactive exhibits because people don't feel like they had to move on immediately if they don't want too.  The hotel rooms were a bit more expensive, but I feel that the venue was so much nicer that it was a small price to pay and I would be happy if the organizers could get us back into the same venue next year.

Thanks so much too the organizers of the VCF Midwest event, your efforts are very much appreciated!  This event remains the highlight of the year for me in the retro computing hobby, and the people and ideas that I see at the show will inspire projects and conversations that will continue throughout the year.

A Tandy 4000 Computer Repair

Adrian Black recently posted a video about a Tandy 4000 computer, an early 386 machine.  I was excited to see this because (as he has mentioned in his video) you don't see alot about these machines online and I have one.  One of the commenters on his video said that these are rare because the machine was only sold through the specialized Tandy computer stores and not at regular Radio Shack stores like the Tandy 1000 range was.

My Tandy 4000 came from another collector here in town last year.  He sold me the machine (at a very good price) because he knew that it had some blown capacitors and that I enjoy doing repairs. I hadn't blogged about it at the time because this was a somewhat routine repair, but if there is interest from Adrian's video I thought I should share my repair experience.

When I got the machine home and began troubleshooting I was able to identify a couple of bad Tantalum Capacitors (which was also a problem on Adrian's machine).  After I replaced those, the motherboard worked!  However, when I plugged everything in again, it stopped working, it turns out the Seagate ST-251 drive in my machine did not work, it kept the machine from powering up.  It's possible this drive also has some blown capacitors.  Thankfully at this point I had a spare ST-251 that I'd repaired after another project ended.  I was able to install that ST-251 into this machine and set the failed one aside.

The next challenge was a cosmetic one.  The faceplate / bezel of the 3 1/2" drive was broken off from my machine and it was nowhere to be found.  I removed the drive that came with the Tandy and replaced it with a beige 1.44 MB drive and bezel kit from Free Geek Twin Cities.  It looks quite nice, if maybe not quite exactly right...

I was not able to find the correct settings for the EGA card in the machine and the display was showing odd color artifacts so I ended up installing a VGA card.  I was also able to upgrade the RAM to 8MB which would have been a very expensive upgrade in 1988.

As with many early systems the BIOS setup program for this machine is not in ROM.  I tried GSETUP as I already have that on a boot disk but that didn't work.  I was able to find the Tandy 4000 specific setup program online here.  I created a DOS 5 boot disk with it and I'll be keeping that with this machine.  I used the Tandy setup program to set the drive type to 39 for the ST-251.  Another quirk was that I had to manually enter the RAM size, as 7168, the setup program did not pick up the RAM amount automatically.  Odd, but it works and boots without any faults.

I'm happy with how this repair turned out and glad to have this machine as a part of my collection!

My First PC - Slimline Gateway 2000 486

My first PC was a Gateway 2000 Slimline 486 which I think I got in 1994.  I've been wanting to re-acquire one of these machines for quite a few years since I got back into Retro Computing, but they've become a bit rare and I've been unwilling to spend eBay prices for one.  At the end of last year I got lucky and one came up for sale at Free Geek Twin Cities as a "Project Machine".   Free Geek is transparent about the problems with these machines and they sell them at really low prices.  The notes on the machine said "Floppy Controller Might be Bad", but the price was low enough that I could afford to fail.

When I got the machine home, I did power up the machine and confirmed the symptom, but I also noticed that the entire machine was filthy.  It wasn't just normal dust either, it was a thick sticky layer so I took the machine all the way apart and cleaned the circuit board with alcohol, opened the power supply and blew it out, and the case with water.

When I got the machine back together I was able to find notes about the motherboard on TheRetroWeb.  I was even able to contribute a BIOS dump and an image to the site!  Neither the floppy drive nor the CD-ROM drive worked on this machine.  I took them apart and cleaned the heads, but I wasn't able to bring these drives back to function.  I had the exact correct floppy drive and CD-ROM replacement from another Gateway 2000 machine that I'd tried and failed to repair earlier.

The other upgrades I installed include 16MB RAM and a Compact Flash adapter that is attached to a slot cover at the back of the machine.  This is attached to the IDE on the Motherboard and configured in the BIOS as a 485 MB HDD, but of course it is faster than a spinning drive.  But the main advantage of the CF solution is that it makes it easy to move files back and forth to the PC from a modern computer.  I also had a Sound Blaster 16 Value card from another lot of retro computer parts and I installed that into this machine as well as a 3COM Ethernet NIC card.

This machine is a 486DX2-66, and my machine was only 25MHz with 4MB RAM, so this feels really fast compared to what I had back in the day.  This machine currently has Windows 95 on it, but I may go back and setup another CF card with DOS 6.22 and Windows 3.1 which would have been what I ran on this computer back in the day.

I'm quite happy with how this build turned out and enjoying the nostalgia of having a Gateway 2000 machine configured with the options I really wanted back in the day.

The 286s are Coming

I've been on a bit of a tear with 286 PCs over the last couple of months.  Actually, I'd planned one of these repairs over a year ago when I got an ALR Fast 286 at an estate sale in the summer of 2022. This was a 286 machine from 1988, and I had been able to get that machine pieced back together and working but it was experiencing lock ups.  So I had been on the lookout for a nice 286 board to use as a replacement for that machine.  I'd purchased a board that needed some work, but that was yet another project that had been sitting for months waiting for time to do board level work on that.  But in the meantime, Free Geek Twin Cites came through once again with a "Project PC" 286.  It was an incomplete machine from 1990, but it had the motherboard, RAM and a functioning Floppy Disk drive, so I was happy to get it.

Shortly after that there was another 286 Project PC at Free Geek that was also incomplete, but included a nice case, Power Supply, and most of the computer.  I purchased this machine as well, thinking that I'd have enough parts already at home to build out both PCs.  One of the oddities of this era is that sometimes a 286 just isn't quite powerful enough for higher resolution VGA graphics, so I had been torn about rebuilding the 286 with VGA or CGA/EGA graphics.  But since I got the second machine, I would no longer have to make that decision.  I could configure the faster machine from 1990 as a VGA machine and the slower machine from 1988 as a CGA/EGA machine.

I did the rebuild of my existing 286 machine first with a target date of 1990.  The "new" motherboard from Free Geek has a 16MHz 286 with 4MB of RAM on it.  I was able to re-use the external battery pack I had previous built for the machine and the ATI All-In-Wonder VGA card.  There is a nice complement of ISA cards in the machine, including a FDD/HDD IDE controller card, a Serial Parallel I/O card, a more modern 3Com 3C509 Network card in it, and I added an CF to IDE card adapter instead of a hard drive.  The CF card is 256 MB and I experimented with the BIOS settings to get 200MB usable capacity from it.  The sound card is a more modern Sound Blaster Vibra 16 CT4170 which is less expensive than a period correct Sound Blaster.

I'm very happy with how the machined turned out, and it runs fast and stable...

After getting my "best" 286 running, I started on the more basic machine targeting a build date around 1988.  This PC is a 286 at 12MHz. It has 640k RAM, and I opted to stick with a CGA / EGA card.  The HDD / FDD controller and Serial Parallel I/O cards in the machine are period correct although again I did opt to install a CF adapter in order to make it easier to load software from my modern computers.  Given the low RAM configuration I won't be installing a Sound Card or other peripherals at this time, but the machine is working good and it looks really nice...

The final project for this article is another 286 PC, a Compaq Portable II.  Thanks to fellow collector Steve H. who passed this machine to me in a lot of luggable computers.  This machine was starting up but it had an error on the screen and the floppy drives were in unknown condition.  I had heard that it would have Citizen Floppy Disk Drives and that these drives were notoriously difficult to service, but when I opened the PC, the floppy drives were made by Canon.  I cleaned and lubricate the drives and after this both drives boot up and run very well, so that ended up being a non-issue.  This generation of Compaq PCs does not have the BIOS setup program in ROM.  When I was restoring my Compaq Portable I machine back in 2020, I had already downloaded and created 360K Floppy Disks for the Compaq Diagnostic and BIOS setup programs.  One of the startup error codes was related to the clock.  Thankfully, Compaq used Tadiran batteries, which I have never seen leak.  Even cooler than that, you can still purchase a replacement cell today.  Once I had installed the new Tadiran cell I was able to go into the Compaq Diagnostics and set the time, date, and machine configuration so that there would not be any error messages at start.

Since this was the lower cost Compaq II without a hard drive I knew I was going to want to install some kind of permanent storage to make the machine more useful.  Since the machine had an IDE controller built in I was able to add another CF to IDE adapter, as before with the other 286 machines.  This one is configured in the Compaq BIOS to give about 120MB of storage, which is more than this machine ever would have shipped with.

The machine boots up and runs great, I'm very happy with how it has turned out...

I think this third machine will conclude my 286 adventures for a while.  Let me know if you have any 286s, or if you have memories from that era of computing.  What games should I load on these PCs?  What programs would make them more useful in 2023?  Leave a comment below, or feel free to reach out to me via the email address in my Bio.

Retro PC Repairs - Know when to hold 'em, Know when to fold 'em.

Things were quiet here on the bLog in April.  I was busy working on computers but I experienced a string of repair failures.  As discouraging as these can be I think it's important to write about them as a way to document lessons learned and to perhaps help others who may experience similar challenges.

The machines were a Compaq 386SX machine, a TI Travelmate 486 laptop, and an IBM PS/note Laptop.

The Compaq Deskpro 386S/20N was labelled as "not working, needs recap" but as my friend John Bumstead has said, when we are troubleshooting machines we need to disregard notes on the machine and do diagnosis ourselves.  In this case however it was obvious by doing a visual inspection on the board that it did need a recap.  As I removed the capacitors it became apparent that this board had suffered alot of damage from capacitor leakage.  There were many, many lifted pads and sections of the board that were heavily corroded with traces coming up.  I did some trace repair during the recap, but it was not enough to bring this board back.  I'm not sure if there are Vias that are missing or if the board has middle layers but after spending many hours with the board with no signs of life, I'm setting this machine aside for now.  This is such a cool little small form factor PC that I have put this on the wish list and I'll be looking for another parts machine, although I wouldn't be willing to pay to much knowing how bad the caps were on this particular one I had here.  Sadly, the end may be near from these Deskpros, although I'm hopeful that ones stored in better conditions may have faired better than this one.

The next repair attempt was a TI Travelmate 4000 Laptop.  This machine was reported as working but the Floppy Drive was not reading disks.  The previous owner suggested replacing a belt inside of the floppy drive.  I have done this on larger machines and so I thought this would be a repair I could handle.  I even found a bLog article explaining how another owner had been able to do this.  For me, I personally feel like a retro project is not complete till the machine can be rebuilt using its own  drives, so I started in on this repair knowing that the machine was partially working and could be left as-is.  Unfortunately, after getting all the way into the machine I discovered that I was not going to be able to take the drive apart far enough to get easy access to the belts.  I was not able to thread a belt onto the machine from the floppy slot although I did try for quite some time.  During the re-assembly process I also caused additional damage so sadly this machine will have to be split up for parts.  Although I'm very disappointed, I don't regret starting the repair for the reasons I've already described.  This is the only one of the three repairs that I consider a total loss.

The final repair attempt of these first three is an IBM PS/note portable computer.  This machine was described as "working for a while, then not working" The note indicated that they believed that the power supply circuit needed recapping.  This is also a repair that I feel quite comfortable doing, and did.  Sadly, after the Power Supply circuit inside the machine was recapped the machine still wouldn't start.  This leads me to think that perhaps the Power Supply Brick is also needing a recap, so this repair that is on hold, and not a failure (at least not yet).

After all these challenges I was able to turn things around a bit.  I bought a couple of "project" computers from a trusted local seller on Craigslist in my area.  He was selling two machines at low cost because he knew they had something wrong with them and needed repair.  I've had a high success record for machines from this seller so I jumped on them as soon as he listed them.

The first machine is a DTK KEEN-2530 machine from around 1991.  The reported symptom was that one of the four SIPP Memory Modules had a RAM chip broken off of it.  Since this machine is a full 32-Bit machine, a 386DX-25, it requires four matching memory modules in order to Post.  I decided to work on the memory issue before doing a through cleaning on the machine, but I did a light cleaning on the outside of the case and disconnected the power supply and tested it first before trying to fire up the machine for the first time.  

I've never worked on a machine before with SIP or SIPP memory, so I had to do some research.  According to Wikipedia and another source, this SIP is basically a 30 pin SIMM with pins soldered onto it.  My first instinct was to try to repair the SIP with the chip broken off, but after a careful examination that did not look easy with broken traces and multiple layers.  I tried searching on FleaBay for a part, but none were available at the time that I looked, so I started digging in on what I had to see if I had an equivalent.  It turns out the machine had 1 MB SIPPs in the 9-chip parity arrangement.  I was able to find a stick of very similar memory in my stock but the one I had was a SIM and not a SIP, and a 70ns part instead of the 80ns chips on the good SIPs.  I found some solid wire that would fit into the SIP socket and started soldering, adding 30 pins to this SIM memory to turn it into a SIP.  I was very gratified at the end of the soldering and leg trimming exercise to discover that this is a working system, my SIP was functional and the machine booted for the first time!  The connection is a bit flaky when I move the system around, so I've hot glued the home-made SIP to its neighbor in hopes that this will hold it in place better.  In the long term I may end up soldering the two end pins into the socket below to prevent movement.   I think this could have been avoided if I'd have had some lead frames on hand in order to cut and solder on proper leads instead of the solid core wire. but I didn't have those parts on hand.

The finishing touches on this build included desoldering a dead Dallas RTC and installing a socket for that, adding a 1.44MB Floppy Disk Drive, and testing the early Seagate IDE HDD in the machine.  The machine cleaned up quite nicely and is a good time capsule 386 machine.

The next repair candidate is an HP Vectra QS-16S from 1989.  This machine was reported to have a failed capacitor which released the "Magic Smoke".  After this failure, the owner powered the machine down quickly.  I find that this seller is very accurate in his descriptions of failures so I knew these symptoms would have been reported accurately.  What I didn't know what what kind of failure I was dealing with, my initial assumption was that it was a capacitor failure inside the Power Supply.  This made the purchase a bit more of a risk because HP machines of this era have a proprietary power supply, so if I couldn't find the fault and correct it then the repair may have to go on hold waiting for a difficult to find part.

So, as usual I started the repair by spending some time learning about the machine.  The HP Computer Museum is a great resource for these machines and did not disappoint with information about the HP Vectra QS-16S.  I also did a bit of light cleaning before starting to take the machine apart from inspection and repair.  As mentioned above, because I suspected the power supply, I didn't even try to test it, but immediately opened it up to look for blown RIFAs or other capacitors with obvious bulging or leaking, but there were none inside the Power Supply.  On putting it back together and testing I was a bit surprised to see all the voltages responding as expected, so I needed to dig deeper into the machine.

This machine has the processor and RAM on a daughter card.  I removed everything from the case and did some cleaning.  As I inspected the main board I noticed a burned surface mount capacitor (C1)!  It was near the keyboard connector on the main board and I can only assume it's part of the power supply section of the machine.  The cap was so burned that I was worried about not being able to figure out the value of it, but after a close inspection every other capacitor on the board had the same shape, size, and value, 22uF, so I was able to find a replacement cap from my stock and install that on the board.  I did some more cleaning as I reassembled the machine as this one had gotten quite dusty inside.  Once I got the daughter card and VGA card re-installed, I was thrilled to see the machine boot for the first time!

Once I started reattaching drives and devices too the machine, I entered another no-start condition.  After isolating the fault two one of the two MFM hard drives (identical ST-251s) I was able to remove the second drive get the machine booting again.  There was a burnt tantalum on the ST-251 board that was causing the machine to not be able to start.  I set the drive aside and came back to it later, but it didn't end up back in this machine.

The next hurdle was the Floppy Disk Drive.  As I've already mentioned in this article, it is important to me to have computers that can start up on their own.  The 1.2MB 5 1/4" Drive in this machine was cleaned and tested, but it is exhibiting some odd symptoms.  The drive spindle rotates and the heads are moving freely, but it can't read or format disks.  In the short term the easiest path forward (and probably the most reliable path forward in the long term) is to add a 3 1/2" High Density 1.44MB Floppy Drive to the machine.  This would have been one of the factory options, so I purchased a replacement drive and bezel kit at Free Geek Twin Cities and installed that.  Since this HP Computer does not have its BIOS setup program in ROM, I also made a couple of floppy disks from images on the Internet in order to set the BIOS settings and deal with Error messages on boot up.  The machine now starts and runs without error.  It's a great looking machine...

The picture above shows the HP Vectra up and running with my copy of IBM OS/2 Version 1.2, but my interest in and history with OS/2 is a story for another time.  

If you've made it this far thanks for reading and let me know if you have had any interesting repair successes or failures you'd like to share either in the comments section, or you can email me at the address shown in the Bio section of my bLog.

Pentium Socket 5 Build - Rounding out 2022 with a PC

As 2022 comes to a close I've completed one more PC build for the year.  This one is nostalgic for me, as the target year is 1994, which is around the time that I got my first PC.  Also, this machine replaces one of my first Retro PCs that I purchased back in 2019 an Epson Pentium 75MHz that was a Socket 5 Machine.  I damaged that machine while I was trying to perform a processor upgrade to bring it up to a 100 MHz chip, a sad episode which I regret quite a bit.

I just finished a Custom Socket 7 build which I'm very pleased with.  I think that these custom builds will be easier to experiment with and also easier to maintain in the long run, so although I do have one other Socket 5 machine, I have been on the lookout for another Custom Build.  Free Geek Twin Cities was selling this custom build at a really good price and I jumped on buying the machine.

The case on this one has yellowed a bit...

But overall I'm quite pleased with the appearance.  This build is based on an Asus Motherboard, PCI/I-P54SP4.  The machine was working as I got it from Free Geek but readers will know I'm not one to leave well enough alone.  According to Free Geek the Dallas clock chip was dead, so I de-soldered that and added a socket for the replacement clock battery, and I also lubricated the CPU fan which was running a bit rough.

Vogons has a nice scan of the manual for this board.  After alot of trial and error, I was able to upgrade the RAM a bit (As configured, it accepts only double sided FPM RAM SIMMs).  I have 48 MB RAM in the machine, but as it's a Windows 95 machine and will normally be running in DOS mode anyway I don't think this will be a problem.

I upgraded the old proprietary 1x CD-ROM to an IDE CD-ROM that will read CD-Rs, this is a nice "quality of life" improvement for the machine.  I also added an IDE ZIP drive which makes it much easier to move files onto the machine.

The machine is still sporting a 1GB Hard Disk drive, although I may replace that with a CF card to IDE adaptor pretty soon.  It's running Windows 95 and it has both an ISA 3COM Network Card and a Sound Blaster 16 (The less desirable CT2940) that work well in both DOS and Windows 95.

The final upgrade on this machine was to CAREFULLY install the Pentium 100 processor that I'd originally bought for the Epson machine.  It's working well and give this motherboard is maximum speed Intel processor.  Since the machine has a Front Panel MHz display and I couldn't find any documentation, I had to do some experimentation to set the display to 99 MHz, as this one doesn't have a third digit.  It's a cool look, and my only PC with the front panel MHz display!

So, perhaps this completes my the last Retro computer project for 2022.  Overall it's been a great year in Retro and I'm looking forward to the challenges and learning that will come in 2023!

Sometimes They Come Easy - Socket 7 Pentium Build

Lately I've had several projects in my backlog that keep stalling out due to broken parts on the original machine, broken accessories, or broken replacement parts.  I've been wanting to complete projects for an original Mac 128K, a Sun Ultra 5 Workstation, and an Amiga 500 among others but these projects are on hold for parts.

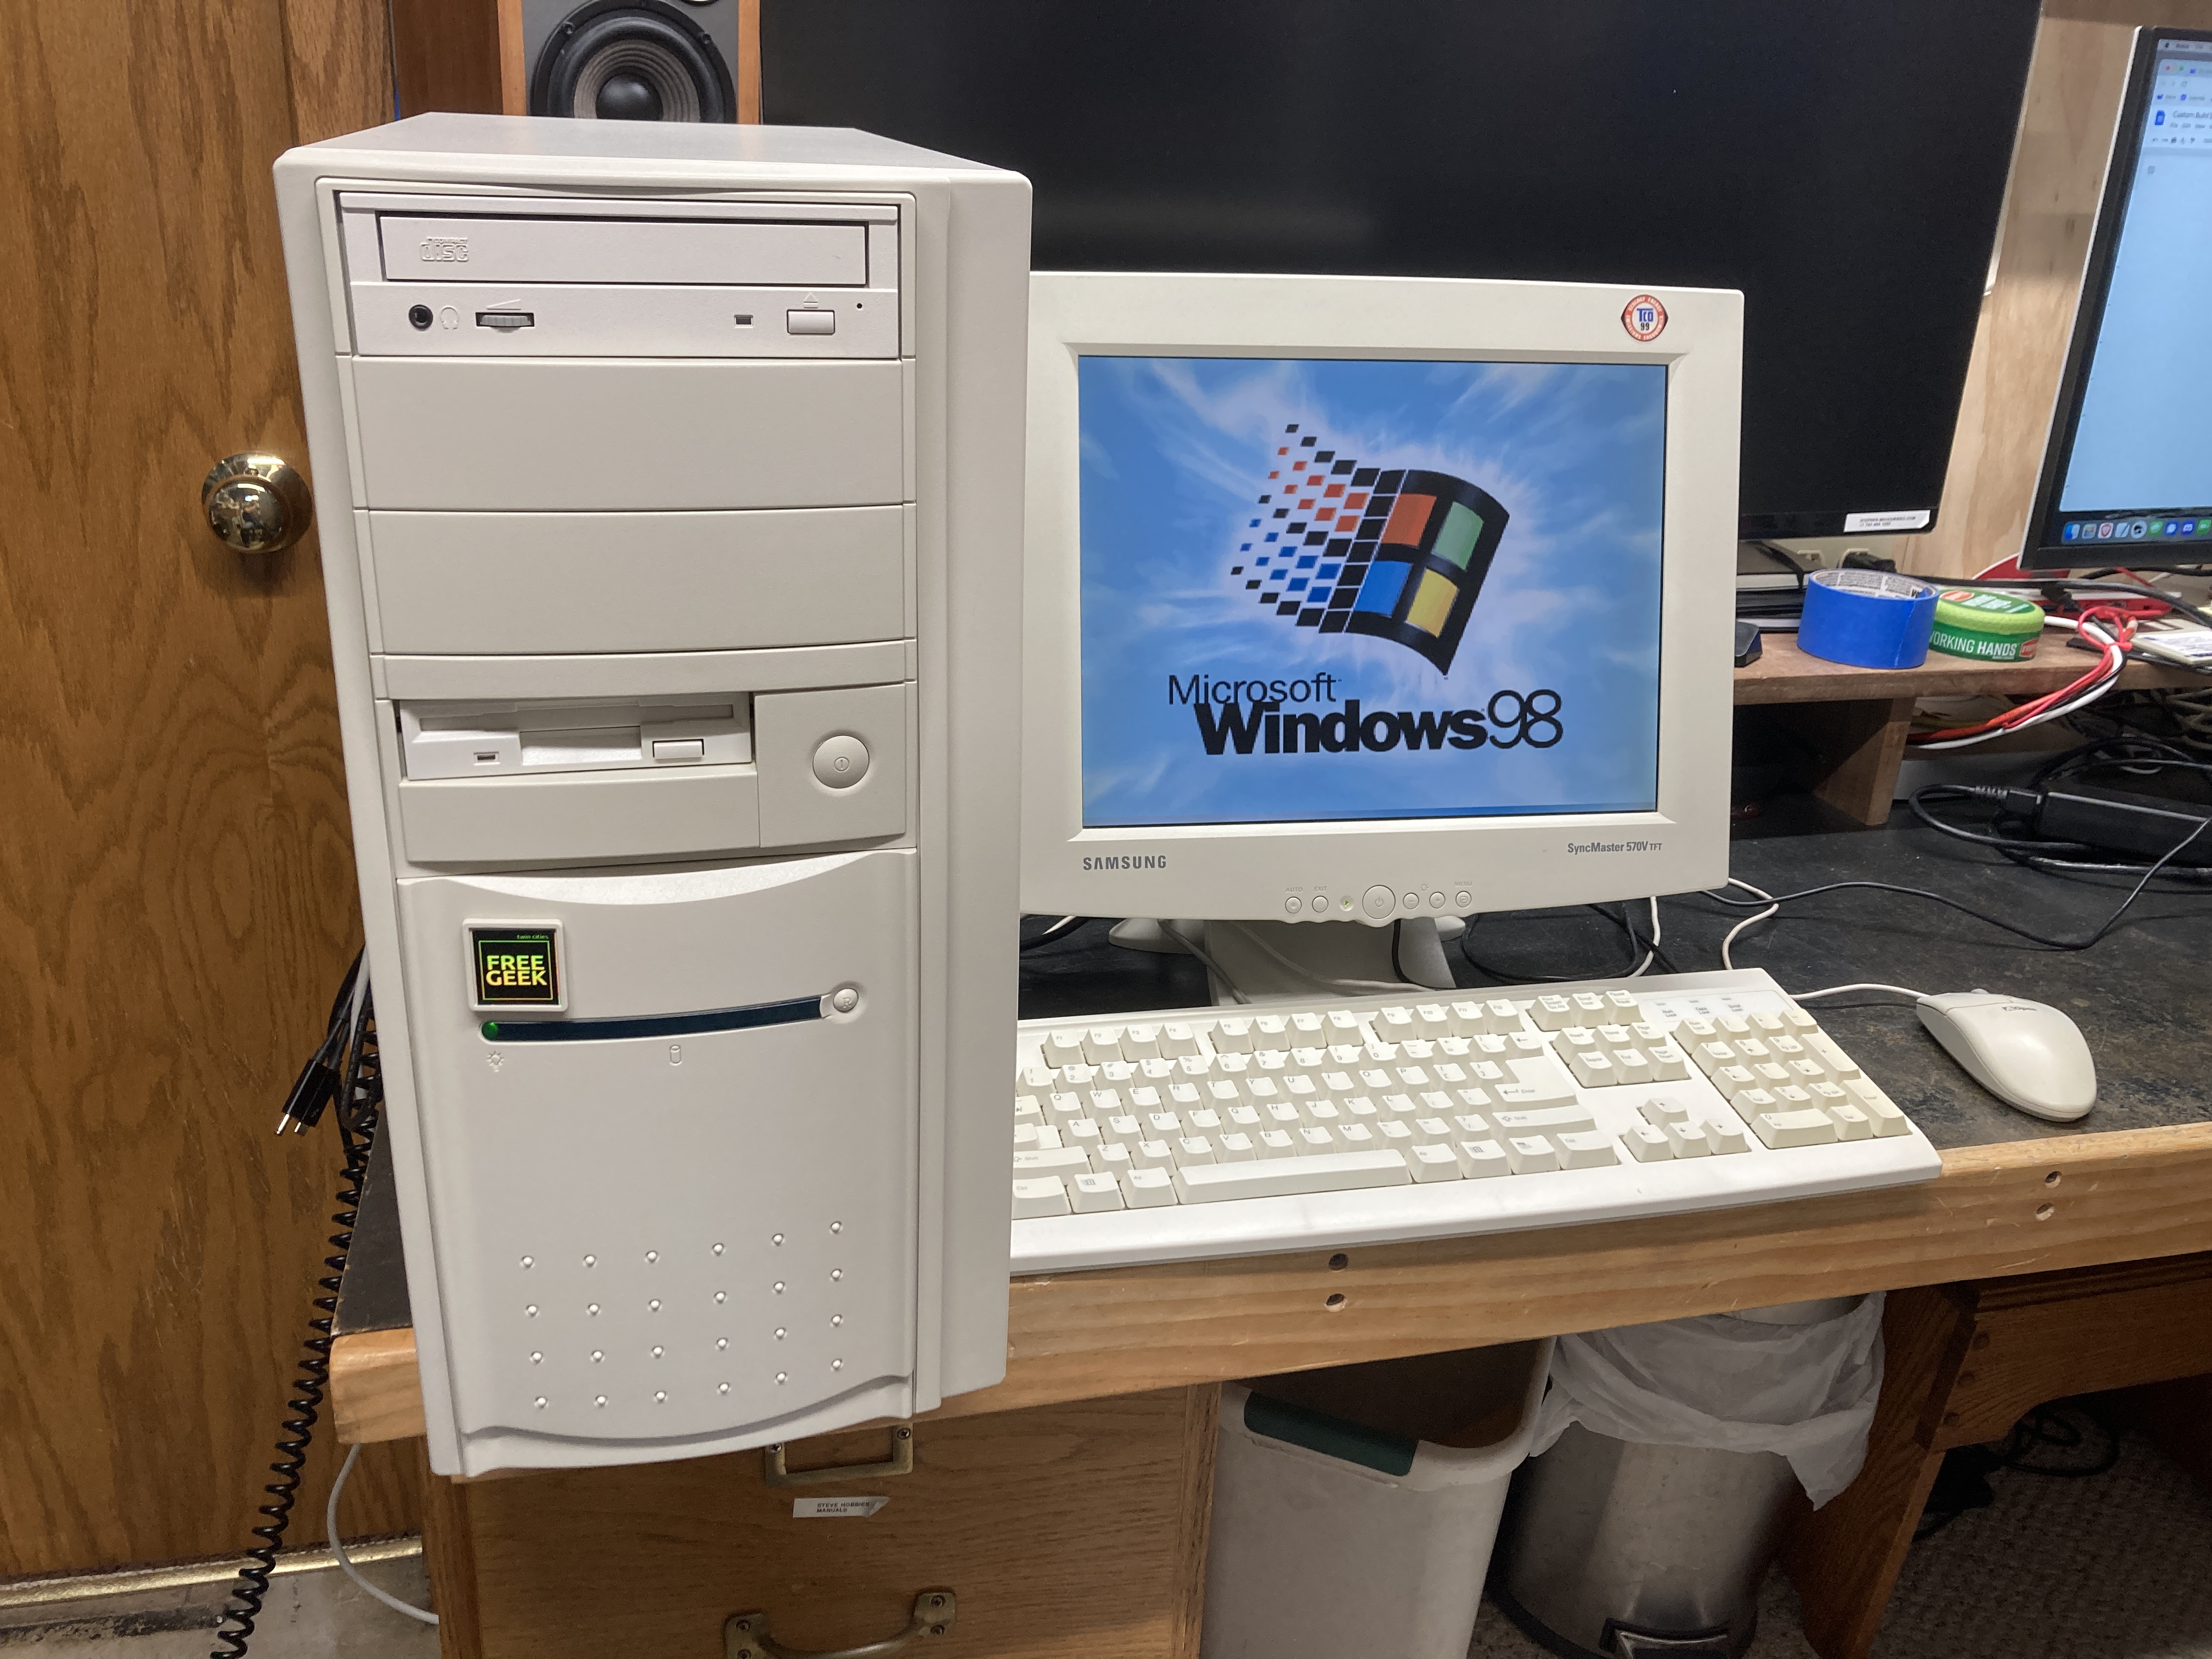
So, in the meantime I was looking for something fun, easy, and low cost.  Once again, Free Geek Twin Cities has come to the rescue!  One of the gaps in my collection has been a nice Socket 7 Pentium.  I've had this on my wish list for some time, but watching Phil from Phil's Computer Lab go over his "daily driver" retro gaming PC really got me thinking about this again.

So, a couple of weekends ago I was in Free Geek and purchased a New Old Stock AT tower case that came from a computer store that had recently closed in our area.  The case was still in the box and it was immaculate.  It was an AT / ATX convertible case, and I had to do a bit of drilling and Dremelling to get an AT Power Supply fastened down inside the case.  I also had to drill out the power button and cut it a bit shorter, but I was able to get an AT power supply in the case and it looks really nice.

The Motherboard, CPU, and Memory came from a Socket 7 Build at Free Geek that had sat for a couple of weeks. Perhaps it didn't sell because the case wasn't perfect but since I was swapping the case anyway I didn't care about that.  The mainboard is an Asus P/I-P55T2P4.  I found a nice generic looking CD drive and I had to replace the Floppy Drive on it because that wasn't working well.

The other upgrade per Phil's video was to put an upgraded video card into the machine with a Digital Interface.  I don't have an Nvidia card (with the hardware scaling that Phil mentions), but I do have an ATI Radeon PCI graphics card with both VGA and DVI outputs on it.

For now, I've paired the computer with a Samsung SyncMaster Beige LCD panel that also came from Free Geek...

I've installed Windows 98 and all the Windows drivers on this machine, but I've also loaded DOS drivers and DOS games as well.  It's a build I'm very happy with and certainly allowed me to "scratch the itch" of completing a build with minimal pain and effort.

Now back to that Amiga 500...

Bringing Back a Basement Cleanup PC - Advanced Logic Research Fast 286 from 1988

This summer we found a moving sale in our neighborhood.  There were a couple of Retro Tech items in the sale, including an Intellivision gaming console.  As usual I was wearing one of my retro technology T-Shirts and when I checked out a family member made a comment about their fathers retro tech collection, most of which was still in the basement and had not made it out into the garage yet.  I asked if I could have a look and was invited in for a closer look.

He had been working on selling some stuff on eBay, and he had some of the items priced with eBay prices, so I took a pass on most of these items.  I let them know that I was willing to repair broken computer and buy bits and pieces and I left with several items and a bunch of pictures.  I ended up going back a second time and left with a total of 4-5 boxes full of parts in unknown or untested condition including parts of a 286 PC, Several 5 1/4" Floppy Drives, a 13" Sony Trinitron SVGA display and an Amdek 310A display from around 1985.

The Amdek monitor has been something I'd been looking for for a while as it's a good pair for the Megatel Quark CP/M machine that I've covered previously on the bLog.  I'm really glad to have a nice, period correct and crisp monochrome monitor paired with that machine.  I'd been running it with a Composite Monitor most recently after having a struggle understanding the video output signal well enough to configure the RGB2HDMI to give a proper display, but that's a story for another day.

The 286 was a longer term project.  When I bought it I knew that the battery had leaked, so I was prepared for it to be a lost cause.  When I brought the machine home, I took the motherboard out cut the battery off and treated the board with Vinegar in the affected area to try to neutralize the battery acid on the board.  After the cleaning (with alcohol) I did try to power up the machine but there were no signs of life.  I put the machine away for several weeks.

A couple of weeks ago, a friend of mine got me an ISA / PCI card that displays the POST codes during the PC Boot process.  I used this on a couple of "lost cause" boards that I have gotten out of other PCs but I was unsuccessful with the other boards.  Then I remembered that this 286 was up on the shelf.  The Post card was quite useful in this case because the machine was running enough to return POST codes to the display on the card.  The codes were related to Memory.  This PC has 2 MB of RAM on board, but it's all in socketed DIP switches.  Given the error codes, I pulled all the RAM DIPS and inspected them, then moved them around.  I did not want to rule out the idea that there may have been some bad chips, but the error code didn't change, so that seemed to indicate that the RAM DIPS were not the issue.

This early 286 has alot of socketed DIPs, so I went ahead and pulled every other socketed DIP out as well and went through and reseated them.  Unfortunately, when I reinstalled them, I had one DIP w/ bent legs, but the POST code changed and I had gotten further along, so I was excited.  Once I got the final DIP installed correctly the machine completed booting.  Always an exciting moment!

But of course a working main board is just the first part of a build.  Although I had rescued many parts from the sale, including the main board, a case, and a 5 1/4" High Density Drive, I did not have most of the rest of the parts I needed to complete the build.  Free Geek Twin Cities came to rescue once again.  I was able to get a Power Supply, a Disk Controller Card, a Serial and Parallel IO Card, and a low cost Sound Blaster card.  I already had an ATI All-In-Wonder VGA / EGA / Hercules card in stock from another project, along with a 1.44MB floppy, and a cool old 200 MB IDE Hard Disk to complete the build.  I'm really happy with how the build turned out...


The logic board is labelled as a "Fast" 286, at 10MHz.  I know this is nowhere near where the 286 topped out for speed, but I do think it was fast for 1988 so I've made some attempt to keep the build period correct.  No Compact Flash drives, although I will not rule that out as a future upgrade.

I've already had a go with Wolfenstein 3D.  At this speed, you have to run it in a pretty small window to get acceptable performance, but it's good for Paku and many of course Planet X3 and many of the earlier DOS games.  I'm really happy to have a generic 286 in the stable along with a couple of more specialized machines like an HP Vectra 286/12 and the CTP 9000.

Nice Northgate!

As I've continued to learn about Minnesota's computer history and the history of the PC compatibles, I've learned that Minnesota seems to have had more than our fair share of successful PC clone builders.  Perhaps this was a lingering effect of Minnesota's strength in the early days of computing with Remington Rand and several of the the mainframe companies located in Minnesota (IBM and the Seven Dwarves).   I know of at least one individual who left an engineering job at a mainframe company in order to run a business building PC clones.

Many of these companies didn't have the market size to design their own boards, and so they would purchase and build systems using boards from many different vendors in Taiwan, but there were a few companies that either started early enough or had a large enough market share to do their own motherboard designs.  There were a couple of local companies that Minnesotans might recognize, ZEOS and Northgate Computer Systems.  Both advertised nationwide, and so had some broader recognition.  It seems that both struggled with financial trouble in the mid 90s, Northgate going through a bankruptcy and Zeos a buyout.

I've been interested in Northgate since I've had one of their keyboards for a while.  I was recently offered one by a collector in St. Paul who is looking to downsize.  The machine was untested, but I was able to look inside and ensure that there wasn't battery damage.

When I got the machine home I unplugged the mainboard and checked the Power Supply voltages.  Everything checked out, so I plugged it back in and it booted.  Of course the clock battery was dead, but I was able to set the BIOS parameters and boot off a floppy.  I was not able to figure out how to set the BIOS to recognize the hard drive but after some time I realized that the Specifications sticker on the back of the machine listed the Hard Drive's BIOS type on it.  When I entered that data in the BIOS the drive was recognized right away and the machine booted to DOS 6.22.  There was a Drive Overlay installed on the HDD to get it to recognize the additional space on the drive, it has a 450 MB drive that appears to be working just fine.


One of the next challenges with this machine was determining which Northgate system it was.  There is not a ton of information available online about these systems, but I found this list on Vogons.  By googling images, I was able to determine that this was a Northgate Slimline 320 (A 386 @ 20 MHz with a date of 1991 on it).  Knowing the model I was able to find these jumper settings and specifications.  It turns out that this unit has already been maxed out at 8MB RAM.

After this, I needed to decide what to do with the machine. It has a total of 3 16 Bit ISA expansion slots, and two 8 Bit slots on the back.  It had a modem which I removed, and replaced that with a generic sound card.  I have a not quite period correct, but significantly cheaper Sound Blaster Vibra 16 on order for this machine.  I also used the slightly newer 3COM 3C509B 10MB Ethernet card.

For storage, I tried directly connecting a Compact Flash card to the IDE Bus on this machine, but I was not able to get the BIOS to recognize the newer cards that I had (2GB and 4GB Sandisk and 1 other brand).  I wouldn't have minded if I could only get those cards working with 250 or 500 MB partition, but nothing was working so I installed a Lo-Tech XT-IDE card that I already had on hand from another build that I changed.  This boots the machine just fine.

Once I got DOS and some of my standard Games and Utilities moved over to the Compact Flash drive, I tried to install Windows 3.1 on this machine.  The machine has Integrated Graphics, and when that is enabled, a boot message indicates that the video card has 256K RAM onboard, which is enough RAM for 640x480 with 8 bit color.  However, I could not get this to work with Windows 3.1, either on the original Hard Drive or on the CF based storage.  Windows 3.1 locks up after the splash screen.  This makes me wonder if the reason this machine was taken out of service back in the day was because of a failing video controller on the motherboard.  Anyway using the board Jumpers I was able to disable the onboard VGA, and test several other 16-bit ISA Video Cards that I have.  I decided to use the most "period correct" VGA card I had.  This came from another 386 parts machine, and it also has only 256K RAM on it.  This works great in Windows 3.1, but of course has no acceleration, which is just fine for this machine.

So that about wraps it up for this machine.  I'm really happy to have a nice clean Northgate Computer in the collection that pairs nicely with the Northgate Keyboard that I've previously blogged about.

Please let me know if you have any memories of using Northgate Systems back in the day, or any tips about where to find additional technical information about the Slimline systems online?

Epson Equity LT - An XT Class Laptop - Flash Storage Solution

As readers of my blog will know, I have a bit of a soft spot for XT class machines with the Intel 8088 processor and similar processors.  One of my first retro computers was the Compaq Portable from 1983.  My friends at Free Geek know this about me, and so I'll occasionally get a machine from them that needs help.  I recently got a Toshiba 3100 machine from them that matched up well with some machines that I helped my friend John with, a couple of those Toshiba machines appeared in this video on his channel.

Anyway, the latest acquisition was an Epson Equity LT machine from 1988.  This make it a "later" XT machine, and instead of a gas plasma display, this has an early monochrome TFT display.

I tried quite hard to get a hard drive going in this machine.  After reading this article about the somewhat proprietary XT Laptop based Hard Drive interface, I even went as far as pulling the Hard Disk out of the Toshiba 3100 which has a bad screen and trying to transplant it into the Epson Equity LT, but I was not able to make this work.  The Epson does spin up the disk, so it worked better than the totally dead drive that I started with, but I was not able to get past a drive error.  I looked for information about a low-level formatting the drive, but that is either not possible or just not documented.

However, I have found what I think may be a better solution in the long run because it's a more generic solution that will apply to other XT class laptops or luggables as well.  I installed a GoTek floppy drive emulator with the Flash Floppy firmware into this machine.  Once the Hard Drive is removed, it's easy to move the original "A" drive over to the left side of the machine and use it as the "B" drive, installing the GoTek as the "A" drive.  Using another computer, I setup a new low-profile USB Flash Drive with 720K Disk Images on it.  One of these disk images has DOS 5.0 and another has DOS 3.3.  Most of the disk images on the floppy have games on them.  These are early DOS games that run in CGA graphics mode, like Alley Cat, Burger Time, Avoid the Noid, and titles like this.  I also created a boot message on the DOS 5 (default) boot drive that lists out which programs are stored on which floppy drive so you don't need a list of Floppy Numbers if you are using a basic GoTek like this one...

I'll include a link to the contents of the USB Flash Drive that I've uploaded to the Internet Archive.

A couple of other "longevity" upgrades included installing a new 3.6 Volt Lithium battery for the realtime clock and permanently removing the main battery that was installed in the machine.  This machine will just be used for demonstrations with power and it's one less thing to worry about.  As an added bonus with the battery, hard drive, and drive controller removed, the machine is alot lighter!

With the low profile USB drive installed, I plan to leave this machine setup and ready to go.  Now I just need to find an old laptop bag that will work for this monster!

SuperCard Pro - For Disk Imaging and Drive Repair

Disk Imaging

One of my interests in the Retro Computing hobby has been software preservation.  Trying to recover data off some of my wife's old floppy disks from her college days sent me down a path that's gotten me to the point where I own several different Macs and PCs from the 90s that I use as "Bridge Machines" to get data moved off old floppies onto modern hardware.

I'm also interested in a range of different systems and in having the ability to make and restore disks of any format.  I became aware of the Kryoflux disk imaging system when reading on Sonic Purity's blog on this article that I've referred to in several bLog articles before.  I didn't pursue the Kryoflux because this solution was expensive and because I didn't understand floppy disk technology well enough to be comfortable with flux imaging.   Thankfully this knowledge gap can be easily addressed by a great deal of information on the Web, and since then I have put more time into researching this topic.

One of the few benefits of the Pandemic has been that all the Vintage Computer Festivals have been online.  I learned about Jim Drew's SuperCard Pro from watching Craig Ernster's presentation. at VCF Midwest 2020.  This device is significantly less expensive than Kryoflux.  I didn't buy one right away, but when I got my first CP/M machine and didn't know how, or even if I'd be able to make floppy disk copies with the machine I put one on order.

I've paired the SuperCard Pro with the Asus laptop I use as my retro computer engineering PC and set up a couple of floppy drives, both a TEAC 5 1/4" DD drive as well as a newer 3 1/2" 1.44MB floppy drive.  I have stored these items together so it doesn't take long to have the disk imaging solution up and running on the bench...


So far, I have imaged and restored boot disks for my Compaq Portable (360K Floppy with DOS 3.3), and that worked well using a preset in the software.

Also I've imaged and restored boot disks for my Megatel Quark 100 CP/M computer, again, using a CP/M preset in the software.

Drive Repair

The Super Card Pro has also been helpful for drive diagnostics and repair.  It has a separate screen  for Drive / Disk Utilities.  This allows you to control the drive motor and also the track steppers that move the heads back and forth.  As you can see in some of Adrian Black's videos, having separate control over these two drive functions can help when lubricating and troubleshooting drives that haven't run for a long time.  Using these features of SCP, I've been able to troubleshoot these issues:

Drive Motor Speed Adjustment
Index Sensor Good / Bad
Track Stepper Motor Position
Track Zero Sensor Good / Bad (the Disk Media Test will fail if the Track Zero sensor is not working)

When comparing the functions of the Super Card Pro with IMD, I believe that IMD could also be used to diagnose all of these scenarios, but I find the SCP interface a bit easier to navigate.  One gap with SCP, I have not been able to adjust drive alignment with this tool.  I think the IMD program is the only (easy, non oscilloscope) way to do that.

My latest drive repair was getting a pair of Magnetic Peripherals Full Height DS/DD Drives back up and running for my IBM 5150.  Although these drives are now fully functional the alignment of these drives doesn't match up with the other 360K drives that I own.  Drive alignment is still outside of my comfort zone, but I'm hoping to learn more about that soon so I can get the various drives I own back lined up with one another.

My (Current) Favorite Retro Computers

It's been a while since I took a picture of my basement shelf where I store my most frequently used Retro / Vintage Computers.  The ones that are out and get used are my de facto "favorite" retro computers, and there's been a fair amount of change on the wire rack since my last update.  I thought I'd outline which computers are out, and why:

From Top to Bottom, Left to Right, on the file cabinet is the NeXTstation Mono Slab (1990).  This is one of my newer acquisitions from Vintage Computer Festival Midwest 2021.  I've still got alot to learn about this machine, and I also have some hardware on order for the machine so I'll be leaving it out for a while.

Next is an original Compaq Portable I (1983).  This was a "project" machine from Free Geek Twin Cities and my first XT class machine.  As one of my first Retro computer "rescues", I really enjoyed the process of getting it working again.  I also really like the design of it and I've used it for disk imaging and a few games that look really cool on the Green Screen. (it has a really long persistence phosphor.)

Next to that in the top right corner is the original non-backlit Macintosh Portable (1989).  Yes, the screen is on, this just shows how you need the lighting just right to see the screen.  I'm fortunate to have one of these that is working as many of them have problems.  Mine has a few dead lines on the screen, but I'll just keep enjoying this while I can. It's probably just a matter of time till the screen dies.  This computer is out on display because I enjoy the fact that it's so different than the laptops of today, a design idea that failed.

On the middle row at the left we have an un-enhanced Apple IIe computer (1983).  I was able to buy this computer monitor and disk drive as a set from a retired school teacher who had bought it new.  It needed quite a bit of repair but since completing those repairs it's been super reliable and super fun.  Total Replay anyone?

To the right of that I have a Power Macintosh 8600 / 200 (1997).  This is a "Bridge Machine" that I have blogged about before.  The main reason this machine is still on the wire rack is utility.  It's easy for me to move files off and on this machine from my modern machine and I have three SD cards setup for Mac OS 7.5.5, 8.6, and 9.1, so it can run the first version that is supported by the hardware all the way up to the last version.  The latest upgrades for this machine include a new Logic board and Processor Card (Still 200 MHz), additional RAM, (288 MB Total), and an ATI Rage 129 video card from 1999.  This machine is running better than it's ever run before.

On the bottom row at the left we have a Macintosh 512K (1984).  Like so many of these machines it started out life as an original Mac 128K but got upgraded fairly early in life.  It has been continuously upgraded to keep it going since then.  It's possible that the only original thing on it is the chassis but I feel very fortunate to have this machine and I enjoy playing some of the classic games and booting Mac OS 1.  It's an absolutely iconic design, and the only system in the display that boots and runs exclusively from floppies.

Last but not least on the wire rack in the bottom right corner is my latest PC Build.  This is a PCI based 486 DX2-80 (1995).  I built this with parts and pieces from a friend and other items I had around.  This is both a Retro Gaming rig with a Sound Blaster in it and a Disk Imaging machine with a 5 1/4" 360 K Floppy drive.  It works great so far, but I just built it, so I'll need to keep it out where I can power it up and keep using it to work out any kinks in the build.

Honorable mention, I also have a Tandy Model 102 (1983) slab top machine that I keep out on display in a different part of my office.  I really appreciate the unique design of this machine.  Another form factor that really didn't last into the modern computer era.  I've recently got a flash based storage solution for this machine, so I'm looking forward to digging in more on this machine, including loading some of the BASIC games onto the machine.

I have more machines but they are all stored in a much less convenient location.  Some of those machines are plugged in and can be run, too, but they get significantly less use than these ones that are out.

Cheap, Fast Bootable IDE Solutions for Retro PCs and Macintosh

I've been working on a series of articles about the things I love about Retro Computing.  The keyboards in general were good, and some were shockingly good.  CRTs appeal to me.  I really enjoy the entire Floppy Disk experience, as that's what we used when I first learned about computers in grade school.  The older Double Density floppies actually tend to be quite long-lived when stored properly, I have 20 and 30 year old disks that still work as expected!

For me, Hard Drives fall into the "not worth the worry" category.  Flash based storage solutions are faster and they make better sense from a preservation point of view because they will keep the machine operating for a longer period of time into the future.  So, one of my ongoing goals has been to figure out what the cheapest method of providing flash based storage to these old machines is.  I'll use this article to catalog a list of solutions that I've tried.  I'm going to cover, total cost per unit (regardless of capacity), cost per GB, Speed, and other considerations.

I've used a couple of different options for IDE machines.  First is using a CF card in place of an IDE drive inside of PCs. For tower and desktop machines, I like to keep the drive accessible from the back, so I prefer these simple passive circuit boards on a Slot cover bracket.  The circuit boards cost about $10, and the price of the CF card is based on the size, w/ 4GB cards costing about $15 each on FleaBay on April 2021 (for used, Industrial rated, name brand cards).  This give a total installed cost of $25.  Depending on the Compact Flash card itself, these can be capable of quite fast transfer rates, with the proper CF card, your computer should be limited by the speed of the IDE interface in the machine.  Here's a picture of my 486 build showing the CF card bracket on the back...

For IDE based Laptops, these CF to 2.5" 44 pin IDE drive adapters cost just a bit more on Amazon, these were about $18 delivered putting the total cost for a 4GB drive solution at about $33.  Again speed is dependent on the CF card itself,  I have one of these in a PowerBook 3400c and that's worked well.

Here's a cheaper solution that I will mention with a caveat.  There is an SD to IDE solution sold on Amazon, but I have tried this solution in several different computers and it's hit or miss.  Sometimes they work and in some computers they just don't work at all.  The price is $16 plus the cost of an SD card.  As you will see in the detail they are quite slow, limited to 25 MB/s transfer rates. The limited compatibility and speed is a disappointment because as CF cards become less available and more expensive this could become the cheapest option on the list.  It's already close to the least expensive at $26 in 2021.

I recently learned about another option from Sean at Action Retro.  He's been recommending and using some low-cost mSATA to IDE drive adapters and lost cost mSATA SSDs from China that work well, are brand new, and have significantly greater storage than the options I've mentioned here.  Here's a link to a drive enclosure, I can't vouch for this seller yet, but there are many like this on Fleabay.  Here's a link too the SSD drive itself.  Note that you have to be careful to match the keying, physical length, and the communication standards for the drive and enclosure, as the enclosure will not work with PCIe based cards.  After I figured this out I was able to upgrade my Pismo with this...

The drive is the white plastic enclosure on the right, not very visually interesting, but this solution cost about $31 for both parts of a 64 GB drive so this is far and away the lowest cost per Gigabyte of the storage options and still in the middle of the pack for overall cost and at the top in terms of speed.  This will be my go-to for "bridge" systems that will see use for disk imaging or backups.

In summary, the CF card solutions still seems like the best solution for now for the older machines given the relatively high speed and lower price but for newer machines the mSATA SSDs will be my go-to solution.  Thanks again to Sean at Action Retro for highlighting this option on his YouTube channel!

Do you have any experience with Flash based storage solutions for older Macintosh or PC based machines?  What low-cost solutions would you add to this list?  Comment below, or feel free to send me an email.

Compaq Deskpro XL 590 - Pentium Workhorse

I recently acquired two Compaq Deskpro XL 590 computers from Free Geek Twin Cities, the pair were labelled as a Project PC, and sold at an enticingly low price.  I was pretty excited to see this because I'd recently damaged my Epson Pentium 75 machine, which was a favorite in my Retro Computer collection, and one of the first that I'd acquired.

The Compaq PCs were in pretty rough shape, as you can see here...

This is an interesting system, it's got a processor on a slot but it's not a passive backplane computer.  There's quite a bit of logic on the mainboard, including; audio, SCSI, IDE, and Ethernet.  The CPU and RAM are on the processor slot, which is almost a full length card.  Modern Classic on YouTube recently did a series of vides on this hardware which you can find here, here, and here.  He started out with a 486 and upgraded to a Pentium 100.

My systems are a Pentium 90 with 16 MB of Built in RAM, these systems have two PCI cards slots, and the rest are EISA slots.  I've never had an EISA system before, so that was an interesting aspect of this build. My goal for this machine is to get Windows 95B running and have a boot menu configuration for DOS gaming or for starting up the Windows 95 GUI.

I had quite a few interesting challenges getting this computer going.  The first was the BIOS setup program.  The BIOS setup program for this computer shipped on Floppy Disks, and can be installed into a small partition on the hard drive, but as with most recycled computers, these machines shipped without a Hard Drive or any floppy disks or documentation.  So,  I started Googling around and used the Wayback machine to figure out what the last set of drivers for this board were.  Having this information was only the start of the struggle, since HP has turned off the FTP site where they had been hosting the old Compaq Softpaqs for many decades.  I asked for and received some good advice about locating these files on the Vintage Computer Forums.

One of my goals for the system is to use it as a Disk Imaging system with a Go-Tek floppy drive emulator with FlashFloppy firmware loaded on it.  I have a couple of these, one lives permanently in my pentium, and the other is a "floater" Go-Tek that's used for building and testing systems.  Using the Go-Tek, I was able to convert the odd Compaq Softpaq Executable files into the more useful IMG Disk Image file format.

I have collected up the drivers I needed to build a Windows 95B machine, and I will link the file here, this includes:
System Diagnostics SP16085
System Configuration Disk 1 - 4 SP6144
Firmware Update (Final 4/7/1997) SP3642
Matrox Millennium PCI Video Card Drivers for Windows95 SP2754
Onboard Ethernet Driver SP1649
Onboard SCSI Driver SP1664

Once I had the disks needed, it was time to start the build.  I wanted to use Compact Flash media for the Hard Disk Drive, but I had no end of problems with a couple of off brand devices that I tried, so for now I've defaulted back too a 6GB Quantum Fireball IDE drive that I had in the parts bin.  The System Configuration utility was able to recognize the drive and startup without error.  Once the System Configuration utility is able to start without error, if there's a blank drive it will offer to install the System Configuration into a partition on the Hard Drive, which I did for convenience.  At that point you can Fdisk the rest of the drive and setup your partition for Windows 95.  This part of the install was normal and painless.

I've moved all the goodies from my Epson computer over to this one.  I've added 128MB RAM, a 52X CD-ROM, a Go-Tek, a newer ISA SoundBlaster 16, a 3Com 3C905C Fast Ethernet card, and a Parallel port Zip drive to use for "Sneakernet".  The case cleaned up pretty good, although it did have some paint missing on the corners...


I'm quite happy with how this machine has turned out.  I still have quite a bit of tweaking left to do to get all my DOS games back up and running, but that is a big part of the fun.  It's great to have a running Pentium class machine back in the stable!

Here's the machine running Internet Explorer 4.0 and using the excellent new FrogFind.com search engine for Retro Computers from Sean at Action Retro...


Next, I need to get the Boot Configuration Menu going, I'll probably copy something from Phil's Computer Lab's MS-DOS Starter Pack.  Also, I've ordered some Industrial CF cards to try again too move the Hard Drive over to Solid State media, but in the meantime, this machine should be tons of fun.