Showing posts with label Recap. Show all posts

A Tandy 4000 Computer Repair

Adrian Black recently posted a video about a Tandy 4000 computer, an early 386 machine.  I was excited to see this because (as he has mentioned in his video) you don't see alot about these machines online and I have one.  One of the commenters on his video said that these are rare because the machine was only sold through the specialized Tandy computer stores and not at regular Radio Shack stores like the Tandy 1000 range was.

My Tandy 4000 came from another collector here in town last year.  He sold me the machine (at a very good price) because he knew that it had some blown capacitors and that I enjoy doing repairs. I hadn't blogged about it at the time because this was a somewhat routine repair, but if there is interest from Adrian's video I thought I should share my repair experience.

When I got the machine home and began troubleshooting I was able to identify a couple of bad Tantalum Capacitors (which was also a problem on Adrian's machine).  After I replaced those, the motherboard worked!  However, when I plugged everything in again, it stopped working, it turns out the Seagate ST-251 drive in my machine did not work, it kept the machine from powering up.  It's possible this drive also has some blown capacitors.  Thankfully at this point I had a spare ST-251 that I'd repaired after another project ended.  I was able to install that ST-251 into this machine and set the failed one aside.

The next challenge was a cosmetic one.  The faceplate / bezel of the 3 1/2" drive was broken off from my machine and it was nowhere to be found.  I removed the drive that came with the Tandy and replaced it with a beige 1.44 MB drive and bezel kit from Free Geek Twin Cities.  It looks quite nice, if maybe not quite exactly right...

I was not able to find the correct settings for the EGA card in the machine and the display was showing odd color artifacts so I ended up installing a VGA card.  I was also able to upgrade the RAM to 8MB which would have been a very expensive upgrade in 1988.

As with many early systems the BIOS setup program for this machine is not in ROM.  I tried GSETUP as I already have that on a boot disk but that didn't work.  I was able to find the Tandy 4000 specific setup program online here.  I created a DOS 5 boot disk with it and I'll be keeping that with this machine.  I used the Tandy setup program to set the drive type to 39 for the ST-251.  Another quirk was that I had to manually enter the RAM size, as 7168, the setup program did not pick up the RAM amount automatically.  Odd, but it works and boots without any faults.

I'm happy with how this repair turned out and glad to have this machine as a part of my collection!

A Kaypro II from 1982

My latested repair story is about a Kaypro II from 1982.  The Kaypro machines have such an odd numbering scheme.  They used Arabic numerals and Roman numerals to refer to different computers, it is so confusing that collectors have taken to referring to them by the year of their release.  The Kaypro II 82 is a different computer from the Kaypro 2 84 released two years later.  There is so much confusion caused by this so many articles online contain inaccuracies in describing the features and functions of the machines.

I've had a Kaypro 2 84 for several years, and acquired a Kaypro 1 from 1986 last year, but I've long wanted a Kaypro II 82 both for historical reasons, because it's the first of an iconic line of CP/M computers, and also for nostalgic reasons because my uncle who bought me my first computer bought one of these machines for my Grandpa and Grandma.  I knew from day one that Grandpa and Grandma's machine was a much more serious tool than the one that I had, and I thought it has an amazing design, it looked like a "real computer".

This Kaypro II 82 came from Free Geek Twin Cities via my friend Chris Gallaty.  Special thanks to Chris for getting this machine when he did and for passing it on to me.  The machine came with a note "Powers On - Keyboard Cable Needs Simple Repair".  One of the basic rules of troubleshooting is that you should not take other people's troubleshooting work at face value, you always want to do that work yourself, but I was hopeful that the label was correct.

The plug on the keyboard port had been smashed in and that repair did need to be done so I started out with the obvious repair first.  Chris has also given me a 4 pin modular jack from a phone handset.  Once I got inside the Kaypro the jack inside had taken a pretty hard hit and was beyond repair, so I needed the new part.  I soldered the replacement in and hot glued it on the inside to improve the support.  It feels quite solid.

I was able to drag out another working Kaypro machine and test the keyboard.  It was working as expected!

Next, I powered up the Kaypro II machine.  The CRT came up, but the normal prompt that appears on power up was not appearing, normally the machine would have a prompt that says 

*Kaypro II*
Please Insert a Disk

This message appears before booting and so a working floppy drive is not needed to get this message, just a working power supply, main board, and CRT.  I checked the power supply voltages and they were OK.  On the CRT I did not see any raster pattern when the brightness was turned up, or after adjusting the knobs.  I did some basic troubleshooting on the mainboard, and ended up moving the main board over into a different Kaypro.  I could see that it was outputting video, so that isolated the issue to the CRT analog circuit.  This was discouraging because I'm not the best at CRT repair, but I started doing some reading and found this article on Vintage Computer Forums.  I normally don't like doing "Shotgun" repairs, but I replaced as many of the caps as I could from my stock of Capacitors and that helped, now the image looked like this...

There was raster and the CRT was displaying text!  Also, I cleaned the disk drives with a floppy cleaning disk, and I made SS/DD Boot Disks for the Kaypro II.  The machine booted from the floppy!

The non-centered but visible image was evidence that I needed to complete the recap so I captured the rest of the capacitor sizes and put in an order on DigiKey.  When the caps arrived and I had time to get back to repairs on this machine I identified a large capacitor that was totally dead, so once the recap was complete, the image looked great and I completed the CRT adjustments.  I now have a fully functional Kaypro II machine...

I feel quite fortunate to have one of these systems, it's been on my wish list for quite some time.  My next project for the Kaypro II 82 will be make some more floppy disks.  I'm also thinking about swapping one of the drives for a Go-Tek as it would be really cool to be able to boot and run from Flash Storage.

Bargain Retro Computer Fixer-Uppers

It is quite common for me and my fellow retro computer collectors to complain about the high prices that Retro computer hardware gets on eBay, but there are still good deals to be had in local markets from people who are doing cleanups.  Personally I use Craigslist and Facebook Marketplace.  I find many of these deals as referrals from my network of friends who know I'm looking for these machines.  It's good to have realistic expectations going in, as most of these lower price computers will require repairs of some kind to bring them back to use.  

Recently I've been able to acquire the following small lots:

$70 for an Apple IIe and a tote full of retro PC software and hardware (Apple IIe was advertised as untested, and it had broken keys)

$50 for an Apple Macintosh Plus (Tested at the store before purchase, boots to ? icon)

$80 for an original Mac and a Macintosh Plus (advertised as not working, and without a keyboard, mouse, or other hardware)

None of these computers were advertised as working.  When I see a local ad like this, I look at the other items that this seller has listed.  If they have alot of Retro computer stuff for sale that is working then I'm less likely to believe that items are "untested", tested and not working is more likely.  But sometimes the seller will indicate that they don't have a monitor to test and I find this explanation more believable.  

The Apple IIe was listed this way, stating that the seller didn't have a monitor to test with and so it was sold untested.  Apple IIes are know to be quite reliable (unlike Commodore 64s of the era), and so when I got it home and connected to an Apple II compatible monitor, it fired right up.  I did have to replace a RIFA cap. in the power supply, and I had to remove the keyboard and replace two key switches and key caps.  This was something I knew would be needed going into the purchase from the sellers pictures and description.  I have fixed Apple keyboards before with parts I purchased from an eBay seller that specializes in Apple keyboard parts.  After the keyboard repair the machine was complete and fully functional.

The first Macintosh Plus was purchased because I have several of the early compact Macs and I wanted to have another computer of this type to use as a Parts machine.  This Mac Plus was working at the store, but I ended up spending time reflowing many of the solder joints on the Analog board to get it starting more reliable.  I also took the floppy disk drive out and lubricated and tested that.  This machine is fully working and I stored it with my other compact macs.

The original Mac and Mac Plus lot was not a purchase I had intended to make, but a friend tipped me off and since original Macs don't come up very often at a good price I gave the listing a good look.  The case was clearly in rough condition but I could see from looking at the ports on the back that the logic board was still inside.  So I made an appointment to buy the systems,  They looked as advertised so I paid for them and brought them home.  

At home, I confirmed that both of the systems were not working (the same symptoms the seller had indicated) and I got to work on the original Mac.  I was hoping that there would be enough parts to make at least one working machine from the two.  It turns out that the original mac wasn't booting because it has a memory expansion board that was not properly seated.  I removed the logic board, re-seated the card, and the machine came to life!


The second Mac Plus was more difficult to troubleshoot.  I have narrowed the problem down to the Aanlog board, but there are no obvious burn marks or leaking caps.  I have put this repair on hold for now and will store the Mac Plus with my other parts machines.  Even without getting this final Mac Plus working, this purchase was still a bargain, but I am sure that I'll come back to the Mac Plus at some point.

So, if you enjoy repairing retro computers there are still many bargains to be had on these machines, it just requires patience and a willingness to accept machines that may have some damage.  For me, I very much enjoy the hands on experience with these machines and so I'd rather have a good solid functional machine with some blemishes than a cosmetically perfect machine that doesn't boot up and run.

Have you fixed any vintage tech. recently?  Let me know in the comments below, or feel free to send me an email and let me know what you are working on.

Macintosh SE - Trash to Treasure

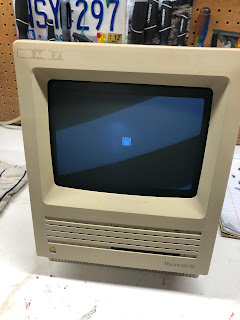
I recently spent some time restoring a Macintosh SE.  I got this project after someone had stalled out on it, and the machine came to me "complete" but disassembled in a cardboard box...

There was a note from the previous owner that stated "works, needs caps.  Bong, but with thin vertical line on screen", so I skipped troubleshooting and started in with the cleaning.  The machine was filthy, not as bad as the "barn find" Apple II+, but dirty enough that it would have been disgusting to work on without some major cleaning.  I took all the metal parts of the chassis off from the plastic parts and washed everything that would fit in the dishwasher, including the Logic Board.  I haven't ever tried dishwashing the analog or power supply boards as I think bad things might happen to the transformers.  As would be expected the parts came out looking much better.  As a side note after a particularly nasty job like this I run an additional cycle on the dishwasher with it empty to make sure all the "computer water" is flushed down the drain before we put stuff that we eat off back into the dishwasher again.

I manually cleaned the CRT and the analog board with paper towel toothbrushes and lots of IPA, avoiding the deflection coils which I clean using compressed air.  I reflowed the flyback connections on the Analog Board and many of the other joints on the board as well, and repaired a few broken items (loose molex connector, problems with the fan).

During this repair, I had the luxury of having another SE machine at hand as I was recapping it for a friend.  This machine needed only to have the Logic Board recapped and it was in much better condition than my machine and so I was able to swap known good parts onto my machine.  I determined that the Tube itself was still good and that my Logic board was working as expected, so it was good to eliminate at least a few components from the troubleshooting.  But the Power Supply / Analog Board combo was not working.

The next item on the list to address was the Power Supply.  I measured the supply, and the +12 Volt rails were at about 9 Volts, which I guess is typical for these when they need a recap.  I did the recap, but as I was doing it, I noticed dark brown marks (burns?) on the Power Supply circuit board.  After the Recap, the voltages on the Power Supply didn't come back.  I checked and rechecked capacitor orientation and other things, but decided that with the burn marks, my confidence would not be high in any repairs that I could carry out, so I decided to replace the supply with a modern supply that would fit inside the housing.  In hindsight, I should have gone out in the forums to ask but I did check in afterwords and discovered some interesting insights.  With my cheaper, but possibly sub-optimal Power Supply replacement in place, I was ready to pivot back to some testing.  I connected up all my parts and on power up, observed this screen...

The white line seems to indicate that the Horizontal Deflection isn't working correctly.  This of course is on the Analog Board, so I decided it was time to recap that.  I made an attempt to find a capacitor list for the Analog Board online, but I was not able to find one and had to make my own.  I had trouble finding a couple of the specific values and didn't realize that one of the critical ones (C15) is a Non-Polarized type Electrolytic Capacitor, so that put the project on hold for a week waiting for two different batches of parts to arrive from Digikey.  Once I got the Analog Board recapped and put the system back together, I was greeted with this very gratifying sight...


The machine was coming back to life!

The next order of business was to work on the Floppy Disk drive.  At the beginning I'd done a very quick service on this drive, but the mechanism was still not moving smoothly on eject, so I went back and watched this video from JDW and followed the steps more closely.  I did end up having to borrow the eject motor from another drive to get this one working, but I'll order some of those gears that JDW mentions to get this other drive back in order.

So, now the Mac SE has a floppy to boot from. I also installed an internal storage device, plugged in a SCSI Zip Drive on the back and started copying files into the machine.  All was not well, thought.  I didn't know it, but I don't think I'd found the root cause of the burn marks on the Analog Board and the reason for the overheating in the original power supply.  The screen went black during a file copy operation, and I discovered afterward that Transistor Q2, part of the Horizontal Deflection had gotten very, very hot.  I tried replacing this transistor, but alas, that was not the root cause and I was quite frustrated and put the project aside for a while.

I mentioned the struggle I was having to a friend in the retro community and he offered an SE analog board that had a damaged POT on it.  I jumped at the chance to be done with the old Analog board, swapped that, and the SE was back to life again.  Long may it live...

So, in hindsight, not the smoothest repair I've ever completed!  The Power Supply recap was a failure, but I learned that multiple modern alternatives exist.  The Analog board recap was also a failure as I was not able to discover the root cause of the burn marks and cascading failures, but sometimes we learn more from failures than we do from easy wins.

This is the first of the SE generation of Mac that I have (I have several of the previous original generation, and one Classic II), I upgraded the SE to the maximum 4 MB RAM and put a 100MB HDD in it.  I'm glad to have one of these in the fleet and it will be both fun to play with as well as a helpful troubleshooting tool should I come across machines of this type that need service in the future.

Macintosh Portable - Power Supply Recap for M5136

 I've been working on a couple of Macintosh Portable repairs for a friend.  While doing this, I've been doing alot of reading on the forums, see this excellent compilation of threads on troubleshooting the Macintosh Portable on 68KMLA.

I've been fortunate enough to get the M5136 Power Adapter with my portable.  From my understanding, it's important to use this adapter and not a replacement because the power management circuit in the Macintosh Portable relies on the 1.5 Amp current limit that this power supply has, a replacement power supply with a higher current limit may work in the short term but can damage the Portable over the long term.

So, I had two challenges to getting the recap of this power adapter done, how to get into the case without dremelling or totally destroying the power adapter housing, and the second too get the capacitor values.

Getting inside was no problem using the technique demonstrated in this video.  The video shows the PowerBook 100 series adapter, but I can confirm that the Macintosh Portable is the same, and the technique works flawlessly.

The second challenge was getting the capacitor values off the board.  I'm not aware of another resource online for getting this information, please let me know in the comments if you have another resource.  In the meantime, I hope you find this guide helpful.