I recently spent some time restoring a Macintosh SE. I got this project after someone had stalled out on it, and the machine came to me "complete" but disassembled in a cardboard box...

There was a note from the previous owner that stated "works, needs caps. Bong, but with thin vertical line on screen", so I skipped troubleshooting and started in with the cleaning. The machine was filthy, not as bad as the "barn find" Apple II+, but dirty enough that it would have been disgusting to work on without some major cleaning. I took all the metal parts of the chassis off from the plastic parts and washed everything that would fit in the dishwasher, including the Logic Board. I haven't ever tried dishwashing the analog or power supply boards as I think bad things might happen to the transformers. As would be expected the parts came out looking much better. As a side note after a particularly nasty job like this I run an additional cycle on the dishwasher with it empty to make sure all the "computer water" is flushed down the drain before we put stuff that we eat off back into the dishwasher again.
I manually cleaned the CRT and the analog board with paper towel toothbrushes and lots of IPA, avoiding the deflection coils which I clean using compressed air. I reflowed the flyback connections on the Analog Board and many of the other joints on the board as well, and repaired a few broken items (loose molex connector, problems with the fan).
During this repair, I had the luxury of having another SE machine at hand as I was recapping it for a friend. This machine needed only to have the Logic Board recapped and it was in much better condition than my machine and so I was able to swap known good parts onto my machine. I determined that the Tube itself was still good and that my Logic board was working as expected, so it was good to eliminate at least a few components from the troubleshooting. But the Power Supply / Analog Board combo was not working.
The next item on the list to address was the Power Supply. I measured the supply, and the +12 Volt rails were at about 9 Volts, which I guess is typical for these when they need a recap. I did the recap, but as I was doing it, I noticed dark brown marks (burns?) on the Power Supply circuit board. After the Recap, the voltages on the Power Supply didn't come back. I checked and rechecked capacitor orientation and other things, but decided that with the burn marks, my confidence would not be high in any repairs that I could carry out, so I decided to replace the supply with a modern supply that would fit inside the housing. In hindsight, I should have gone out in the forums to ask but I did check in afterwords and discovered some interesting insights. With my cheaper, but possibly sub-optimal Power Supply replacement in place, I was ready to pivot back to some testing. I connected up all my parts and on power up, observed this screen...

The white line seems to indicate that the Horizontal Deflection isn't working correctly. This of course is on the Analog Board, so I decided it was time to recap that. I made an attempt to find a capacitor list for the Analog Board online, but I was not able to find one and had to make my own. I had trouble finding a couple of the specific values and didn't realize that one of the critical ones (C15) is a Non-Polarized type Electrolytic Capacitor, so that put the project on hold for a week waiting for two different batches of parts to arrive from Digikey. Once I got the Analog Board recapped and put the system back together, I was greeted with this very gratifying sight...
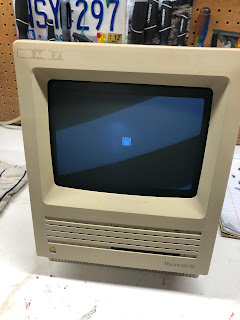
The machine was coming back to life!
The next order of business was to work on the Floppy Disk drive. At the beginning I'd done a very quick service on this drive, but the mechanism was still not moving smoothly on eject, so I went back and watched this video from JDW and followed the steps more closely. I did end up having to borrow the eject motor from another drive to get this one working, but I'll order some of those gears that JDW mentions to get this other drive back in order.
So, now the Mac SE has a floppy to boot from. I also installed an internal storage device, plugged in a SCSI Zip Drive on the back and started copying files into the machine. All was not well, thought. I didn't know it, but I don't think I'd found the root cause of the burn marks on the Analog Board and the reason for the overheating in the original power supply. The screen went black during a file copy operation, and I discovered afterward that Transistor Q2, part of the Horizontal Deflection had gotten very, very hot. I tried replacing this transistor, but alas, that was not the root cause and I was quite frustrated and put the project aside for a while.
I mentioned the struggle I was having to a friend in the retro community and he offered an SE analog board that had a damaged POT on it. I jumped at the chance to be done with the old Analog board, swapped that, and the SE was back to life again. Long may it live...

So, in hindsight, not the smoothest repair I've ever completed! The Power Supply recap was a failure, but I learned that multiple modern alternatives exist. The Analog board recap was also a failure as I was not able to discover the root cause of the burn marks and cascading failures, but sometimes we learn more from failures than we do from easy wins.
This is the first of the SE generation of Mac that I have (I have several of the previous original generation, and one Classic II), I upgraded the SE to the maximum 4 MB RAM and put a 100MB HDD in it. I'm glad to have one of these in the fleet and it will be both fun to play with as well as a helpful troubleshooting tool should I come across machines of this type that need service in the future.


