Showing posts with label Disk Imaging. Show all posts

Epson QX-10 - One of the Last CP/M Machines

The Epson QX-10 is a sleek looking design from the early 80's.  It is from the tail end of the CP/M Era and it's a really neat looking machine.  My experience with the QX-10 started when a friend was demonstrating his at a local Retro meet up hosted by Free Geek.  It turns out he had a second machine in need of repair and since he's already got a very nice one, I was able to acquire that second machine from him, thanks again, Steve!

I started working on this in the Fall of 2025 when I acquired the machine.  There was no cable included to attach the custom CRT to the base unit.  This cable brings both power and signals from the base unit to the CRT and so it's difficult to begin testing without that.  There is a replacement cable avaliable online, so I ordered one of those.  With the cable installed I could see that the machine was powering up to the "Insert Diskette" prompt.  This is a very good sign because it means that the processor is running and whatever diagnostic checks are built into the ROM are passing.

As with most CP/M machines that don't have a hard drive the A drive is used constantly to boot and run the machine, so the A drive often needs special attention.  This machine was no exception.  The floppy drives were manufactured by Epson themselves.  In order to maintain the sleek form factor of the machine they made these drives 1/3 height, not a standard 1/2 heigh drive, so these can not be easily replaced.  Knowing this I took my time removing the drives and cleaning and lubricating the mechanisms.  They were so jammed that I could not even insert or remove floppy disks from the mechanism.  With the floppy drives working, I could move on to the next phase of the repairs.

I made some floppy boot disks using my flux disk imaging setup that I've discussed before, but unfortunately my normal workflow did not work because these machines have a very unusual disk geometry so the first round of disks I created were not able to boot the machine properly.  But I did get far enough to type characters in to the screen and this is when I noticed the next challenge, the keyboard was not working.

This keyboard, the Epson Q603A, is a special one designed for the word processing software called ValDocs.  There is some good information on Deskthority about the keyboard.  This is a foam and foil keyboard, so I was not concerned because I've repaired several foam and foil boards over the years using the replacement kit from TexElec.  However, sadly, this board used a prototype switch with a much lower profile of foam and the normal replacement pads would cause the switches to remain pressed all the time.  I emailed TexElec about this and I was very happy to learn that they were already working on a low profile foam pad.  I got a set of these and installed them and the keyboard is working again as expected, one more step closer to getting this machine back on the road.

At this point because of my problems getting booted up and not have known good boot disks I stalled out on the project and set it aside.  But within a few weeks I saw a relevant post on the Vintage Computer Federation forums where I hang out, so I chimed in on there.  I received some great feedback about my disk imaging problem from one of the members there and I was able to create some new boot disks using a different starting point.  These boot disks worked and I could see that the Epson was fully booting up into an operating system.

Unfortunately, as often happens with Retro Computers, just when we think a project is ending, something else broke.  The CRT display starting rolling and I couldn't get the video to stabilize.  This CRT has only one adjustment for brightness on the outside so I took the case off to get inside.  I went through all the potentiometers on the circuit board and put Deoxit Fader Lube on them and cycled them back and forth.  I also did a careful inspection.  I was not able to identify anything wrong. After plugging everything back in it started working again.  I think there may be an intermittent connection with one of the sync signals so I'm going to try to isolate that to the Monitor side or the Computer side and maybe reflow the solder joints on those circuit boards.

But for now, the machine boots and runs, and it's time for me to explore one of the last and most modern looking of the CP/M machines.  I'm really glad to have this machine in the collection as it very much has the look of the era it came from...

Did you use CP/M back in the day?  Do you have memories of the Epson QX-10 or the Valdocs software?  If so leave a comment below, or drop me an email at my address in my profile, I'd love to hear about your experiences.

Wang Professional Computer from 1984

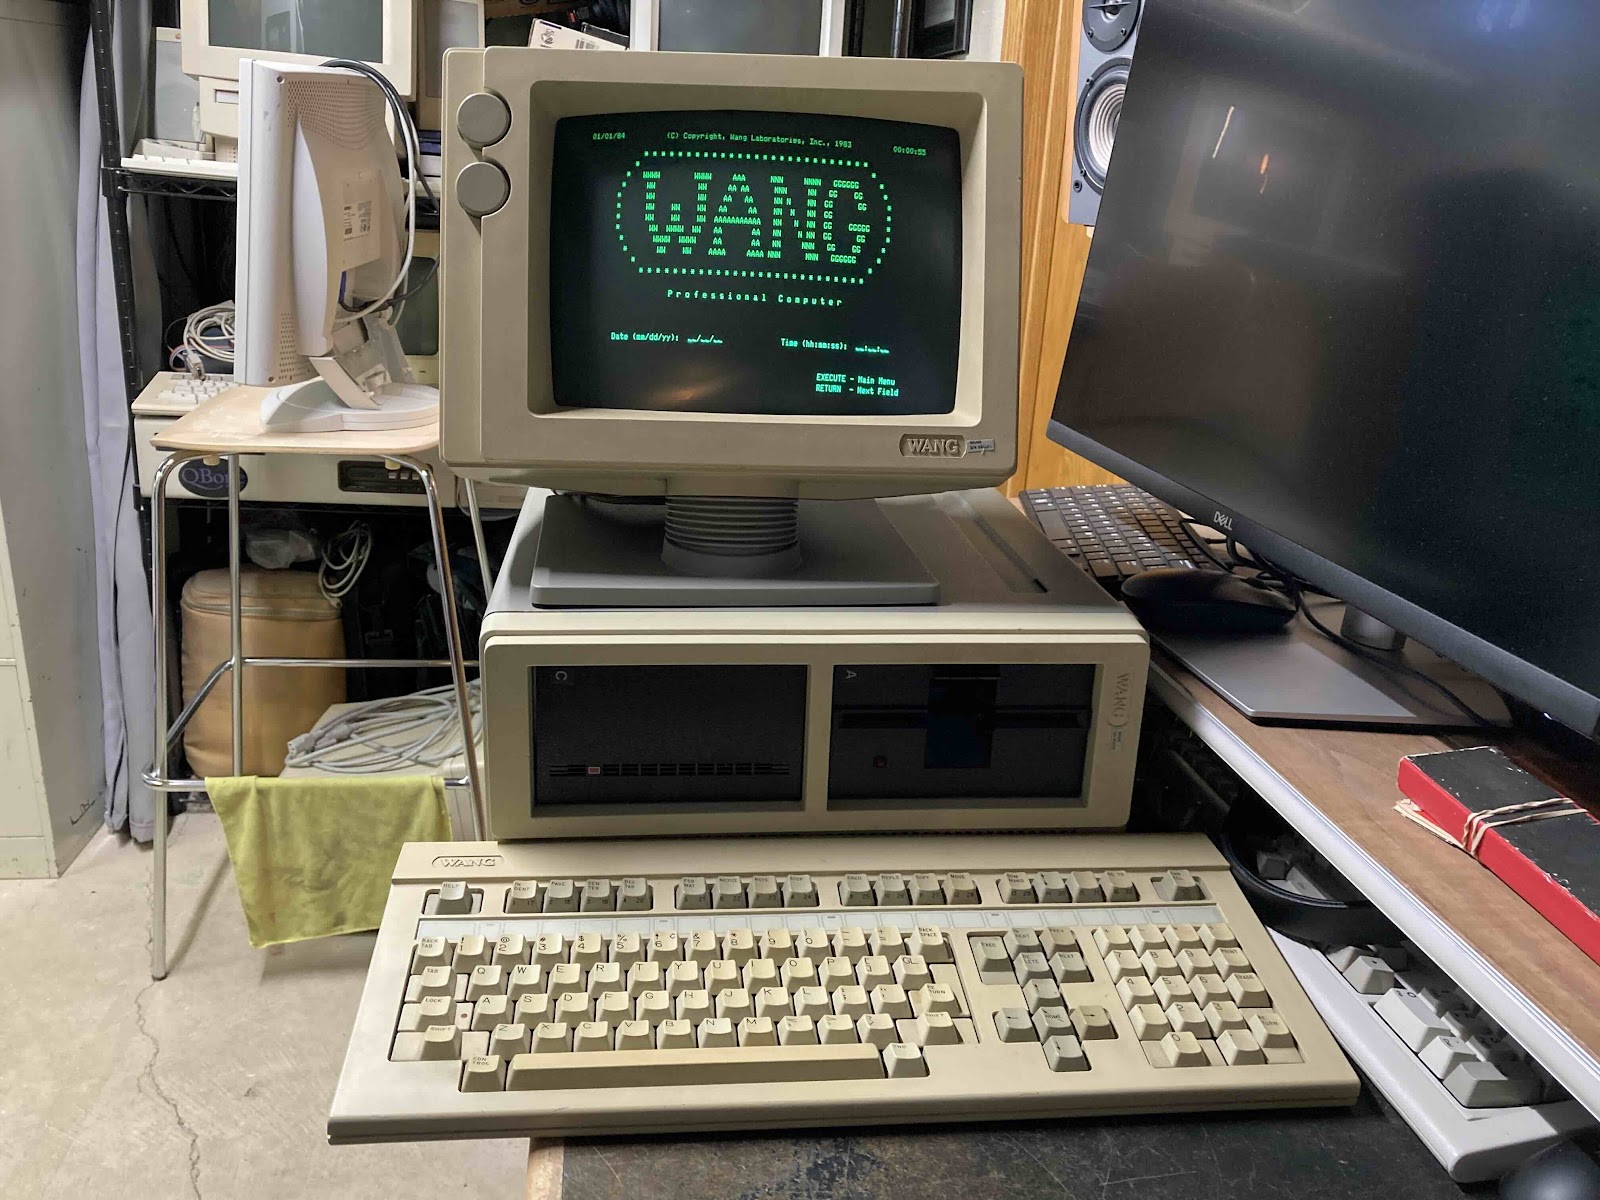
 At the end of last year (Dec 2024) I was browsing Facebook Marketplace and saw a somewhat interesting computer that I had never heard of before, a Wang Professional Computer (Wang PC).   I've been interested in Wang since learning about the history of the company founder, An Wang, and his contributions to the history of computing.  He was involved in the development of Core Memory, and was able to use the funds from the sale of that invention to start his computer company Wang Laboratories.

I was interested in the Wang PC but did some research before buying it.  Because this is not IBM PC compatible, you need the custom Wang Keyboard and a custom monitor to use this machine.  The Facebook listing included a Keyboard but not a Monitor.  I was going to take a pass on the machine, but the seller lowered the price to the point that I could not refuse. 

I took the Wang PC apart and did some light cleaning and dusting inside of the case.  The computer appears to be in good shape.  Then it went up on a shelf in storage waiting for a time when I could find a matching CRT at a reasonable price.

Fast-forward 4 months.  I had a saved search for Wang CRT monitors on eBay, and a compatible monitor appeared.  I got the Wang PC down and tested it out to see if the Power Supply was working and if the computer was showing any signs of life without the monitor.  The computer did appear to be working, at least as well as I could tell without a monitor, and I thought it was even booting from the internal Hard Drive.  So I ordered the specialized CRT from eBay.  I was a bit nervous becuase the screen was not guaranteed to work.  But the seller did a great job of packing it and it arrived intact.

I was super happy when I powered the system up with the monitor for the first time and it worked!  Then only a few seconds later, the CRT's horizontal sweep collapsed to a vertical line, what a bummer...


Thankfully I have been able to fix simple CRT problems in the past so I took the monitor apart and started troubleshooting.  I was not able to find a service manual or a schematic, but the circuit board was well labelled.  That is about the best I can say about the circuit board.  When I started removing components to test out of circuit I damaged several traces as they were not stuck to the board very well.  It took me quite a few hours over a couple of different evenings to get the monitor working again, I never did identify a bad component.  I did reflow most of the solder joints on the monitor board so it was likely a cold solder joint from vibration or old age, or the low quality of the circuit board.  Either way the monitor is working again and the Wang PC is usable!


But, then I encountered the next issue, the keyboard was not working well.  I did get a few key presses to register but most of the keys didn't work at all.  Then the ones that had worked stopped working, too.  This was not a huge surprise as I had already read that this was a "Foam and Foil" type keyboard.  I've restored a couple of other brands of these type using these pads that are sold by TexElec so I got another set of those on order and prepared the keyboard by taking it all apart, removing the old pads and doing a through cleaning.  After replacing all tbe pads I did some testing and then fully re-assembled the keyboard.  All the keys appear to be working and I'm quite happy with how it turned out.

Once the keyboard was complete, I was able to explore the computer and see what files were present on the hard drive.  The 10MB hard drive is about 1/2 full.  The drive appears to be working well, it's not making any unusual sounds so that's good.  One interesting feature of the machine is a simple menu that starts up on boot, it allows the user to move around without typing any commands to start programs and move files around...


This machine has the Wang Word Processor installed.  Wang was famous for this.  They had dedicated hardware just for word processing in their previous generation of hardware, which you can see covered on Usagi Electric.  Although my machine is a General Purpose computer, Wang Word Processing is just about the only software installed on this machine.


I tested the Floppy Drive a bit, and it did not seem to be working correctly.  It was functional for a little while, then stopped working.  I took the machine apart and did some cleaning.  I re-seated connectors but there was nothing obvious wrong with the drive.  When I re-assembled in, the drive started working!  I was able to boot the machine from Floppies I had made from Drive Images I found on WinWorld.

And with that repair, the Wang PC is functionally complete!  I'm very happy to have this system.  It will go nicely with my other MS-DOS compatible machine, the Tandy 2000, and maybe this will motivate me to work on another MS-DOS system I've had in storage for a while, a Zenith Z-100 system.

Kaypro - An Iconic (and Nostalgic) CP/M Machine

Kaypro computers have long been nostalgic for me.  My grandparents had a Kaypro and I remember thinking how impressive of a computer it was.  Very rugged and industrial compared with my VIC-20 connected to a color TV.  I was recently offered a Kaypro from a trusted seller whom I've done business with before and I was most happy to be the next owner of a Kaypro 2X from 1984.

The naming of the Kaypro model numbers is a bit odd, but if you are interested, this article explains the timeline quite well.  The 2X is one of the final machines, but they all looked quite similar to the rest of the line.  I think they may have used the same case dimensions through the entire run of models.  From the outside, the distinguishing characteristic of the later systems is the 1/2 height drives instead of full height.  

My repair story started with finding and reading the relevant sections of the technical manual from BitSavers.  The first problem to overcome was that the CRT display was not working.  You could see that the tube was working, but the display was rolling.  By figuring out which of the three CRTs (Toshiba) was inside, I was able to locate the adjustment Pots and get the display solid.

The next challenge was to get the Kaypro booting.  I didn't have any Kaypro media, but as readers will know I've got a SuperCard Pro flux disk imaging system.  I've recently figured out a new workflow for that which has allowed me to create bootable disk images for several different retro systems, including the DEC VT-180 Robin and now this Kaypro.  Here is that workflow at a high level:
    Find Appropriate Bootable Disk Images for the Target System
    Use HxCFloppyEmulatorSoftware from this page to convert Disk Images into Flux Image Files
    Use Flux Imaging Tool to write out Floppy Disks, in my case SuperCard Pro.

Once I had floppy disks I was ready to try booting the machine. Sadly the unique push-button floppy drives in the machine were not working. Neither drive would eject a disk.  In the short term I was able to find a working DS/DD 5 1/4" drive from my parts bin that worked with the Kaypro.  Jumpering this as Drive 0 I was able to see the machine boot into CP/M for the first time.

Next on the agenda for the Kaypro was a through cleaning.  This was a dusty and dirty machine, both inside and out, but like many of the 80s systems, it was quite easy to take apart all the way down to the board level, so I did this both for the computer and the keyboard.  I washed the housings with warm soapy water and set them aside to dry, then cleaned the circuit boards w/ Isopropyl Alcohol, including the power supply, the analog CRT board, and the logic board.  I also removed the keycaps and washed them, and spent some time cleaning up the switch deck of the keyboard.  I did not try remove any of the switches as all the keys appear to be working on this machine!  I wonder if the enclosure design keeps dust out of the keyboard?

Part of the cleanup process was to return to the two floppy drives.  These were unique mechanisms, Epson SD-521 drives.  Like so many times before, the forums have been quite helpful, and I got some good advice about the cleaning.  After cleaning and lubrication, one of the drives is working well (it was previously the B drive, so maybe had fewer hours on it?).  I was able to get the previous A drive ejecting again, but there is a problem with the drive motor which I was not able to easily troubleshoot, so I've set that aside for now.  

As I was troubleshooting, I made an interesting observation about just how small CP/M even when compared to DOS 3.  One of the floppy drives I was troubleshooting was having trouble w/ the head stepper motor but if I manually pushed the head back to Track Zero (on the outside of the disk), then when the computer would successfully boot into CP/M and even give the Directory listing (DIR).  Trying to load a program would lock up the computer since the heads were not able to move to the correct position.  So this is another drive that I've set aside for now.

The machine doesn't look perfect since the two drives are not an exact match, but I'd much rather have the second drive functional than have it look nice but not work correctly.  The final results for now are shown below...

I'm quite pleased with how it turned out.  The highlight so far as been playing a text based Pac Man clone called Catchum...

It's surprising how much fun a text based arcade game can be.  The Space Invaders clone, called Aliens also looks like it would be fun, but there's a problem with the keyboard mapping for that game, so it isn't working on the Kaypro 2X.

Do you have any memories of the Kaypro computer, or suggestions about software to run on it?  If so, please let me know in the comments below.

Epson Equity LT - An XT Class Laptop - Flash Storage Solution

As readers of my blog will know, I have a bit of a soft spot for XT class machines with the Intel 8088 processor and similar processors.  One of my first retro computers was the Compaq Portable from 1983.  My friends at Free Geek know this about me, and so I'll occasionally get a machine from them that needs help.  I recently got a Toshiba 3100 machine from them that matched up well with some machines that I helped my friend John with, a couple of those Toshiba machines appeared in this video on his channel.

Anyway, the latest acquisition was an Epson Equity LT machine from 1988.  This make it a "later" XT machine, and instead of a gas plasma display, this has an early monochrome TFT display.

I tried quite hard to get a hard drive going in this machine.  After reading this article about the somewhat proprietary XT Laptop based Hard Drive interface, I even went as far as pulling the Hard Disk out of the Toshiba 3100 which has a bad screen and trying to transplant it into the Epson Equity LT, but I was not able to make this work.  The Epson does spin up the disk, so it worked better than the totally dead drive that I started with, but I was not able to get past a drive error.  I looked for information about a low-level formatting the drive, but that is either not possible or just not documented.

However, I have found what I think may be a better solution in the long run because it's a more generic solution that will apply to other XT class laptops or luggables as well.  I installed a GoTek floppy drive emulator with the Flash Floppy firmware into this machine.  Once the Hard Drive is removed, it's easy to move the original "A" drive over to the left side of the machine and use it as the "B" drive, installing the GoTek as the "A" drive.  Using another computer, I setup a new low-profile USB Flash Drive with 720K Disk Images on it.  One of these disk images has DOS 5.0 and another has DOS 3.3.  Most of the disk images on the floppy have games on them.  These are early DOS games that run in CGA graphics mode, like Alley Cat, Burger Time, Avoid the Noid, and titles like this.  I also created a boot message on the DOS 5 (default) boot drive that lists out which programs are stored on which floppy drive so you don't need a list of Floppy Numbers if you are using a basic GoTek like this one...

I'll include a link to the contents of the USB Flash Drive that I've uploaded to the Internet Archive.

A couple of other "longevity" upgrades included installing a new 3.6 Volt Lithium battery for the realtime clock and permanently removing the main battery that was installed in the machine.  This machine will just be used for demonstrations with power and it's one less thing to worry about.  As an added bonus with the battery, hard drive, and drive controller removed, the machine is alot lighter!

With the low profile USB drive installed, I plan to leave this machine setup and ready to go.  Now I just need to find an old laptop bag that will work for this monster!

SuperCard Pro - For Disk Imaging and Drive Repair

Disk Imaging

One of my interests in the Retro Computing hobby has been software preservation.  Trying to recover data off some of my wife's old floppy disks from her college days sent me down a path that's gotten me to the point where I own several different Macs and PCs from the 90s that I use as "Bridge Machines" to get data moved off old floppies onto modern hardware.

I'm also interested in a range of different systems and in having the ability to make and restore disks of any format.  I became aware of the Kryoflux disk imaging system when reading on Sonic Purity's blog on this article that I've referred to in several bLog articles before.  I didn't pursue the Kryoflux because this solution was expensive and because I didn't understand floppy disk technology well enough to be comfortable with flux imaging.   Thankfully this knowledge gap can be easily addressed by a great deal of information on the Web, and since then I have put more time into researching this topic.

One of the few benefits of the Pandemic has been that all the Vintage Computer Festivals have been online.  I learned about Jim Drew's SuperCard Pro from watching Craig Ernster's presentation. at VCF Midwest 2020.  This device is significantly less expensive than Kryoflux.  I didn't buy one right away, but when I got my first CP/M machine and didn't know how, or even if I'd be able to make floppy disk copies with the machine I put one on order.

I've paired the SuperCard Pro with the Asus laptop I use as my retro computer engineering PC and set up a couple of floppy drives, both a TEAC 5 1/4" DD drive as well as a newer 3 1/2" 1.44MB floppy drive.  I have stored these items together so it doesn't take long to have the disk imaging solution up and running on the bench...


So far, I have imaged and restored boot disks for my Compaq Portable (360K Floppy with DOS 3.3), and that worked well using a preset in the software.

Also I've imaged and restored boot disks for my Megatel Quark 100 CP/M computer, again, using a CP/M preset in the software.

Drive Repair

The Super Card Pro has also been helpful for drive diagnostics and repair.  It has a separate screen  for Drive / Disk Utilities.  This allows you to control the drive motor and also the track steppers that move the heads back and forth.  As you can see in some of Adrian Black's videos, having separate control over these two drive functions can help when lubricating and troubleshooting drives that haven't run for a long time.  Using these features of SCP, I've been able to troubleshoot these issues:

Drive Motor Speed Adjustment
Index Sensor Good / Bad
Track Stepper Motor Position
Track Zero Sensor Good / Bad (the Disk Media Test will fail if the Track Zero sensor is not working)

When comparing the functions of the Super Card Pro with IMD, I believe that IMD could also be used to diagnose all of these scenarios, but I find the SCP interface a bit easier to navigate.  One gap with SCP, I have not been able to adjust drive alignment with this tool.  I think the IMD program is the only (easy, non oscilloscope) way to do that.

My latest drive repair was getting a pair of Magnetic Peripherals Full Height DS/DD Drives back up and running for my IBM 5150.  Although these drives are now fully functional the alignment of these drives doesn't match up with the other 360K drives that I own.  Drive alignment is still outside of my comfort zone, but I'm hoping to learn more about that soon so I can get the various drives I own back lined up with one another.

Starting the New Year Right - Macintosh 512K - Part 2

As I mentioned in the last bLog post, I've recently become the next owner of a Macintosh 512K computer.  One of the first things I'd do with most of my Retro Computers is figure out how to get some kind of Flash Storage solution going for the system, but my goals for this system have been somewhat different.

One of the main things I was hoping to get out of this was experience and a workflow setup for creating bootable Single Sided, Double Density (400K) Floppies for the earliest Macs from Disk Images.  That's been an ongoing interest of mine, and one I've bLogged about before a couple of times.

I've had good success in the past creating 1.44 MB and 800K floppies for Mac OS installers from disk images from the Internet, using a Beige Power Mac, but I was really struggling with 400K disk images.  You can find disk images on the Internet and suggested workflows, but I was not able to use any of the downloaded disk images I could find with Disk Copy 4.2, as the resource fork from these disk image files had been stripped and the files were no longer useable with the older version of Disk Copy.

Then I remembered my FloppyEmu.  These are a bit expensive so I have only one, and usually have it connected to an Apple II computer.  Moving it onto the Mac requires that the firmware be re-programmed, it's not a huge task, but I usually avoid it.  At this point, I could avoid it no longer and I'm glad I didn't because it ended up being exactly what was needed.

As a test, I started out with my Macintosh Plus because I can boot it from SCSI2SD and I have a large range of OS choices, for this, I choose 6.0.8 because it's got good native support for the 400K disks, so the disks I'd image would be immediately readable and testable on the disk imaging machine.

I started out with Mac II Disk v. 5.2, and used the settings shown here...

I apologize for the scanlines on the screen, but to summarize, we are doing a single-sided, sector by sector copy from FloppyEmu too the real internal floppy drive.  This worked great, and how I have a floppy disk set with Mac OSs from 1.1 up to 3.3 on 400K floppies that work great in the 512K.

However, this method isn't perfect because it requires the use of the FloppyEmu each time.  (as I've mentioned, I prefer to leave this connected to an Apple II).  So, I fired up Disk Copy 4.2, and used it to grab backup copies of the disks from FloppyEmu as .image files, with correctly formatted resource forks.  I have these files safely backed up to the cloud, as well as ready to go on my disk imaging rig any time additional floppies are needed.

These are all files that ship on FloppyEmu, just in a different file format that should work with the workflow I've described.  If you have any comments, questions, or feedback about this workflow or the files, please let me know!

Using Bootable Floppy Disk Images from the Internet to make Actual Floppy Disks

I’ve recently made some interesting discoveries that I thought may be valuable to other fans of the early Apple Macintosh Computers.

I had an interesting conversation about running some old Macintosh software that was pre System 6.  This era of Mac was before my time and so an interesting challenge.  Of all the early Mac system software disks out there, I think the best organized collection is currently on Winworld, here.  These files work great with the vMac Mini emulator running on a modern Mac, but when you move the files back onto a “Rosetta Stone” Mac in order to build boot floppies, the files are not associated with Disk Copy (the resource fork is missing, and Disk Copy does not recognize the files as disk images).

In the past, I have had some limited success in finding StuffIt (SIT) archives and bringing them onto the bridge machine before un compressing them, that way if the resource fork was intact it will be maintained, but unfortunately a lot of the files on Winworld are missing that information.  Up to this point I had been deleting these versions of the files and moving on to try to locate different sources of the files.

Today I learned that there is another good option.  The vMac Mini folks have created a set of utilities that can be used on OS9 and early versions of OSX to recreate the resource fork for a disk image if that information is missing.  The part of the tool that’s most relevant to vMac Mini is used to indicate that the file should be opened in vMac Mini, but they also created a tool too associate files with Disk Copy.  This utility is called SetFType and is avaliable here.

Normally I used OS 8 or OS 7 for disk imaging activities, but unfortunately this utility requires OS9, so the process I used was this:
Put the files I wanted to use on ZIP drive using the modern Mac, 
Boot my Bridge Mac up in OS9
Run the SetFType utility on the files on the Zip drive
Reboot to OS8 and copy the files over onto the Bridge Mac
Create Floppies using Disk Copy 6.3

Using this technique, I’ve been able to create boot floppies for System 3, the earliest version that will boot on the Macintosh Plus, and to get my Macintosh Plus running System 4, which is the earliest version that will support large 2GB SCSI partitions.

Other than running some very old versions of software that will crash on System 6, I’m not sure how much use I’ll get out of System 4, but it will be interesting too understand more of the history of these early systems.

Moving Data using a "Rosetta Stone" Macintosh

As you may have read in my previous article, I have a Power Macintosh 8600 / 200 that is a "Rosetta Stone"  Mac, which I will refer to as a Bridge Mac in this article.  For background about this machine, please refer to the article "My Adventures with Classic Macintosh Hardware - Part 1".

As we left things in that article, the Mac was booting OS 9.1, the last major supported version of Mac OS that will run on that hardware.  Since then, I've discovered through some more careful reading that if I were to get System 7 running, I would have access to more of the original 400K mac floppy disks in the collection.  This was the beginning of my quest to install System 7 on the 8600 / 200.

Being that the computer already has a SCSI2SD adapter, it's quite inexpensive to swap system drives.  Finding a System 7 installer CD that was compatible with the 8600 was more of a challenge.  I tried several disk images before I found one that the computer would boot from.  In the end, the Apple approved System Installation disk for the 8600 and 9600 for Mac OS version 7.6.1 was found here...

The next challenge came because with the SCSI to SD adapter, you cannot easily power off the machine, pull the SD card, and write files to it with the modern Macintosh.  With the SCSI2SD we must find another drive that can be installed in the Mac while it is running either System 7 or Mac OS 9.  I was extremely fortunate because this Mac already has a Zip Drive.

I was able to get a USB Zip drive for my modern mac from my local Free Geek store in Minneapolis, one of my favorite stores!  Once all the hardware was here and in place, I was hoping that I could move files from System 7 directly to my modern Mac in one jump, but the Modern Mac OS (10.14 Mojave) has read only access to "Standard HFS" disks.  So this single jump method will work for migrating files from old too new, but not the other direction.

The more modern HFS Plus file system drives are read write in the Modern Mac, but they seem to work better if you use the old machine to format the drives, then verify access on the modern mac.

There is some information on the Internet about "Puddle Jumping", but it took me some time to realize how to do this.  Although it seems obvious now, I'll cookbook this in a bit more detail in case it will help others.  Here's what I did do to get files transferred From the Modern Mac OS X (Mojave 10.14) machine back to the Bridge Mac running System 7.

Setup Procedure:
  1. Start the Bridge Mac in Mac OS 9
  2. Format one of the Zip Disks Standard HFS
  3. Create these folders on that Zip Disk
    System 7 -> Mac OS 9
    System 7 <- Mac OS 9
    System 7 -> Mac OS X
  4. Format another Zip Disk as HFS Plus
  5. Created two folders on this Zip Disk:
    Mac OS 9 -> Mac OS X
    Mac OS 9 <- Mac OS X
  6. On the Bridge Mac HDD (Mac OS 9 System), create folders to store these files since only one Zip Drive will be plugged in at a time:
    System 7 <- Mac OS X
    Mac OS 9 <- Mac OS X
    Mac OS 9 -> Mac OS X
  7. Insert the HFS Plus Disk in the Zip drive attached to the Modern Mac
  8. Verify write access to the HFS Plus disk

Now we have the tools in place, we can begin moving files from new too old (the more challenging direction).
  1. Prepare all the file data on the Modern Mac computer.
  2. Insert the HFS Plus disk into the Zip drive on the Modern Mac
  3. Copy the files from the Modern Mac to the folder "Mac OS 9 <- Mac OS X"
  4. Eject the Zip Drive from the Modern Mac
  5. Start the Bridge Mac using the system drive for OS 9
  6. Insert the HFS Plus Zip Drive into the Bridge Mac
  7. Copy the files from the Zip folder "Mac OS 9 <- Mac OS X" to the HDD "System 7 <- Mac OS X".
  8. Eject the HFS Plus Zip Drive and Insert the HFS Standard Zip Drive.
  9. Copy the files from the HDD Folder "System 7 <- Mac OS X" to the folder on the Zip drive called "System 7 <- Mac OS 9"
  10. Shutdown the Classic Mac
  11. Swap the system drive from OS 9 to System 7 and Restart
  12. Move the files from the HFS Standard Drive folder called "System 7 <- Mac OS 9" to the appropriate folders on the System 7 HDD and enjoy access!

I hope these instructions may be of use.  Please leave a comment below if you have suggestions to improve this article, or if you want to share your experiences moving data back and forth off Retro Mac hardware.

Update:

If you only need to use the Bridge Mac to copy data from HFS Standard disks to HFS Plus disks, use Mac OS 8.x. This version allows read and write access to both disk types and can save some hassle.