Building a "Terminal" out of Retro Parts

As I work my way back in time in my Retro Computing journey, it's time for me to get a Terminal.  Ideally I'd like to get a VT-320 as this is the interface that I remember using most frequently during my college years to access the DEC Vax systems in the computer labs.  These labs were filled with 30-40 terminals each and were large enough for lab classes to meet with everyone logged into the Vax at the same time, or to use for programming assignment when classes were not in session.

As interest in retro computing has risen, so have the prices of these terminals, with these "newer" 20 year old terminals selling on eBay around $300, sometimes without keyboards that could cost another $50 to $100.

What is a retro computing hobbyist to do?  I encountered a suggestion on a kit building website about directly attaching a display and keyboard to a Raspberry Pi and remembered that I still had a few RPi's in storage from projects that I'm not using any more.  What followed is this:


This "Terminal" consists of an early VGA Monitor (640x480 only, not multi-sync), and a nice Omnikey 101 keyboard which I have previously covered on the bLog.  Here's what I did to get the retro monitor and keyboard working with the Pi...

I started with the current base image of Raspberry Pi OS (32-bit, lite version).  I'm running this on an RPi 2, since that's what I had around, but I did want WiFi connectivity so there's a dongle plugged into a USB port.

I plugged the Pi in with a modern USB Keyboard and HDMI Monitor to start, and used raspi-config to setup the networking, enable ssh, change the password, and get the display configured.  Using the information from this article, I set the display resolution to DMT 640x480@60Hz.  After restarting the Pi, I double checked the image resolution and it was indeed lowered to the required resolution.

After checking that, I was able to connect the Keyboard with a PS/2 to USB adapter that I had laying around.  I don't have a model number but if you use a Northgate Keyboard I'd recommend reaching out to Bob @ Northgate Keyboard Repair as I've heard that these keyboards can be somewhat picky about which adapters work well.  Once the keyboard was tested and working with the Pi I moved on to the Retro Monitor.

In order to plug the VGA monitor into the Pi, we need an HDMI to VGA adapter, these are commonly used to connect laptops with old projectors so they are still available.  I used an Inland brand I had around, but I've also ordered a couple of replacements on Amazon here that I will test when they arrive.  Plugging this in, it worked right away.  It's so fun to see the colorful Raspberry Pi Boot menu on this late 80s / early 90s combination of hardware!

Here's a list of the hardware in the build:
    5 Volt Power Adapter (not shown)
    Raspberry Pi 2 w/ Case
    WiFi Dongle for RPi
    Inland HDMI to VGA Adapter Dongle
    PS/2 to USB Keyboard Adapter Dongle
    VGA Monitor w/ Cords
    PS/2 Keyboard w/ Cord

And a picture of what the connections look like at the back.

Longer term, I might add a Serial Port for attaching to other Retro Computers, but my immediate use case is for a kit that I've ordered with emulation running directly on the RPi, so this Pi will be removed from its case and transplanted into that kit when it arrives.  I'm sure I'll be blogging about that when the time comes, so stay tuned!

Do you have an old terminal system, or good memories of using these systems back in the day?  Let me know in a comment, or feel free to drop me an email.


NeXT Megapixel Display N4000A Repairs

 As you may have seen previously on my blog, I'm fortunate to be the custodian of a NeXTStation setup that I purchased at last year's Vintage Computer Festival - Midwest.

Since blogging about that machine, I've recapped the mainboard, added an External SCSI CD-ROM so I can load software the old fashioned way, and upgraded the Hard Drive to a 2GB Quantum Fireball (Fingers crossed, it's still working!).  One outstanding issue with the machine has been that the audio on the monitor has not worked since I owned the machine.

According to this article, on the nextcomputers.org forum, it was likely that a circuit board in the monitor need to be recapped.  I finally got the time to tear into the monitor and have a look.  What I found surprised me, and so I thought I'd put this out here for the community so you can potentially avoid these pitfalls.

First let me start with the obligatory warning about working inside of CRTs.  I recommend you not do what I've done. If you do decide to go ahead, then watch a video or three about how to properly discharge a CRT before you work on it.  OK now that that's over with...

First, it was pretty easy to tear down the monitor, but I did make a mistake along the way removing the stand from the bottom of the monitor.   You don't need to do that, and if you do release the tension on the monitor stand's hinge, it's difficult to get that back in adjustment, so I'd recommend that you not remove the stand or mess with the hinge.

The back comes off with four Allen screws...


This exposes the old school RF shielding.  I'd recommend putting this back on when you are done (I'm looking at you Adrian Black).  The shielding is held on by four screws on one side and five screws on the other, they are all the same length.   When they are off, the housing comes back just a bit to release from some tabs, then can go straight up off the monitor...


This exposes the entire CRT and both boards.  Now would be the time to discharge the CRT if you were following along, which of course you are not because this is dangerous...


The main circuit board cover the back of the monitor, but the sound board is on the bottom of the enclosure.  It cannot be removed without taking the electronics off the chassis, but this is pretty easy to do.  

On the bottom of the monitor, there are two large screws that hold the electronics portion of the chassis onto the sub-frame that holds the tube and the stand.  Removed these two screws...


Disconnect all the cables from the tube, including the high voltage, the yoke, and the tube socket at the end of the tube.  Once they are disconnected, the rear of the chassis with the electronics on it can be pulled straight back.  It may be easier to pull it back just an inch to get your hand in to remove the socket from the end of the CRT.  Once all the wires are de-routed the electronics are more accessible...


The large circuit board must come off the back first before the connector board with the sound circuit can be removed.  There are two connectors going from the large board on the back to the small board on the bottom, remove those.  There are five screws holding it in.  Remove the screws and set the large board aside.  Note:  I did a careful inspection and some cleaning on this board, but I did not see any of the small electrolytic capacitors on this board, so I didn't do any recapping on this board at this time.

The small circuit board is held in by two screws inside, and two nuts on the outside of the enclosure where the cable attaches, remove those...


The circuit board has a Dozen (12) Electrolytic Capacitors. They are 47uF, 16 V rated caps...


Remove and replace the caps.  In this case the monitor was from 1991 and so it was suffering from capacitor leakage and needed some minor rework on a couple of the traces.  I'm glad I caught this in time.

But, there was one more twist in the story.  When I tested the monitor, the audio was not restored to function.  After measuring resistance on the speaker, it was open circuit.  I was able to source a replacement speaker from Rob at Black Hole, Inc, and the monitor and speaker are now functioning normally.

The final hardware upgrade I'm planning for this machine is to replace the Spinning HDD with a Solid State device, but in the meantime I've got alot of learning to do about how this machine works and what its capabilities are.


It's a Unix System, I Know This.

The title of this article may be a bit misleading as the young lady in Jurassic Park probably knew more about A/UX than I did when I started this project, but it's been a fantastic learning experience and I thought I'd share some of the ups and downs along the way in case other beginners experience similar struggles getting A/UX installed on actual hardware.

I became aware of Apple's first foray into the world of Unix within the last few years.  I was not a Macintosh user at that time, or a Unix user, as I had a PC and my college had DEC VAX systems.  As usual with my experiences in Retro Tech, I started by watched several YouTube videos about the process of installing A/UX.  The Penelope A/UX site has also been an extremely useful resource.  The idea of exploring an earlier *NIX than any I'd ever used before sounds intriguing to me as I learn about computer history.

After reading the hardware compatibility pages from this site I started thinking about which of my Beige 68K macs were compatible.  When I started the project I had only one option from the list, a Macintosh IIsi.  As the project progressed I came into enough parts to build a IIci system.  The site does warn that a IIci is underpowered for the final version of A/UX but as I didn't have a compatible '040 system at this time I decided to forge ahead with the best hardware I have and version 3.x.

The IIci I am using has been built up from one machine that was saved from recycling by my friend John, and two machines I bought from another friend.  The case parts were cleaned and the logic board was recapped.  I won't go into too much detail about my restoration process because it was rather routine, although I must say that I have not yet been able to get the Motherboard from John's machine working, as there was quite a bit of corrosion on the board.

The Specs of the machine are:

IIci w/ Cache Card
32MB RAM
Asante MacCon PDS Ethernet Card
Blue SCSI HDD Replacement

Another requirement for installing A/UX is an Apple Compatible CD-ROM drive from a short list of compatible hardware on the list at Penelope A/UX.  This was something I had to wait and watch for a while.  I was able to harvest an internal 12x Apple CD-ROM out of a PowerMac that was headed for recycling and I also came across a TASCAM branded External CD-ROM drive w/ a TEAC drive in it.  I drive swap placing the Apple drive into this enclosure and get a working "Apple" External CD ROM.  It doesn't look authentic and the SCSI ID and termination are fixed inside the drive, but the price was right!

Once I had the hardware collected getting the software burned to CD was a challenge.  Most of that struggle was due to user error on my part.  I downloaded the CD disk image and burned it multiple times from multiple sources before realizing that I needed to rename the toast image file extension to .ISO before Mac OS would burn it to CD properly.  Once I had a working Boot Floppy and correctly burned A/UX CD, I was off to the races getting this installed.

One interesting quirk I noticed with my setup is that the CD was not being recognized on the initial boot from floppy.  I inserted the CD into the machine before it booted up and when the A/UX boot floppy completed booting, it would not recognize the CD.  I had to eject and re-insert the CD after the Floppy had fully booted, then press the retry button before the installation process would recognize the CD.

I read that the maximum partition size for a bootable A/UX partition was 2GB, so I used the standard 2000MB blank drive image from RaSCSI that is recommended for Blue SCSI, however, using this partition size resulted in some drive write errors and a corrupted partition.  After that failure I moved back to using the 1000MB blank drive image which seemed to install just fine.  I can add additional space on other SCSI IDs afterwards if 1 GB is not enough for the tools I'd like to install.

After installing the Base OS and all the Extras off the 3.0.1 CD, I then moved on to the 3.1 updates.  The A/UX system is now up and running on my Macintosh IIci...

In the future, I'd like to get TCP/IP running on this machine, but I"m waiting for a part for that, as the AUI is too thick to reach inside the narrow slot openings on the IIci, I'll have to build an adapter with a male and female DB-15 connector to extend the AUI port from the card further out of the Mac's case.

This is currently my oldest *NIX system, so I'll have to go back and brush up on System V.  Time to pull UNIX in a Nutshell and Essential System Administration down off the shelf, I don't think I've looked at these since the early 2000s!

Are you, or were you an A/UX user?  Let me know what your favorite things to do with an A/UX system are in the comments, or find my email address in my profile.

Macintosh SE - Trash to Treasure

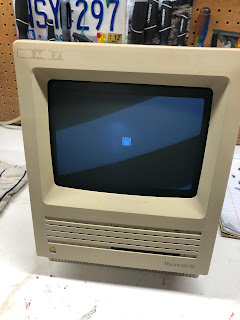
I recently spent some time restoring a Macintosh SE.  I got this project after someone had stalled out on it, and the machine came to me "complete" but disassembled in a cardboard box...

There was a note from the previous owner that stated "works, needs caps.  Bong, but with thin vertical line on screen", so I skipped troubleshooting and started in with the cleaning.  The machine was filthy, not as bad as the "barn find" Apple II+, but dirty enough that it would have been disgusting to work on without some major cleaning.  I took all the metal parts of the chassis off from the plastic parts and washed everything that would fit in the dishwasher, including the Logic Board.  I haven't ever tried dishwashing the analog or power supply boards as I think bad things might happen to the transformers.  As would be expected the parts came out looking much better.  As a side note after a particularly nasty job like this I run an additional cycle on the dishwasher with it empty to make sure all the "computer water" is flushed down the drain before we put stuff that we eat off back into the dishwasher again.

I manually cleaned the CRT and the analog board with paper towel toothbrushes and lots of IPA, avoiding the deflection coils which I clean using compressed air.  I reflowed the flyback connections on the Analog Board and many of the other joints on the board as well, and repaired a few broken items (loose molex connector, problems with the fan).

During this repair, I had the luxury of having another SE machine at hand as I was recapping it for a friend.  This machine needed only to have the Logic Board recapped and it was in much better condition than my machine and so I was able to swap known good parts onto my machine.  I determined that the Tube itself was still good and that my Logic board was working as expected, so it was good to eliminate at least a few components from the troubleshooting.  But the Power Supply / Analog Board combo was not working.

The next item on the list to address was the Power Supply.  I measured the supply, and the +12 Volt rails were at about 9 Volts, which I guess is typical for these when they need a recap.  I did the recap, but as I was doing it, I noticed dark brown marks (burns?) on the Power Supply circuit board.  After the Recap, the voltages on the Power Supply didn't come back.  I checked and rechecked capacitor orientation and other things, but decided that with the burn marks, my confidence would not be high in any repairs that I could carry out, so I decided to replace the supply with a modern supply that would fit inside the housing.  In hindsight, I should have gone out in the forums to ask but I did check in afterwords and discovered some interesting insights.  With my cheaper, but possibly sub-optimal Power Supply replacement in place, I was ready to pivot back to some testing.  I connected up all my parts and on power up, observed this screen...

The white line seems to indicate that the Horizontal Deflection isn't working correctly.  This of course is on the Analog Board, so I decided it was time to recap that.  I made an attempt to find a capacitor list for the Analog Board online, but I was not able to find one and had to make my own.  I had trouble finding a couple of the specific values and didn't realize that one of the critical ones (C15) is a Non-Polarized type Electrolytic Capacitor, so that put the project on hold for a week waiting for two different batches of parts to arrive from Digikey.  Once I got the Analog Board recapped and put the system back together, I was greeted with this very gratifying sight...


The machine was coming back to life!

The next order of business was to work on the Floppy Disk drive.  At the beginning I'd done a very quick service on this drive, but the mechanism was still not moving smoothly on eject, so I went back and watched this video from JDW and followed the steps more closely.  I did end up having to borrow the eject motor from another drive to get this one working, but I'll order some of those gears that JDW mentions to get this other drive back in order.

So, now the Mac SE has a floppy to boot from. I also installed an internal storage device, plugged in a SCSI Zip Drive on the back and started copying files into the machine.  All was not well, thought.  I didn't know it, but I don't think I'd found the root cause of the burn marks on the Analog Board and the reason for the overheating in the original power supply.  The screen went black during a file copy operation, and I discovered afterward that Transistor Q2, part of the Horizontal Deflection had gotten very, very hot.  I tried replacing this transistor, but alas, that was not the root cause and I was quite frustrated and put the project aside for a while.

I mentioned the struggle I was having to a friend in the retro community and he offered an SE analog board that had a damaged POT on it.  I jumped at the chance to be done with the old Analog board, swapped that, and the SE was back to life again.  Long may it live...

So, in hindsight, not the smoothest repair I've ever completed!  The Power Supply recap was a failure, but I learned that multiple modern alternatives exist.  The Analog board recap was also a failure as I was not able to discover the root cause of the burn marks and cascading failures, but sometimes we learn more from failures than we do from easy wins.

This is the first of the SE generation of Mac that I have (I have several of the previous original generation, and one Classic II), I upgraded the SE to the maximum 4 MB RAM and put a 100MB HDD in it.  I'm glad to have one of these in the fleet and it will be both fun to play with as well as a helpful troubleshooting tool should I come across machines of this type that need service in the future.

Nice Northgate!

As I've continued to learn about Minnesota's computer history and the history of the PC compatibles, I've learned that Minnesota seems to have had more than our fair share of successful PC clone builders.  Perhaps this was a lingering effect of Minnesota's strength in the early days of computing with Remington Rand and several of the the mainframe companies located in Minnesota (IBM and the Seven Dwarves).   I know of at least one individual who left an engineering job at a mainframe company in order to run a business building PC clones.

Many of these companies didn't have the market size to design their own boards, and so they would purchase and build systems using boards from many different vendors in Taiwan, but there were a few companies that either started early enough or had a large enough market share to do their own motherboard designs.  There were a couple of local companies that Minnesotans might recognize, ZEOS and Northgate Computer Systems.  Both advertised nationwide, and so had some broader recognition.  It seems that both struggled with financial trouble in the mid 90s, Northgate going through a bankruptcy and Zeos a buyout.

I've been interested in Northgate since I've had one of their keyboards for a while.  I was recently offered one by a collector in St. Paul who is looking to downsize.  The machine was untested, but I was able to look inside and ensure that there wasn't battery damage.

When I got the machine home I unplugged the mainboard and checked the Power Supply voltages.  Everything checked out, so I plugged it back in and it booted.  Of course the clock battery was dead, but I was able to set the BIOS parameters and boot off a floppy.  I was not able to figure out how to set the BIOS to recognize the hard drive but after some time I realized that the Specifications sticker on the back of the machine listed the Hard Drive's BIOS type on it.  When I entered that data in the BIOS the drive was recognized right away and the machine booted to DOS 6.22.  There was a Drive Overlay installed on the HDD to get it to recognize the additional space on the drive, it has a 450 MB drive that appears to be working just fine.


One of the next challenges with this machine was determining which Northgate system it was.  There is not a ton of information available online about these systems, but I found this list on Vogons.  By googling images, I was able to determine that this was a Northgate Slimline 320 (A 386 @ 20 MHz with a date of 1991 on it).  Knowing the model I was able to find these jumper settings and specifications.  It turns out that this unit has already been maxed out at 8MB RAM.

After this, I needed to decide what to do with the machine. It has a total of 3 16 Bit ISA expansion slots, and two 8 Bit slots on the back.  It had a modem which I removed, and replaced that with a generic sound card.  I have a not quite period correct, but significantly cheaper Sound Blaster Vibra 16 on order for this machine.  I also used the slightly newer 3COM 3C509B 10MB Ethernet card.

For storage, I tried directly connecting a Compact Flash card to the IDE Bus on this machine, but I was not able to get the BIOS to recognize the newer cards that I had (2GB and 4GB Sandisk and 1 other brand).  I wouldn't have minded if I could only get those cards working with 250 or 500 MB partition, but nothing was working so I installed a Lo-Tech XT-IDE card that I already had on hand from another build that I changed.  This boots the machine just fine.

Once I got DOS and some of my standard Games and Utilities moved over to the Compact Flash drive, I tried to install Windows 3.1 on this machine.  The machine has Integrated Graphics, and when that is enabled, a boot message indicates that the video card has 256K RAM onboard, which is enough RAM for 640x480 with 8 bit color.  However, I could not get this to work with Windows 3.1, either on the original Hard Drive or on the CF based storage.  Windows 3.1 locks up after the splash screen.  This makes me wonder if the reason this machine was taken out of service back in the day was because of a failing video controller on the motherboard.  Anyway using the board Jumpers I was able to disable the onboard VGA, and test several other 16-bit ISA Video Cards that I have.  I decided to use the most "period correct" VGA card I had.  This came from another 386 parts machine, and it also has only 256K RAM on it.  This works great in Windows 3.1, but of course has no acceleration, which is just fine for this machine.

So that about wraps it up for this machine.  I'm really happy to have a nice clean Northgate Computer in the collection that pairs nicely with the Northgate Keyboard that I've previously blogged about.

Please let me know if you have any memories of using Northgate Systems back in the day, or any tips about where to find additional technical information about the Slimline systems online?

Epson Equity LT - An XT Class Laptop - Flash Storage Solution

As readers of my blog will know, I have a bit of a soft spot for XT class machines with the Intel 8088 processor and similar processors.  One of my first retro computers was the Compaq Portable from 1983.  My friends at Free Geek know this about me, and so I'll occasionally get a machine from them that needs help.  I recently got a Toshiba 3100 machine from them that matched up well with some machines that I helped my friend John with, a couple of those Toshiba machines appeared in this video on his channel.

Anyway, the latest acquisition was an Epson Equity LT machine from 1988.  This make it a "later" XT machine, and instead of a gas plasma display, this has an early monochrome TFT display.

I tried quite hard to get a hard drive going in this machine.  After reading this article about the somewhat proprietary XT Laptop based Hard Drive interface, I even went as far as pulling the Hard Disk out of the Toshiba 3100 which has a bad screen and trying to transplant it into the Epson Equity LT, but I was not able to make this work.  The Epson does spin up the disk, so it worked better than the totally dead drive that I started with, but I was not able to get past a drive error.  I looked for information about a low-level formatting the drive, but that is either not possible or just not documented.

However, I have found what I think may be a better solution in the long run because it's a more generic solution that will apply to other XT class laptops or luggables as well.  I installed a GoTek floppy drive emulator with the Flash Floppy firmware into this machine.  Once the Hard Drive is removed, it's easy to move the original "A" drive over to the left side of the machine and use it as the "B" drive, installing the GoTek as the "A" drive.  Using another computer, I setup a new low-profile USB Flash Drive with 720K Disk Images on it.  One of these disk images has DOS 5.0 and another has DOS 3.3.  Most of the disk images on the floppy have games on them.  These are early DOS games that run in CGA graphics mode, like Alley Cat, Burger Time, Avoid the Noid, and titles like this.  I also created a boot message on the DOS 5 (default) boot drive that lists out which programs are stored on which floppy drive so you don't need a list of Floppy Numbers if you are using a basic GoTek like this one...

I'll include a link to the contents of the USB Flash Drive that I've uploaded to the Internet Archive.

A couple of other "longevity" upgrades included installing a new 3.6 Volt Lithium battery for the realtime clock and permanently removing the main battery that was installed in the machine.  This machine will just be used for demonstrations with power and it's one less thing to worry about.  As an added bonus with the battery, hard drive, and drive controller removed, the machine is alot lighter!

With the low profile USB drive installed, I plan to leave this machine setup and ready to go.  Now I just need to find an old laptop bag that will work for this monster!

A New Retro Computing Forum?

As readers of my bLog will know, I'm a big fan of the forums, and one of my favorite things about Retro Computing is the help that the members of the community offer to one another.

I was recently invited to join the "Tinker Different" forum which has just formed.  Several people I know and a couple of the YouTube personalities that I follow are on board with this project.  The first question in my mind when I heard about a new forum was, why another forum when there are already several to choose from.  The reasoning is explained in this video, which I found quite compelling.

I'm excited about the project and I look forward to contributing.  I hope to see you on Tinker Different!

SuperCard Pro - For Disk Imaging and Drive Repair

Disk Imaging

One of my interests in the Retro Computing hobby has been software preservation.  Trying to recover data off some of my wife's old floppy disks from her college days sent me down a path that's gotten me to the point where I own several different Macs and PCs from the 90s that I use as "Bridge Machines" to get data moved off old floppies onto modern hardware.

I'm also interested in a range of different systems and in having the ability to make and restore disks of any format.  I became aware of the Kryoflux disk imaging system when reading on Sonic Purity's blog on this article that I've referred to in several bLog articles before.  I didn't pursue the Kryoflux because this solution was expensive and because I didn't understand floppy disk technology well enough to be comfortable with flux imaging.   Thankfully this knowledge gap can be easily addressed by a great deal of information on the Web, and since then I have put more time into researching this topic.

One of the few benefits of the Pandemic has been that all the Vintage Computer Festivals have been online.  I learned about Jim Drew's SuperCard Pro from watching Craig Ernster's presentation. at VCF Midwest 2020.  This device is significantly less expensive than Kryoflux.  I didn't buy one right away, but when I got my first CP/M machine and didn't know how, or even if I'd be able to make floppy disk copies with the machine I put one on order.

I've paired the SuperCard Pro with the Asus laptop I use as my retro computer engineering PC and set up a couple of floppy drives, both a TEAC 5 1/4" DD drive as well as a newer 3 1/2" 1.44MB floppy drive.  I have stored these items together so it doesn't take long to have the disk imaging solution up and running on the bench...


So far, I have imaged and restored boot disks for my Compaq Portable (360K Floppy with DOS 3.3), and that worked well using a preset in the software.

Also I've imaged and restored boot disks for my Megatel Quark 100 CP/M computer, again, using a CP/M preset in the software.

Drive Repair

The Super Card Pro has also been helpful for drive diagnostics and repair.  It has a separate screen  for Drive / Disk Utilities.  This allows you to control the drive motor and also the track steppers that move the heads back and forth.  As you can see in some of Adrian Black's videos, having separate control over these two drive functions can help when lubricating and troubleshooting drives that haven't run for a long time.  Using these features of SCP, I've been able to troubleshoot these issues:

Drive Motor Speed Adjustment
Index Sensor Good / Bad
Track Stepper Motor Position
Track Zero Sensor Good / Bad (the Disk Media Test will fail if the Track Zero sensor is not working)

When comparing the functions of the Super Card Pro with IMD, I believe that IMD could also be used to diagnose all of these scenarios, but I find the SCP interface a bit easier to navigate.  One gap with SCP, I have not been able to adjust drive alignment with this tool.  I think the IMD program is the only (easy, non oscilloscope) way to do that.

My latest drive repair was getting a pair of Magnetic Peripherals Full Height DS/DD Drives back up and running for my IBM 5150.  Although these drives are now fully functional the alignment of these drives doesn't match up with the other 360K drives that I own.  Drive alignment is still outside of my comfort zone, but I'm hoping to learn more about that soon so I can get the various drives I own back lined up with one another.

My (Current) Favorite Retro Computers

It's been a while since I took a picture of my basement shelf where I store my most frequently used Retro / Vintage Computers.  The ones that are out and get used are my de facto "favorite" retro computers, and there's been a fair amount of change on the wire rack since my last update.  I thought I'd outline which computers are out, and why:

From Top to Bottom, Left to Right, on the file cabinet is the NeXTstation Mono Slab (1990).  This is one of my newer acquisitions from Vintage Computer Festival Midwest 2021.  I've still got alot to learn about this machine, and I also have some hardware on order for the machine so I'll be leaving it out for a while.

Next is an original Compaq Portable I (1983).  This was a "project" machine from Free Geek Twin Cities and my first XT class machine.  As one of my first Retro computer "rescues", I really enjoyed the process of getting it working again.  I also really like the design of it and I've used it for disk imaging and a few games that look really cool on the Green Screen. (it has a really long persistence phosphor.)

Next to that in the top right corner is the original non-backlit Macintosh Portable (1989).  Yes, the screen is on, this just shows how you need the lighting just right to see the screen.  I'm fortunate to have one of these that is working as many of them have problems.  Mine has a few dead lines on the screen, but I'll just keep enjoying this while I can. It's probably just a matter of time till the screen dies.  This computer is out on display because I enjoy the fact that it's so different than the laptops of today, a design idea that failed.

On the middle row at the left we have an un-enhanced Apple IIe computer (1983).  I was able to buy this computer monitor and disk drive as a set from a retired school teacher who had bought it new.  It needed quite a bit of repair but since completing those repairs it's been super reliable and super fun.  Total Replay anyone?

To the right of that I have a Power Macintosh 8600 / 200 (1997).  This is a "Bridge Machine" that I have blogged about before.  The main reason this machine is still on the wire rack is utility.  It's easy for me to move files off and on this machine from my modern machine and I have three SD cards setup for Mac OS 7.5.5, 8.6, and 9.1, so it can run the first version that is supported by the hardware all the way up to the last version.  The latest upgrades for this machine include a new Logic board and Processor Card (Still 200 MHz), additional RAM, (288 MB Total), and an ATI Rage 129 video card from 1999.  This machine is running better than it's ever run before.

On the bottom row at the left we have a Macintosh 512K (1984).  Like so many of these machines it started out life as an original Mac 128K but got upgraded fairly early in life.  It has been continuously upgraded to keep it going since then.  It's possible that the only original thing on it is the chassis but I feel very fortunate to have this machine and I enjoy playing some of the classic games and booting Mac OS 1.  It's an absolutely iconic design, and the only system in the display that boots and runs exclusively from floppies.

Last but not least on the wire rack in the bottom right corner is my latest PC Build.  This is a PCI based 486 DX2-80 (1995).  I built this with parts and pieces from a friend and other items I had around.  This is both a Retro Gaming rig with a Sound Blaster in it and a Disk Imaging machine with a 5 1/4" 360 K Floppy drive.  It works great so far, but I just built it, so I'll need to keep it out where I can power it up and keep using it to work out any kinks in the build.

Honorable mention, I also have a Tandy Model 102 (1983) slab top machine that I keep out on display in a different part of my office.  I really appreciate the unique design of this machine.  Another form factor that really didn't last into the modern computer era.  I've recently got a flash based storage solution for this machine, so I'm looking forward to digging in more on this machine, including loading some of the BASIC games onto the machine.

I have more machines but they are all stored in a much less convenient location.  Some of those machines are plugged in and can be run, too, but they get significantly less use than these ones that are out.