Project Updates - Dealing with the Backlog

It's been a busy year for me and so I haven't got as much retro computing done this year.  That being said, I have been able to sell four computers and give away a couple more this year so I am still having success with thinning out the collection.  For quite a few years I've been building a backlog of interesting broken machines.  I keep this hardware out in the garage and have a list going for each of these potential projects.  When I'm feeling inspired to take on a new project I can go find one any time by looking at the list to see what I'm interested in taking on next.  I've had a bit more time as of late and I've repaired a series of PCs since I kind of like working on groups of similar vintage hardware at the same time.

The first repair is an interesting Zenith 386 PC that came from Free Geek Twin Cities in the spring of last year.  This machine was badly rusted from water damage in and around the power supply.  The Free Geek team handled this machine well, they knew that it should not be powered up, but the machine included a nice matching keyboard and a full box of documentation and software so it was worth some effort to fix it up.  

I started repairing this machine last year right after I got the machine.  I took it all apart and cleaned it up.  It's model number ZBF-3340-EK, an early 386 machine built on a passive backplane.  The backplane is based on ISA but extended to 32 bits.  It was a very good thing that Free Geek didn't power the machine up because there were pieces of rust floating loose inside the power supply.  I took all the metal pieces apart and cleaned the power supply up. I spray painted the rusty pieces to stop further rust, but this wasn't a full restoration, just trying to halt the deterioration enough to get some basic testing done and decide if the PC would be salvageable or not.  To my great surprise after cleaning up the machine and some basic repairs the PC was able to Post!  I got video working with an old VGA card which had been paired with the machine later in life (It originally had a proprietary monitor and video card which are missing now).  It took quite a few hours of effort to reach this point so I set the project aside.  I thought I'd come back to it soon but it ended up being a year till I came back to it.

After moving this PC around in the garage for the 3rd or 4th time I decided it was time to finish this project.  I took the machine apart enough to get a look at the four drives.  It had two 1.2MB 5 1/4" Floppy Disk Drives, and two Full Height MFM Hard Drives.  I cleaned and tested both of the Floppy Drives.  One of them was working and the other was not.  I replaced the non-working drive with a 3 1/2" drive I had in my spares and set the bad drive aside.  Once I figured out the BIOS settings which were needed for the two Hard Drives I was pleased to see that both of them worked (after a few seek errors, which makes alot of sense if the heads had not moved for a decade or more).  It's very cool to have a machine with Dual MFM drives, although I may just leave one in there and keep the second one as a spare.

Adding a clock battery was the final step.  After adding the clock battery the PC still wasn't holding time and BIOS settings.  It turns out there was a bit more corrosion on the board around the battery area so I replaced a few corroded components, some diodes and resistors, and added a bodge wire for a damaged trace.  After that the clock battery worked and it is holding the BIOS settings.  The machine looks nice...


Due to the solid construction, large chassis, and dual full heigh MFM drives, this computer is very heavy.  It's great to have the documentation and a matching keyboard with lovely mechanical switches.

The next PC up on the bench is an XT class machine.  The seller let me know that it had bad tantalum capacitors which had blown.  They didn't want to do a recap on the machine so they sold it to me as a project machine.  This is machine sat on my project intake queue for even longer than the Zenith.  I have several XT PCs so I knew this would be a PC that I wouldn't hold onto for my collection.  It turns out that it had one bad tantalum (which failed short on the +12 volt rail), when I removed that, the computer came up to the BIOS Post screen.  After a few minutes of operation, another tantalum failed (this time on the -12 volt rail), but again that was easily removed after some basic troubleshooting probing around with the multimeter on the board.  I didn't have 4.7 uF Tantalums in stock so I ordered some of those and did the recap when those arrived.

Other than that my main tasks were to take the machine all apart and clean it.  It was quite dusty.  I cleaned the mainboard with my ultrasonic cleaner.  After it dried I cleaned and tested the 360K 5 1/4" Floppy Disk Drive.  It was working good.  Sadly, the MFM hard drive inside the machine was not working.  I set that aside for further troubleshooting.  The faceplates for this machine were incomplete.  I was able to find a second half-height black Floppy Disk Drive to cover the gap in the front panel of the machine and I 3D printed a Full-Height Hard Drive blanking plate for the other drive bay, which completes the cosmetics of the front panel.  The machine is fully functional and I'm happy with how it looks...


The last PC in this group was an original PC, the IBM 5150.  I already have one IBM 5150 that came from a pickup of Facebook Marketplace some years back.  But over the last couple of years I've been making an effort to find a second machine if I can find one at a good price.  I'd been collecting bits and pieces for a second IBM PC for well over a year now and I finally came back to this project since I was already working on the XT Clone from that era.

The IBM PC also had bad tantalums on the main board and that was the reason why the seller sold it to me as a project machine.  I was able to locate the shorted capacitor and replace it.  I also tested the power supply with a load but disconnected from the PC, the power supply voltages were all in range.  I was able to find a VGA card that would works in an 8-bit slot, most VGA cards only work in a 16-bit slot.  This VGA card enabled me to do testing with a more modern monitor and I also left the original Monochrome MDA card in the machine as well, since the IBM PC does support two different types of video cards at the same time.  The machine has 256K of memory (the maximum capacity on that mainboard) and it Posts and comes up as expected.  The next order of business was to clean the two floppy disk drives.  After cleaning they were both working.  I had two cases and so I was able to put together the best cosmetic version of the case.  It's got some rust spots on the top, but as a spare machine it will be just fine and I'm happy to have it in the collection...


Of these three machines, I'll be moving the first two on too new owners, either here locally or at VCF Midwest in the fall.  The IBM PC 5150 will go back into storage to be used as a spare.  Given how long it took me to get to these repairs I probably won't be seeking out more machines of this type to repair, but it is always gratifying to get a broken computer fixed and to have more projects off my to-do list.

If you have any memories of using a Zenith 386, an Ameridata XT PC, or an IBM 5150, please post in the comments below or drop me an email (my email address is in my profile).

Retro Computing at the Movies

Streaming and the wide availability of video on the Internet have made it easier than ever to find and watch material that was unavailable or just hard to find for many years. I a previous bLog article, I covered YouTube channels that are providing archival first person computer history videos.  But Hollywood entertainment is another culturally relavant source.  Here are several feature length Hollywood movies with connections to computing and computer history.

The films in this article fall into two categories.  The first set of films from before Y2K show peoples attitudes towards computing machines and their interactions with them.  The second group of films are more modern movies post Y2K which have historical computing as a theme of the movie.

Older Films (Pre Y2K)

Desk Set (1957) with Spencer Tracy and Katherine Hepburn was fun, I saw this film for the first time last year.  Two of the things that stood out to me were the uncertainties the workers had about how computer automation would affect their jobs and a repetition of the pattern where new automation solutions do not live up to the hype, at least in the short term.  An enjoyable film and one I'd recommend.

The films Twilight's Last Gleaming (1977) and Damnation Alley (1977)  both show inside of a Cold-War Atlas missile silo.  These were of interest to me since I'm a child of the cold war and the "What If" scenarios presented by these movies are definitely the main point.  But another thing caught my eye watching these films since these missile silos were controlled by a massive computer network called the SAGE Air Defense System (or its successor).  SAGE was designed and built during the cold war to try to prevent nuclear strikes from the USSR reaching the US.  If you are not familiar with the SAGE system, there's a fantastic talk from VCF 2025 that I'd recommend by Richard Thompson "The SAGE Air Defense System".  Richard points out in his talk that many of the SAGE control panels were saved and used a props in TV and film decades.  These appearance are cataloged on Mike Loewen's website here, and his catalog opens another whole world of media exploration in Film and TV shows.

What list of computer related films would be complete without a discussion of War Games (1983)?  This is the first film on my list that I remember watching at the time.  Back then I was more concerned about the threat of war but I was also interested in computers and computing.  Here's an interesting article about the tech used for making the film both on and off screen.  The main computer star of the show is the IMSAI 8080 computer, which has become quite expensive.  These pre-1977 machines didn't sell in the millions like an Apple II, but we can still have a similar experience with a modern replica kit built using a modern microcontroller.  I've got one of these kits on order, so stay tuned for a future bLog article on that topic.

Skipping ahead more than a decade, we have Hackers (1995).  I was in college at the time struggling to get an engineering degree and surrounded by computer geeks like me.  I didn't have a car in college and I didn't get out to the movies much which is just as well because we would not have found much to relate too in this film.  We weren't cool like the characters in the film.  It wasn't until studying the history of the Homebrew Computer Club and Hacker culture that I began to understand how computing was connected with the 60s counter culture on the West Coast.  This was not a significant part of my experience at a midwestern engineering school in the mid '90s.  However, rewatching the film recently was a fun opportunity for me to play the "Name that Computer" game.  Trying to figure out, is that an Apple PowerBook?  Is that a Toshiba Satellite or a Tecra? Which one?  I don't have a list from my last watch through.  Google search shows a detailed list, but I'm honestly not sure if you can tell just from shots in the film which computer is which, so I won't link that spoiler article here and let it ruin the fun of re-watching the film and playing "Name that Computer".

The only romantic comedy on todays list is You've got Mail (1998).  I recently rewatched the film as I was interested in seeing the portrayals of the early days of the Internet, but I'd forgotten (or never noticed when I was a kid) how problematic the Tom Hanks character's behavior (Joe) is.  But I watched the film so you don't have to.  Per the fantastic FAQ section on IMDB, Joe is using a "Desktop Replacment" IBM Thinkpad 770 and Kathleen is using an Apple Powerbook G3 250, the fastest of the Wallstreet machines.  I did enjoy the nostalgia remembering using the AOL free trial period and other dial up Internet experiences back in the day.

New Movies (Post Y2K)

The second category of films on this list is modern movie set back in time with computer themes.  When we look at modern films about the past sometimes we may learn more about our present attitudes than we do about the past, but these films are still interesting.

The next movie on my list is The Imitation Game (2014).  This is a film about Alan Turing and his team's work during WWII on code breaking.  I had my own doubts about the historical accuracy of this film after watching it.  One reviewer confirmed my suspicions says this is "... one of the most celebrated and most misleading historical movies ever".  I think most of us interested in computer history would be better off reading this article and skipping the film.

Silicon Cowboys (2016) was intriguing to me.  I've read and enjoyed Rod Canion's book "Open" about the founding of Compaq but I really didn't get into the TV Series "Halt and Catch Fire".  I remember one of the folks presenting about the history of Tandy computer saying "it was never that exciting" or something to that effect about that show.  But Silicon Cowboys is focused on what actually happened and that's still very exciting.

I've seeen The Social Network (2010) but it didn't make that big of an impression on me, so I'm not going to comment other than to say that I did watch it.  Hidden Figures (2016) is a feel-good movie where the underdogs overcome their challenges because of their patience and hard work.

What other films can you think of that have computing as a theme of the film?  Comment below or drop me an email, my address is in my blog Profile on the left side of the homepage.

Epson QX-10 - One of the Last CP/M Machines

The Epson QX-10 is a sleek looking design from the early 80's.  It is from the tail end of the CP/M Era and it's a really neat looking machine.  My experience with the QX-10 started when a friend was demonstrating his at a local Retro meet up hosted by Free Geek.  It turns out he had a second machine in need of repair and since he's already got a very nice one, I was able to acquire that second machine from him, thanks again, Steve!

I started working on this in the Fall of 2025 when I acquired the machine.  There was no cable included to attach the custom CRT to the base unit.  This cable brings both power and signals from the base unit to the CRT and so it's difficult to begin testing without that.  There is a replacement cable avaliable online, so I ordered one of those.  With the cable installed I could see that the machine was powering up to the "Insert Diskette" prompt.  This is a very good sign because it means that the processor is running and whatever diagnostic checks are built into the ROM are passing.

As with most CP/M machines that don't have a hard drive the A drive is used constantly to boot and run the machine, so the A drive often needs special attention.  This machine was no exception.  The floppy drives were manufactured by Epson themselves.  In order to maintain the sleek form factor of the machine they made these drives 1/3 height, not a standard 1/2 heigh drive, so these can not be easily replaced.  Knowing this I took my time removing the drives and cleaning and lubricating the mechanisms.  They were so jammed that I could not even insert or remove floppy disks from the mechanism.  With the floppy drives working, I could move on to the next phase of the repairs.

I made some floppy boot disks using my flux disk imaging setup that I've discussed before, but unfortunately my normal workflow did not work because these machines have a very unusual disk geometry so the first round of disks I created were not able to boot the machine properly.  But I did get far enough to type characters in to the screen and this is when I noticed the next challenge, the keyboard was not working.

This keyboard, the Epson Q603A, is a special one designed for the word processing software called ValDocs.  There is some good information on Deskthority about the keyboard.  This is a foam and foil keyboard, so I was not concerned because I've repaired several foam and foil boards over the years using the replacement kit from TexElec.  However, sadly, this board used a prototype switch with a much lower profile of foam and the normal replacement pads would cause the switches to remain pressed all the time.  I emailed TexElec about this and I was very happy to learn that they were already working on a low profile foam pad.  I got a set of these and installed them and the keyboard is working again as expected, one more step closer to getting this machine back on the road.

At this point because of my problems getting booted up and not have known good boot disks I stalled out on the project and set it aside.  But within a few weeks I saw a relevant post on the Vintage Computer Federation forums where I hang out, so I chimed in on there.  I received some great feedback about my disk imaging problem from one of the members there and I was able to create some new boot disks using a different starting point.  These boot disks worked and I could see that the Epson was fully booting up into an operating system.

Unfortunately, as often happens with Retro Computers, just when we think a project is ending, something else broke.  The CRT display starting rolling and I couldn't get the video to stabilize.  This CRT has only one adjustment for brightness on the outside so I took the case off to get inside.  I went through all the potentiometers on the circuit board and put Deoxit Fader Lube on them and cycled them back and forth.  I also did a careful inspection.  I was not able to identify anything wrong. After plugging everything back in it started working again.  I think there may be an intermittent connection with one of the sync signals so I'm going to try to isolate that to the Monitor side or the Computer side and maybe reflow the solder joints on those circuit boards.

But for now, the machine boots and runs, and it's time for me to explore one of the last and most modern looking of the CP/M machines.  I'm really glad to have this machine in the collection as it very much has the look of the era it came from...

Did you use CP/M back in the day?  Do you have memories of the Epson QX-10 or the Valdocs software?  If so leave a comment below, or drop me an email at my address in my profile, I'd love to hear about your experiences.

Steve's Retro Year in Review for 2025

With 2025 coming to a close it's time to reflect back on another year in Retro Computing.  Alot of great things happened in 2025, some planned and some unexpected.  This is my seventh year being involved in Retro Computing and my interest continues, there seems to always be something new to learn and the forum members of the Vintage Computer Federation and Tinker Different continue to be a source of help and inspiration for new projects.  Also this year I authored my 100th bLog aticle here on Steve's Retro Computer bLog.

In my retrospective article from last year I mentioned that I wanted to downsize the collection.  I added fewer new computers to my collection this year and I said no to quite a few eBay and local listings that were interesting.  I added about 15 machines this year instead of the 20+ machines I'd been adding over the last couple of years and more importantly I sold quite a few of those 20+ machines from previous years as well.  Half of the computers I sold this year are ones I bought to fix up and resell since I really do enjoy the repair process.  It also helps to know ahead of time that I won't be keeping the machines, it makes it easier to sell them when the time comes.

I sell complete systems whenever possible on both Craigslist and FaceBook Market Place (FBMP).  This year I sold about two computers on FBMP for every one on Craigslist, but I will still continue to use both platforms.  I think I get alot more spam from FBMP, but I know I'm getting alot of views on that platform since they show you those statistics now.  I'm still pricing below eBay prices, and I'm seeing machines sell on average after about a 2-3 week wait.

I bought three lots of computers this year, one with seven machines (mostly compact Macs), one with three Macs, and the final lot with eight machines (mostly Apple IIs).  In each of these lots I knew there were only 1 or 2 computers I'd want to keep but having these computers on hand made it easy for me to find an interesting repair project any time.  I plan to keep doing this (assuming that I can continue to find small and medium sized lots of computers in "as is" condition).  If you know anyone that is downsizing or needs help disposing of an old computer collection, please let me know, I'd be glad to buy machines in as-is condition or just even just offer advice about selling.

As I look back at acquisitions this year I made good progress on getting early Apple II hardware.  I got an early Apple II Plus machine and then an original Apple II machine.  I also got to extend my collection of Next computers, adding another NextStation Mono Slab and and an HP PA RISC machine that runs NextStep really well.  I got a new CP/M Machine that I haven't completed repairs on yet and another early MS-DOS compatible Wang PC, so I'm continuing to learn about both of these types of machines.  I added a couple of calculators to the collection, although I do not intend to become a calculator collector, since I'm trying to stay focused in my area of interest for collecting.

I also completed a couple of Unix workstation projects that were a long time coming, first getting a Y2K Era Compaq Alpha Personal Workstation up and running after a long time waiting for parts and then getting a Sun Ultra 10 machine up and running.  The Sun project was a machine I got at VCF Midwest 2024 so that one took a while.  The Apple III Computer parts that I got in the fall of the year were totally unexpected, but alot of fun to repair and learn about.

I don't have much room to display retro computers, so none of the machines I've acquired this year are on display in my office, instead I have an Original IBM PC, a Compaq Portable I, a Macintosh Portable, an Apple Macintosh Perform 550, a Gateway 2000 Slimline 486, a PDP-11 with VT-220 Terminal, and an Apple IIe as shown here...


During 2026 I need to think about focusing my interests even more and continuing to downsize the collection.  I still have more beige box PCs that I don't want in the collection and I will also consider downsizing other categories of machines.

During 2026 I should spend more time with software setup on the machines I already have.  Alternative Operating Systems has long been an interest of mine, and many of these machines support multiple OSes.  Networking is also one of my interests so I'd also like to spend time connecting more of the machines together.

What about you?  Do you have any highlights to share about fixing or using old computers in 2025 or plans for next year that you'd like to share?  Feel free to leave a comment below, or reach out to me via email at the address shown in my Blogger Profile.

Another member of the 1977 Trinity Joins the Collection - Apple II

One of my long term goals for collecting Retro Computers is to get the original Trinity of Home Computers from 1977, the TRS-80 Model 1, an original Apple II and a original Commodore PET.  In 2023 I got a really dirty TRS-80 Model 1 and cleaned it up.  I have a Commodore PET 4016 from 1980, but it's not the original machine.  I've also got an early Apple II Plus machine from 1979 which I've setup with the original ROMs so it would behave like an Apple II.

Earlier this year I found out about a large lot for sale locally and I jumped at the chance to buy the entire lot.  I've blogged about starting in on that lot of repairs here already.  I mentioned that I would set the Apple II aside for repairs.  It didn't sit for to many weeks before I came back too it.  Ironically, this machine was built in 1980, one year after my Apple II Plus but they have the same Revision 4 motherboards inside.  If you look on the timeline on Wikipedia it does not show any overlap between Apple II and II+ production but I think that is incorrect, Apple continued to make Apple II and II Plus at the same time and that may have continued right up till they switched to making the Apple IIe in 1983.

When I got the computer on the workbench I found that the video signal was stable but I was getting garbage characters.  Also, not all the keys on the keyboard were working.  I started by taking the entire machine apart and cleaning it throughly, it wasn't too dirty, but the seller had told me these were stored in a basement for years so the machine was just dusty.  This machine will never be a museum piece.  It came from the University of Minnesota so I've left those asset tags on the machine.  It has quite a few scratches and bumps on it but I don't mind since I intend to actually use this machine.

The Keyboard is a Datanetics type.  I sprayed Deoxit on the keys that were not working and most of them came back to function just by cycling them a few dozen times, but the S key was persistently broken.  I was able to find a couple of Datanetics key switches on eBay so I ordered a couple.  After replacing the S key the keyboard was fully functional, except that the power light was out.  I removed the bulb and tested it, it was working, so it just needed to be reseated into the keyboard and it has been working fine since.

The garbage characters on the screen were a harder fix.  I removed every single socketed IC off the motherboard and sprayed the DIP sockets with Deoxit and replaced them but the problem persisted.  I should have tested all the RAM chips but at the time I didn't have a tester for the 4116 RAM chips used on this machine (I have since got a working tester for these).  Eventually I was able to identify bad 4116 RAM chips by trial and error and swap them out.  Since this is an original Apple II I have configured this with 48K RAM.   I will be leaving the 64K RAM card out, and I will not be adding an Autostart ROM, which makes this more authentic to the original experience.  Since the machine starts up in the ROM Monitor you have to learn at least one ROM Monitor command (Control-B) to get BASIC started every time you boot the machine.  I enjoyed learning about all the different early ROM versions of the Apple II and II+ and this is much more interesting now that I have access to the hardware.  Incidentally, the Apple I also started up in the ROM Monitor, and this was all code written by Steve Wozniak himself.

During the repairs the original power supply failed.  This was not the most common failure of RIFA filter capacitors which can be easily replaced, so I removed the circuit board and replaced it with the Reactive Micro Apple II Power Supply kit.  It still looks original because that fits in the original case, but I enjoy having the peace of mind that comes with a modern power supply.

Although I am interested in experimenting with the original hardware configuration, I'm not thrilled with the idea of loading programs from tape, so I may go ahead and leave the Disk II controller attached even though I know it wasn't an option in 1977.  The Disk II system was and is an amazing "quality of life" upgrade for this machine.

I'm quite happy with how this machine turned out...


Do you have memories of the original Apple II?  If you have stories or thoughts please leave a comment here, or reach out via my email shown in my profile.

My Apple III Adventure

The Apple /// Computer was released by Apple in 1980.  It has an iconic design, and was a famous failure for Apple.  They were trying to increase their share of the business of selling computers for business.  The chronology is important otherwise we risk passing judgement on the decision makers at Apple with the benefit of hindsight.  We should remember that Apple did got a taste of the potential of the Business market when Visicalc was only available on Apple II.  This "killer app" sold alot of Apple II computers for a period of time, but by 1980 Visicalc was becoming avaliable on other platforms.  The IBM PC wouldn't be out for another year (1981), and it would be several years after that before IBM PC Compatibility would emerge as a market trend.  I think this context makes the design decisions around Apple III a bit more understandable.  It's likely the failure of the system was due to the complexity of the system and technical problems with the computers.  This system was arguably the first Apple project that didn't have Steve Wozniak at the helm, and it does feel like a system that was designed by a committee.  Or maybe it just feels more corporate (by design).

Because the systems were a commercial failure they have always been rare in comparison to Apple IIs.  Because they are early Apple computers they've become more desirable for collectors and more expensive to purchase but once again my retro computer friend Steve Hatle has been very generous with several parts machines.  This gave me a very good shot at getting a working Apple /// system.  On intake the pile of hardware looked like this...

Working my way thorough the hardware I noticed that there were two different types of main circuit boards.  I started watching repair videos and downloading and reading manuals since I've never owned or even used an Apple III machine before.  As is so often the case, Adrian Black came through with a really informative Apple III video.  There was an earlier design and a later design for the Apple III.  I had one machine with the later design and one with the earlier design as well as a spare main logic board and memory board of the older type that was quite dirty.

One of the first things I learned was that all the RAM on an Apple III is on an expansion board.  The machines won't boot at all without that board installed.  The older style main board has 12 Volt RAM and can go up to 128K, the newer style RAM board runs at 5 Volts and can go up too 256K.  The differences are explained here, but the important point is that the RAM boards can not be swapped without changes to the motherboard!

On intake both machines were showing signs of life.  I started repairs with the older machine.  I went through and tested all the RAM chips one at a time.  The first row must be populated by special 32K RAM chips that Apple had made for them at the time.  These are prone to failure and I don't have a tester that will work with these chips so I pulled the RAM off both of the 12V RAM boards and tested using trial and error.  The Apple III does have a helpful RAM diagnotic on boot, but I don't think it's a very thorough test, which I will come back to later.  The second and third rows can be populated with 4116 RAMs, which I can test offline with a low cost tester from eBay, there were several bad chips that I replaced from chips I have in stock.  After that, the machine would get through the diagnostics and try to boot.

Neither keyboard was complete.  I was able to scavenge parts off one keyboard to get the first keyboard working.  I cleaned the External and Internal Floppy Disk drives and they appear to be working good.  After this the machine would boot off Floppy Disks I made from disk images on the Internet. It was very gratify to see the machine boot for the first time.  I started poking around with the Apple III and learning about the operating system software (called SOS) but then put this project on hold just before Vintage Computer Festival.

During VCF Midwest I was happy to learn from  Chris Tersteeg that the Apple III could boot off a Fujinet.  I got one of these circuit boards from Chris that allows the Apple III ROM to be modified to auto start a smart port device.  I later learned that you can make a special boot floppy that will do the same thing.  The project is called SOSHDBOOT by Rob Justice.  I also spent quite a bit of time experimenting with a similar project that allows the DAN II Controller to boot in the Apple III, but I ended up damaging my DAN II because I didn't notice that one of the slots on the Apple III had the end broken off.  I ended up having mis-alignment of the connector pins in the slot which caused a short of some kind. I don't know what the failure mode was exactly, but I could smell that things were getting hot before I shut down, and then the card will no longer work in an Apple II.  The Dan II is an open source project, so I hope to come back to that repair, but I have set that card aside for now.  On the Apple III I don't need four expansion slots, so I've tapped off the damaged one for a future repair and pivoted to using the BOOTI card instead since it is also supported.

I discovered through trial and error some of the error codes for the SOSHDBOOT project which I'll share here:
BOOT ERROR C = No Smart Port Device Detected
BOOT ERROR R = Device Detected, but Not Good (One error is fragmented image files, fix here)
BOOT ERROR S = Device Detected and Drive Detected, but can't boot, (could also be fragmentation)

This project includes several Hard Drive image files pre loaded with software.  As a beginner to the III I was quite excited about not having to figure out program installation, but my excitement faded when the boot up stopped with an error message:
Selector Error 0D:.PROFILE/SOS.MENU

I thought that it may have another mistake that I'd made with the software setup on the drive emulation so I used Chris T's adapter to hook up my FloppyEmu to the external Floppy Disk port and put the same disk image on that.  I got the same error message.  So this made me think that the problem may be with the hardware configuration, maybe I didn't have enough RAM?  I looked for system requirements for the Selector III software that creates the boot menu, but I couldn't find that online.

But I wanted to work on the newer machine anyway, so I pivoted back to that and started doing more troubleshooting on the second machine.  The state I had left this machine is that it would do the diagnostics and pass with a keyboard attached, but it would not boot SOS.  It would boot the Confidence test disk, but it would only run for a few minutes before locking up with garbage characters on the screen.

I had used the on-board RAM diagnostics to condemn and replace several of the RAM chips in a previous troubleshooting session.  The machine was passing the boot RAM diagnostics, but I decided to remove the RAM and test one at a time on the separate RAM tester again.  What I found was a surprise, one of the "known good" RAM chips that I'd tested when I put the RAM in storage was the culprit, I should have been testing the replacement RAM as it went into the machine!  When I replaced that, the machine was back to booting and running with it's full 256K RAM.

Now I had a machine to test the theory about the Apple III Selector III menu needing 256K RAM.  This did indeed solve the problem, the Smart Port functionality works, and I have a second functional Apple III with an emulated Profile Hard Drive full of software to explore!  Very exciting.  Here's the machine paired with a Monitor III I had gotten with a previous Apple II purchase...


I spent a bit more time with the keyboards and a third parts keyboard from Steve.  I had been told before that if the light bulb on the keyboard died, the system would not recognize the keyboard, but I forgot that till I got to the point where I needed two working keyboards.  Sure enough, replacing the dead light bulbs on these two parts keyboards does allow them to be recognized by the computer, so this was another hurdle overcoming to getting the second machine back up and running.

Another side excursion on this project was the Power Supplies.  On the newer machine I purchased one of the Reactive Micro power supply upgrade kits.  This provides peace of mind.  On the second machine, I was continuing to use one of the original Astec power supplies without having given it much though, but I should have!  A couple of hours into one of the troubleshooting sessions the big RIFA on the high voltage side of the power supply gave way and released its magic smoke.  As the smell lingered in the basement I replaced the Rifas with modern filter caps from a different brand.  I've got a few hours on this repaired power supply, so far so good with that repair.

The second "Full" Keyboard is not quite perfect, I had to make some printed labels for a couple of the keys and the Alpha Lock key is a momentary key not a toggle.  The bezel around the keyboard is smashed, but other than that this is a second working Apple III machine that is somewhere between a partially completed project and a parts machine...


I did not anticipate at the start of this project that I'd be able to get two functional Apple III machines out of this lot.  These machines have a bad reputation but so far my experience with them has been good.  I'm going to keep the first machine setup and I'll keep poking around with it and learn more about the software.  One of my next goals is to try to get a printer working.

Do you have memories of using the Apple III?  Repair Stories?  Feel free to comment or send me an email using my address stored in my Profile at the top of the page.

Last of the PA RISC Machines, Hewlett Packard PA RISC 9000 System 712/60

 Early this year (2025) I picked up a cool Unix workstation at Free Geek Twin Cities, an HP PA RISC workstation, the 712/60.  It was a project machine; missing RAM, drives and a top cover, but the logic board was there with a good power supply.  Reading online, it is very difficult to find compatible RAM for these machines.  I did try buying 72 Pin ECC SIMMS on eBay, but they were not HP branded and they were not recognized by the machine.  So the computer went into storage and the project went on hold.

In the lead up to VCF Midwest this year I read a post on the Vintage Computer Forums offering to re-home some machines from an estate.   I made a note to follow up with the person who posted and I checked in with them first thing on Saturday Morning.  They had a cool pile of machines...


I am lucky enough to have a several of these machines already, and thanks to Rick I was able to add a complete HP 712/60 machine to my collection.  The hard drives were removed from all of these machines, but during the show I purchased a couple of BlueSCSI hard drive emulators.

Back at home after resting from the long weekend away I got started on the project.  I added the BlueSCSI and it was working, but I was unable to start an installer with the machine.  After some experimentation I found this article which explains that the HP 712/60 needs a special INI file for the BlueSCSI.  Although this helped, I was still experiencing lockups with the HP-UX Installer CD ISO file.  I tried switching to a different installer, it turns out that NextStep 3.3 has a RISC version that is compatible with this hardware.  The NEXT installer generated a Kernel Panic that was a bit more verbose than the HP-UX installer.  The kernel panic made me suspect that there could be an issue with the Logic Board.  After several hours of troubleshooting (and taking a break for the evening and sleeping on the problem) I decided to get the parts system I had and try that.  It booted the installer right away!  So I swapped this newer main logic board into the complete Chassis from VCF, and it works great.

I now have a complete, working HP PA RISC machine running NextStep 3.3 in Color!  The machine looks great...

And even more important it runs great.  It does feel like "where NEXTSTEP belonged all along".

I look forward to getting it setup a bit better, I need to configure users, networking, and install more software.  I also want to go back and try to get the machine dual booting with its original HP-UX operating system, but this is a topic for a future blog article.

Do you have any memories of using these machines back in the day?  These engineering workstation computers had mostly gone out of use before I started my first engineering job in 1996, I never used one at work, so I'd love to hear any stories that people have to share about using this kind of hardware back in the day, please leave a comment below or find my email in my profile.

VCF Midwest 2025 Recap

It's late September and VCF Midwest #20 (2025) is in the rear-view mirror.  This was my fourth in-person visit to VCF Midwest, but I think of the online only 2020 event as my first VCF, so I've been to five total VCF events now.  It was another excellent event this year and I really enjoyed being there.

I decided a couple of months ahead of the event that I was too busy to exhibit this year so I bowed out of having a table for the first time in 2 years.  It was nice to not have to worry about prepping and I already have an exhibit idea that I'm excited about for next time.  I'll save that as a surprise for next VCF.

This year at VCF I invited along a couple of my Minnesota based retro computer friends who came for the first time.  It was more enjoyable to have a shared experience; shared meals, attending talks, and of course walking the show floor.  Of course we also talked with alot of the other Minnesota based folks that travelled to the event.

I spent a fair bit of time walking the show floor on my own looking for bits and pieces for projects.  I had planned ahead of time that I was not going to buy new projects (unless there were deals I couldn't pass up) because I already have a handful of new projects from the previous lots I purchased locally earlier this year that I haven't got too yet.  I was successful, bringing home only a small number of items from the show...

The monitor is a composite green screen that I'll pair with and resell with an Apple IIe project.  The Pizza Box computer is an HP PA RISC machine, an 712/60 from 1993.  I've been holding onto another one of these so this allowed me to get started on an HP 712/60 project which will probably be a future bLog article.  There are a couple of Apple Unidisk drives that will pair up with an Apple IIe Platinum and my IIgs systems, and most of the rest of the lot is various kits for pending or future projects.

One of the highlights of the show was the last minute addition of Lee Felsenstein.  I'd read his book earlier this year and quite enjoyed his take on the early days of home computing in the SF Bay Area.  I got to meet Lee and he signed my copy of his book...


I didn't get to talk to Lee for very long, but it was fun to meet one of the originals from the Homebrew Computer Club, certainly a highlight of the weekend for me.  One of my friends from Minnesota brought down his Sol-20 computer and Lee signed his computer manual, too.  I have an Osbourne computer, but it's a bit of a hodge-podge so I didn't bring it to show to Lee.

Sunday morning was significantly quieter at the show.  Since I didn't have a table, I just did a single lap of the show, purchased a few final items, and then headed home.  I'm already looking forward to next year.

My Personal Personal Computer History - 100th bLog Article

For my 100th bLog article, I thought I'd do something nostalgic and go back and outline my own history with personal computing.  When I started in the hobby 6 years ago I didn't know if it would be possible for me to collect the computers I'd previously owned but it has been possible, and I've written bLog articles about all but one machine, an omission which I will remedy in this article.

I started out with the VIC-20 that my Uncle gave me in the last 80s when he upgraded to the C64.  I've already written about my new VIC-20.  Since that article I've been able to get a Penultimate II Cartridge which has alot of fun games on it.  I've also found a good deal on a "PET Keys" VIC-20 and added that to the collection, so now I have a good running machine and a parts machine if needed.  When I was a kid I tinkered with the expansion port on my VIC-20 and ended up destroying the computer, at the time I didn't know how to repair computers so we were without a computer at home for a while, a gap in my Personal Computing resume.

Of course all throughout this time I used computers at school.  We had Apple II computers at school.  We had mostly Apple IIe but also a couple of IIgs machines.  I don't recall using a Mac during my High School years although there must have been a couple of them around in the early 90s.

After High School I moved to college at the Milwaukee School of Engineering.  When I first started school there I didn't have my own computer and was reliant on the computer labs.  At this point in time some of the programming courses were still being taught on DEC VAX hardware.  I think the school may have been running 11/780s.  One lab had VT220 terminals and another had 320s.  The school also had Macintosh labs and PC Labs for the students to use, but in my electrical engineering course we were encouraged to use PCs.  Shortly after I started school during my freshman year I got a Slimline Gateway 2000 486 PC, that would have been in 1993.  It was my first new computer.

After college I moved to Minneapolis for work.  I continued to use the 486 until 1999 when I got an Apple Power Macintosh G3 Blue and White.  I was starting to get into shooting and editing Digital Video as a hobby at that time and the G3 was a necessary tool for that hobby.  I paired the Mac with a 17" Sony Trinitron CRT, it was a great setup, although I do recall how painful it was to use the Puck Mouse.  I ended up buying an accessory to change the shape of the Puck Mouse and make it more ergonomic.

That machine worked well for quite a few years, I think we used it up till 2004 or 2005.  At that point we purchased a Power Mac G5.  This was the last of the Apple professional computers I purchased new.  I have re-acquired a 2005 dual processor G5 for my collection. This is a computer I have not blogged about before, so here's a picture of the setup...


We used the G5 till 2009 when I bought our first Intel Mac Mini. Since then we've used a string of Mac Mini machines, up to and including an M4 Mac Mini I bought earlier this year.  These are great value for money but I not nearly as interesting.

Thanks for following along with my bLog!  The retro community is a really amazing group of people and I hope I can give back just a little bit here on the bLog by sharing about my experiences restoring computers regardless if they are nostalgic like the machines listed above or projects built to learn about the history of technology.

What about you?  Let me know about your personal computing history in the comments below, or find my email address in my profile.  Did you have any of the same computers?  What are your "grail computers" for your collection and why?

Another Retro Lot: Recovery, Repair, and Resale

One of my fellow vintage computer collector friends posted a listing on the Free Geek Twin Cities Discord server in the "Swap Meet" channel about a lot of Vintage Computers posted on Facebook Marketplace.  There were eight computers, mostly Apple IIs of various vintages, untested but priced to sell quickly.  I had some free time on that day and so I immediately jumped on the post.  It's always a pleasant surprise when I'm first in line since so many folks are interested in vintage computers.  I went down within a couple of hours and met seller for the pickup, he had been a huge fan of Apple computers back in the day.  He had collected these machines from the University of Minnesota when they got retired from the computer labs.  He is still involved with software too this day and he was glad to hear that these would be moved to other homes.

This is the third lot I've gotten this year, I already blogged about the first lot here.  I only have one repair left from that lot, a pair of Macintosh 512K machines.  That will be a more complicated repair because servicing the 400K drives is difficult, but I know how to do that now so I expect to be able to bring the drives back to working order.  All the other machines from that lot have been fixed up and resold already.

The second lot had three machines in it but only one I wanted to keep, a Macintosh Quadra 650.  I installed a BlueSCSI in that machine and it's back in good running order.  I still have some big box software but the other two machines (a Macintosh Plus and a Power Mac G4 Quicksilver) have sold and much of the boxed software was donated to Free Geek.

When I got this lot home I was faced with a pile of incoming material to process...


The lot included an original Apple II from 1980, four Apple IIe machines, two green screen monitors for those machines, two Apple IIcs with two CRTs, and a NextStation w/ Keyboard and Mouse (but no monitor).  On the first pass through these machines I had the following results:

The original Apple II is booting and running, but the video is rolling.  Since this is a machine that I want to keep I set this machine aside for a future repair.

Of the four Apple IIe one just worked with some basic cleaning and testing and one with a DuoDisk only needed a new cable, which are avaliable online from this vendor.  I've already sold those two Apple IIe machines, but I have two more which power up with garbage characters on the screen so that will be a future repair.  I've repaired multiple Apple IIes in the past so I'm looking forward to that repair.

Of the two Apple IIc machines only one was complete.  Neither showed signs of life.  The incomplete machine is an early revision which matches the Apple IIc I already have so I'll keep it as a parts machine.  The second Apple IIc didn't work right away but I took it all apart and cleaned and inspected it.  While I was re-assembling it I put deoxit on all the connectors and after that it came back to life.  I ordered a 3rd party power supply to make this a complete listing and it sold.  I also had made a bunch of DOS boot disks and Flapple Bird floppy disks so that I could include software with the Apple IIs as I've been selling them, it's really nice to be able to set people up with a functioning system.

Finally, the NextStation.  These can not be tested without Next hardware as the connectors are proprietary.  I am fortunate to have a complete NextStation setup, so I was able to setup and test this machine.  The Keyboard and Mouse were both working, but I had some trouble with the NextStation itself.  I had forgotten that this machine will not boot at all if the clock battery is dead.  When I moved the good battery over to the new NextStation it booted right up!  I ordered another new battery to replace the dead one.  It may come as no surprise that the Quantum SCSI HDD was dead so I installed a BlueSCSI V2 into the machine and got NextStep 3.3 installed and booting on that.  I'll be holding on to this machine at least for now.

It's been fun to meet the people who buy these machines.  We have some interesting conversations and I get to hear about their experiences with machines like this, and their plans for their new acquisitions.  I've had a couple of repeat customers and even made friends with some of the buyers.  So as I complete a few more of these repairs I look forward to helping people expand their collection while I build my own.

Let me know if you have a lot of retro computers to sell, or if you have memories of using these machines, or have been helped by my repair experiences.  You can comment below or reach out via email with the contact information in my profile.

Here Comes the Sun - Sun Ultra 5 & 10 Systems

If you have learned much about the history of computing it's hard to avoid hearing about Sun Microsystems.  They dominated the personal workstation market for pretty much the entire time it existed.  They came out of Stanford and invented or popularized many technologies that ended up being widely adopted around networking and the Internet.  I've had Sun equipment on my wish list for quite a while as I never used it during the 90s.  I wanted to experience Sun hardware and software for myself.

The first Sun that I acquired was an Ultra 5 desktop.  I had been warned that it was not working and incomplete, a parts machine, but I was happy to have it anyway.  I purchased parts on eBay and tried to get it working spending many hours reading and learning and testing, but the main board on this machine ended up having a bad MMU, so I made a note on my wish list to get another machine of this type and I moved on.

Shortly after that I acquired a working Sun Ultra 1 machine from my friend Steve Hatle.  He worked on these machines during his career so he's had professional experience with them and he did a nice job restoring this Ultra 1.  It works great, and it's always nice to be able to start out learning about a new type of computer with one known good working machine as a baseline.

But the Sun Ultra 5 project sat for quite a while until last fall.  A generous donor, Peter Manina, gave me another working good Sun Ultra 5 during VCF Midwest 2024, thank you Peter!  He had donated another machine previously, an IBM RS/6000 Machine which I covered here.

This second Ultra 5 machine was also a bit of a project because this lot included a SunPCI card (a PC on a card made by Sun for these machines).  Peter had suggested that the PC Card runs hot, and that it would be better to run it in an Ultra 10 tower which has better cooling.  The Ultra 5 and 10 are sister machines with the same motherboard so the CPUs and peripherals are interchangeable.  I waited for a while and when an Ultra 10 parts machine came up on eBay for a reasonable price I purchased it.  At that point I had three machines. I was hoping for two working machines a 5 and a 10.

The next hurdle for these machines is getting a working NVRAM / Clock Battery.  I tried the battery replacement hack where you use a dremel tool to cut through the side and solder on a CR2032 coin cell holder, but these are not Dallas brand batteries and are much harder to modify in this way.  I tried ordering clock batteries from China, but these parts came with a dead battery, too.  I ordered another pair from an eBay seller.  The project sat for quite a while but eventually I found this video and decided that I should be able to dremel out the epoxy far enough to get to the terminals inside and solder on a battery.  The results were not pretty but I modified three chips and added an easily replaced CR2032.

The Sun Ultra 5 machine came together easily after the clock battery situation was resolved, Peter had already put a modern SSD in it with a StarTech SATA to IDE adapter that is well known in the retro community for providing good compatibility.  I was able to re-install Solaris 9 on that machine and had it back up and running in a short period of time.  It looks a bit yellowed on the front, but overall I'm quite happy with this machine...

The Ultra 10 was more of a challenge.  Peter had warned me that some of the Solaris Install Media, even though it came directly from Sun, might not work.  I had been planning to use Solaris 8 because it is compatible with the PC Compatibility card but neither of the two versions of 8 I had were working for a clean install, but then watching this video from the Phintage Collector he showed that the PC Compatibility Card could be made to work with Solaris 9.  I decided to follow the path of least resistance and go with Solaris 9 on the Ultra 10 system, too.  I setup this machine with another Star Tech IDE to SATA bridge card and a low cost SSD.  I also replaced the non-functional CD-ROM drive in the eBay machine with a working drive.  After I got the machine running with Solaris 9 I started on the SunPCI card configuration.  This article was also extremely helpful for getting the SunPCI Card to work, and here it is running Windows 98...

I'm very happy with how the machine turned out and I wish to thank Peter Manina again since his gift got me restarted on this project.

Do you have any memories of the Sun SPARC or Ultra series workstations?  Let me know in the comments or reach out to my email address shown in my profile.

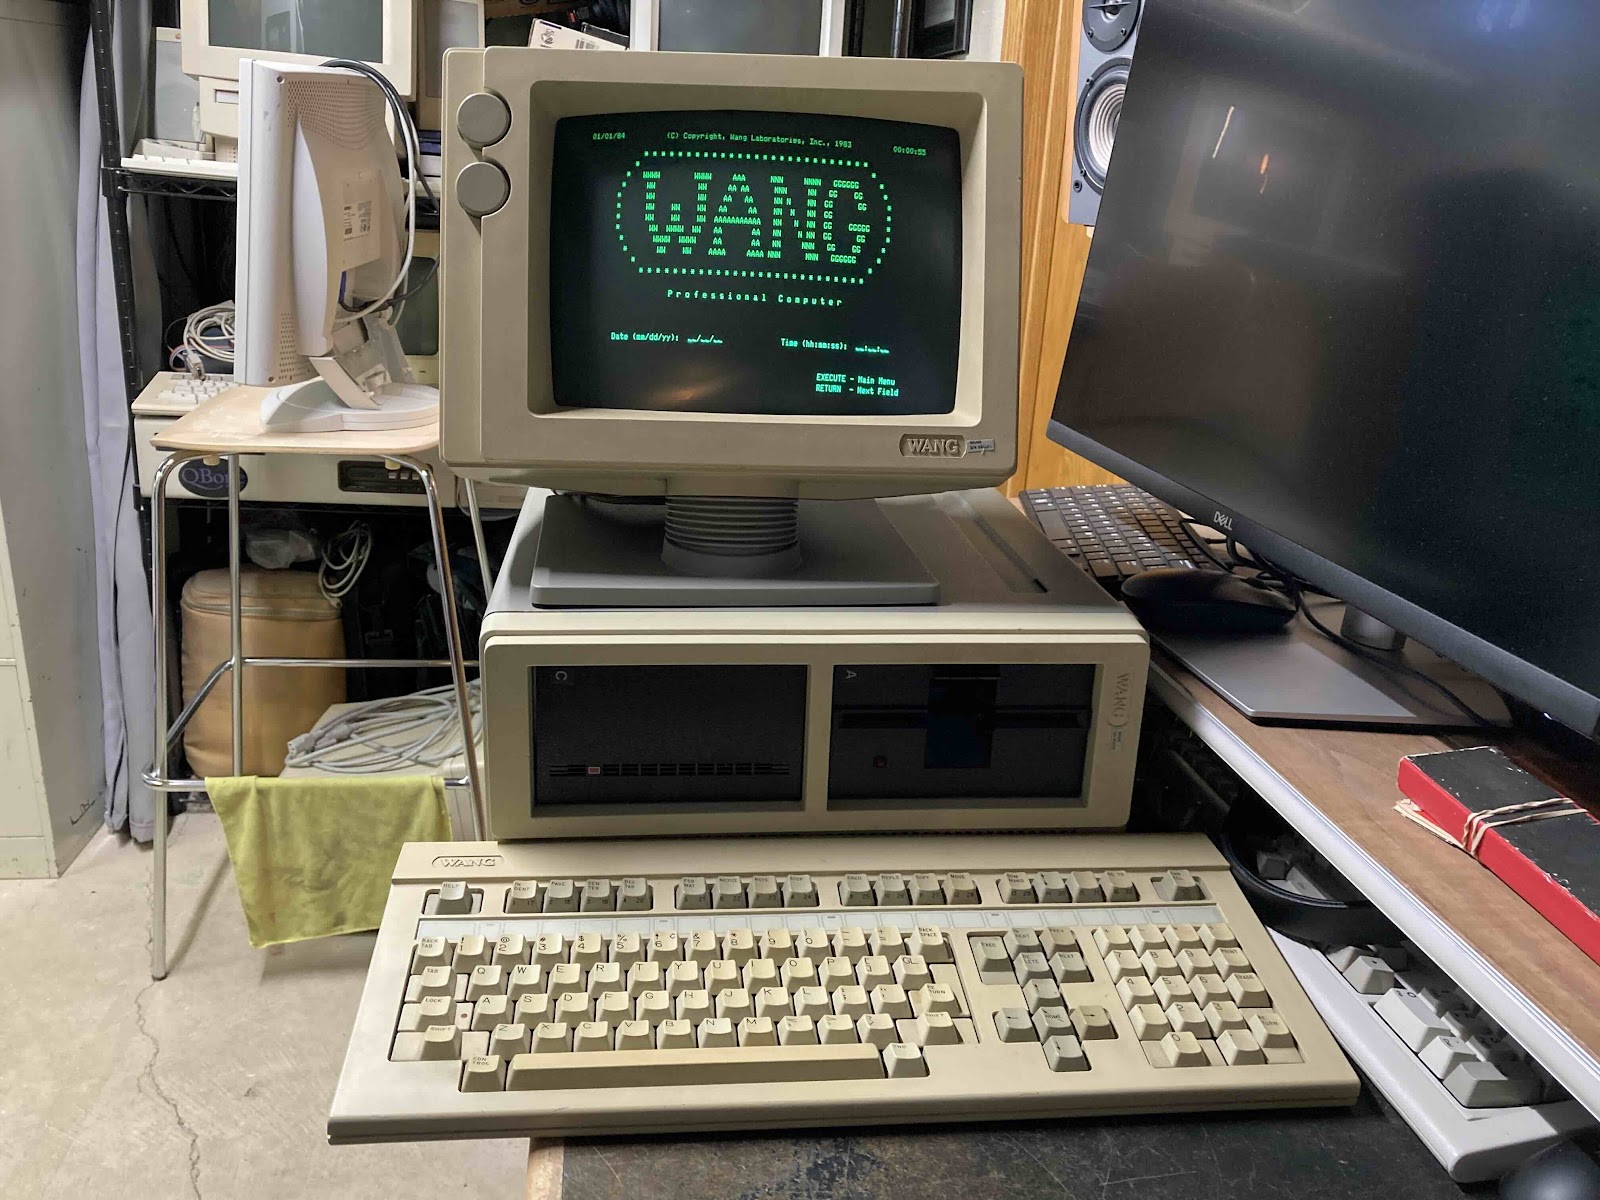
Wang Professional Computer from 1984

 At the end of last year (Dec 2024) I was browsing Facebook Marketplace and saw a somewhat interesting computer that I had never heard of before, a Wang Professional Computer (Wang PC).   I've been interested in Wang since learning about the history of the company founder, An Wang, and his contributions to the history of computing.  He was involved in the development of Core Memory, and was able to use the funds from the sale of that invention to start his computer company Wang Laboratories.

I was interested in the Wang PC but did some research before buying it.  Because this is not IBM PC compatible, you need the custom Wang Keyboard and a custom monitor to use this machine.  The Facebook listing included a Keyboard but not a Monitor.  I was going to take a pass on the machine, but the seller lowered the price to the point that I could not refuse. 

I took the Wang PC apart and did some light cleaning and dusting inside of the case.  The computer appears to be in good shape.  Then it went up on a shelf in storage waiting for a time when I could find a matching CRT at a reasonable price.

Fast-forward 4 months.  I had a saved search for Wang CRT monitors on eBay, and a compatible monitor appeared.  I got the Wang PC down and tested it out to see if the Power Supply was working and if the computer was showing any signs of life without the monitor.  The computer did appear to be working, at least as well as I could tell without a monitor, and I thought it was even booting from the internal Hard Drive.  So I ordered the specialized CRT from eBay.  I was a bit nervous becuase the screen was not guaranteed to work.  But the seller did a great job of packing it and it arrived intact.

I was super happy when I powered the system up with the monitor for the first time and it worked!  Then only a few seconds later, the CRT's horizontal sweep collapsed to a vertical line, what a bummer...


Thankfully I have been able to fix simple CRT problems in the past so I took the monitor apart and started troubleshooting.  I was not able to find a service manual or a schematic, but the circuit board was well labelled.  That is about the best I can say about the circuit board.  When I started removing components to test out of circuit I damaged several traces as they were not stuck to the board very well.  It took me quite a few hours over a couple of different evenings to get the monitor working again, I never did identify a bad component.  I did reflow most of the solder joints on the monitor board so it was likely a cold solder joint from vibration or old age, or the low quality of the circuit board.  Either way the monitor is working again and the Wang PC is usable!


But, then I encountered the next issue, the keyboard was not working well.  I did get a few key presses to register but most of the keys didn't work at all.  Then the ones that had worked stopped working, too.  This was not a huge surprise as I had already read that this was a "Foam and Foil" type keyboard.  I've restored a couple of other brands of these type using these pads that are sold by TexElec so I got another set of those on order and prepared the keyboard by taking it all apart, removing the old pads and doing a through cleaning.  After replacing all tbe pads I did some testing and then fully re-assembled the keyboard.  All the keys appear to be working and I'm quite happy with how it turned out.

Once the keyboard was complete, I was able to explore the computer and see what files were present on the hard drive.  The 10MB hard drive is about 1/2 full.  The drive appears to be working well, it's not making any unusual sounds so that's good.  One interesting feature of the machine is a simple menu that starts up on boot, it allows the user to move around without typing any commands to start programs and move files around...


This machine has the Wang Word Processor installed.  Wang was famous for this.  They had dedicated hardware just for word processing in their previous generation of hardware, which you can see covered on Usagi Electric.  Although my machine is a General Purpose computer, Wang Word Processing is just about the only software installed on this machine.


I tested the Floppy Drive a bit, and it did not seem to be working correctly.  It was functional for a little while, then stopped working.  I took the machine apart and did some cleaning.  I re-seated connectors but there was nothing obvious wrong with the drive.  When I re-assembled in, the drive started working!  I was able to boot the machine from Floppies I had made from Drive Images I found on WinWorld.

And with that repair, the Wang PC is functionally complete!  I'm very happy to have this system.  It will go nicely with my other MS-DOS compatible machine, the Tandy 2000, and maybe this will motivate me to work on another MS-DOS system I've had in storage for a while, a Zenith Z-100 system.

Oops I Did it Again - Another Lot of Computers Needing Repair

Recently I was browsing the retro computer forums and a for sale ad came up in my city.  A fellow Macintosh computer enthusiast had purchased a lot of Macintosh machines to restore and the project sat for a long time.  He decided to shift the project along to someone else.  The listing had a single photo and some text, the photo showed seven machines and one box full of peripherals.  The text described another box of peripherals not shown but included in the sale.  The price was low enough that I could purchase the entire lot and if my repair attempts failed I'd still have gotten some much needed peripherals for my collection.  But as readers of my blog will know, I really enjoy the repair process and so I was hoping that I'd be able to repair much of this lot and sell it on, since these were all machines that I had, and I even had some parts machines of this type.

When I got the lot home this is what I had...


The lot consisted of; 2 512K Macs, 3 Macintosh Plus machines, a Mac SE and a Mac Classic II along with the peripherals, an external 400K floppy, an HD20, and a couple of different keyboards and even a couple of random vintage PC parts.  As usual I began the intake process with some light cleaning.  It was no surprise but the equipment was quite dusty, including inside of the machines, so I think it was likely these machines spent quite a few years in a garage or basement.

On my initial checks (triage), both of the 512K macs booted to a ?.  I'm quite certain the floppy drives will need lubrication and maintenance so I've set those machines aside for now.

For the Mac Plus machines, 2 of the 3 booted right up to the ?.  The third machine was booting, but showing some odd video corruption of a kind I had not seen before.  On further inspection that machine had a 68030 accelerator board inside of it.  It's possible this accelerator board is damaged, but I need to do some research to figure that out, so I've set the accelerator board aside for now.

The Mac SE booted up to a ?.  This was a project I wanted to work on in the short term because I have a couple of other Mac SEs including one mostly good machine with bad Floppy Drives and one parts machine.  I was hoping to get two working Mac SEs out of these three, but more on that later.

The Mac Classic II made a normal good chime on boot up, but the video did not come up.  These machines from the early 1990s are often damaged for two reasons, the first is an exploding clock battery, and the second is the "Capacitor Plague" where Apple unknowingly used sub-standard electrolytic capacitors that slowly leak out onto the circuit board.  Both of these problems can ruin Mac Classic and Mac Classic II machines and so all of these machines should be serviced ASAP.  Fortunately for me, the clock battery had not leaked, so I removed it.  The capacitors had been leaking so I removed them immediately and got to work cleaning the board to prepare it for a recap.

I worked on the Mac SE and the Classic II at the same time.  For me, a big part of the experience with the original style Mac computers is using the Floppy Disk drives.  Servicing them can be tedious and error prone, but there are some great tutorial videos out there, and once you've done each type of drive a couple of times it starts to come easier.  But it can be tedious when there are many drives to service.  I try to keep one or two of each type of drive in my stock because often drives will require spare parts not just lubrication so I got the drives out of the Classic II and the Mac SE along with some of my spares and got started...

Having these drives ready allowed me to start the repairs in earnest.  As I've mentioned, I had a couple of other Mac SE machines and I checked on those floppy drives that were not working, and they had already been serviced.  It turns out that the reason they weren't booting was because I had some bad boot floppies, so that was one mystery solved.

The Mac SE from this lot had badly yellowed in the sun, but my parts machine was still a great looking platinum case, so I did a case swap on the Mac SE and got a lovely looking fully running machine...

I don't need 3 Macintosh SEs so I currently have this machine listed for sale locally here in the Minneapolis / St. Paul area.

The Mac Classic II repair took a bit longer because I had to order capacitors and wait for those to arrive for the recap.  Also it took a while to clean the logic board of this machine using both water and IPA and multiple manual rinse cycles.  I also had a parts machine for this repair, a Classic machine that I'd previously recapped but that machine never worked quite right after the recap it would boot and run just fine but the external SCSI and FDD ports weren't quite right.  It's possible that further board level work could bring this machine back to full function, but I was able to use the Classic to help troubleshoot the Classic II.

It turns out that not only did the Classic II need a recap on the logic board but the analog board was bad as well.  I did another swap on the analog boards and CRT boards to get a good setup into the Classic II case.  After swapping the Analog board the Classic II came back to life, and with the recap and cleaning, I'm hopeful that this machine will have a long and happy future.  Classics and Classic II machines are not my favorite from this time period, so this is another machine that is for sale here in the Minneapolis / St. Paul area...


I'm still actively working on fixing up the Macintosh Plus machines.  I have all three of them running again because I was able to borrow parts off another parts machine that I had, so the next step is servicing another set of Floppy Disk drives, the earlier 800K drives that came in the Mac Plus and Mac SE...


Since I already have a couple of nice Mac Plus machines I plan to offer these machines for sale when the Floppy Servicing is complete.  Hopefully I can complete the Plus repairs this weekend and get back to the other projects I was working on when this lot came up.  It's been alot of fun doing these repairs but I'll also be glad to move back to my "regularly scheduled programing" of Retro Computer projects.

Do you have memories of using these machine?  Let me know if you have stories you'd like to share in the comments, or my email address is in my profile.  Thanks for following along with this repair story.

The Original Slide Rule Replacement - Hewlett Packard Handheld Scientific Calculator

As I have pointed out in a previous post, I am a calculator collector.  As I was doing research about HP Calculators in order to replace the one used during my college years, I learned of the original handheld scientific calculator.  This was invented by HP in the early 70s.  At first the machine didn't even have a model name, it was just the HP Handheld Calculator, but later it was labelled as the HP 35 since it had 35 keys on it.

As of this writing in early 2025 prices for the original HP 35 are rising with good working examples going for several hundred dollars on eBay.  These are much more repairable than modern calculators and there is at least one detailed tutorial video showing the process to take them apart and clean them.  The repairability and information online made me feel comfortable enough to purchase a non-working unit on eBay and attempt a repair myself, but things are often more complicated than initially expected.

The unit arrived and I was able to take it apart as shown in the video.  There were signs that this one had already been taken apart, which was disappointing since that was not shown in the eBay listing.  I should have asked for pictures of the back.  Cleaning the contacts did not resolve the dead keys on this calculator as it did in the YouTube video so it turns out that this calculator had something wrong with the electronics on the main circuit board.  I reflowed the solder joints and poked around on the main board a bit, it isn't very complicated, but I'm guessing one of the custom logic ICs is damaged, so this project went on hold for a few weeks.

Shortly after I got an email from one of my saved searches on eBay.  It was the cheapest HP35 on eBay in. quite a while.  It was a loose calculator without a Power Supply.  I talked to the seller and he had no way to power it up, so it was a gamble, but he also showed the back of the unit and this one had not been opened, so I took the chance and purchased it.

The second calculator was in really rough shape.  When I got it on the workbench it had battery corrosion on the inside of the battery compartment and it wouldn't power up.  I started disassembly, cleaning as I went.  It was obvious that corrosion had gotten inside and affected the power circuits under the battery compartment, however, the design was modular and that was not a part of the main logic board that was bad on the other calculator, so I was still hopeful.

When I swapped the older logic board onto the newer HP35 it fired right up and worked!  I was very happy to have a working calculator after buying two broken ones.  As soon as I got one working I checked for the 2.02 bug.  The working Logic Board is from the first year, 1972, but it does not have the bug, which is OK with me since it would have looked out of place in the newer case with the H P 35 logo on the front.

I also rebuilt the battery pack with 3 NiCd AA cells and it looks quite nice running without being plugged in...


So now that I have the first ever scientific calculator, the HP 35, and my favorite calculator, the HP48G that got me through college.  These are the bookends for my collection and should not really need any more calculators in the collection.  For now.