Apple II Plus - Trash to Treasure - Part 1

One of my goals in Retro Computing is to learn about older and older computers, and work my way back in time, one generation of computers at a time.  The nostalgia factor is certainly important for me, but I’m also interested in the tech that came before.  In my own retro computing development, I’d been keeping my eye out for an Apple II Plus machine.  I have an Apple IIe that I’ve already mentioned, and have been interested in the experience of using the original Apple II's since I’ve never owned one of the original “Trinity” of home computers.  Finding an original Apple II (not a Plus) seems a bit out of my price range at this point, but perhaps someday I’ll be able to repair an original Apple II.

My opportunity for a II+ came in mid November of this year, when a trusted retro computer seller on Craigslist posted a Bell and Howell “Darth Vader” computer in need of some serious help.  As Apple fans will know, this was a partly re-branded Apple II Plus, Bell and Howell painted it black, and since it’s a bit more rare it’s more valuable.  The seller and I had a phone conversation about the state of the machine, which was poor, but I was able to convince him to sell me the machine regardless of the state.


The state of the computer was not good.  The biggest problem with this computer was that the top cover had been removed before the computer was stored.  This meant that dust and dirt got inside.  I even found a couple of acorn tops as I was cleaning inside.  The main board had a significant amount of dirt on it, and there was one chip (one of the ROMs) that had bent pins  It seems likely that something very heavy was dropped onto this chip causing the pin legs to bend.

So on intake, it was obvious that I should not even try to power the machine on without doing a lot of cleaning first.  I started by taking the top half off the case, removing the power supply, main logic board, keyboard, and backpack from the unit.

I started with the logic board.  I used the cleaning method that Adrian Black has been demonstrating, warm soapy water in my basement laundry sink.  I used Dawn dish detergent, warm water, and brushes for the initial cleaning.  It took quite a bit of time because there are more than 80 chips on the board that all needed to be cleaned around, but it was very gratifying to see how much better the board looked after.

Also, at this point I was able to get a look at the date code on the board and discover that this II Plus was made in 1981, so this would have been the third year of production for the II+, starting in 1979.  After the initial clean of the logic board, I shifted gears to the power supply.   I had already serviced the power supply in my Apple IIe, but this one had an additional rivet on either side that I had to drill out.  The RIFA cap was certainly on its way out (bulging) so I'm glad I saved the smelly mess associated with a power on test.  I removed and replaced with a new X type filter cap that I had in stock.  When I put the power supply back together and tested voltages, it was not working correctly.  I remembered that as I was re-assembling it, the circuit board had flexed quite a bit.  Since this board has a heavy transformer in the middle, I think this design is prone to getting cracked solder joints at the transformer.  After I reflowed the joints on the transformer and several other components while I was at it, the power supply was working with all voltages reading good.

Next, I tackled the keyboard.  One of the things I dislike about the Apple II Plus is the use of ribbon cables with DIP connectors on the end.  I didn’t realize how fragile these were, and as I was taking the computer apart, I broke pins on the interconnect cable between the logic board and the keyboard.  Thankfully, I was able to find this article online, I ordered the replacement cable from DigiKey, and it is on the way.  This keyboard has the SKCC Short Stems with the extenders installed, and it ended up being significantly less dirty than the previous one I’d cleaned. My son especially enjoys keyboard cleanup (I think it reminds him of Legos), so he helped me with this part of the project.  We pulled all the keys and gave them a soak, he helped me go over them all with a toothbrush, they look great.  I then worked on the keyboard deck, using the same procedure I described in the Apple IIe article with lots of Isopropyl and DeOxit.

The next day, after the main logic board had dried, and on further inspection, I needed to do more spot cleaning on the logic board.   This time I used Isopropyl and  Q-Tips to get in close to each chip.  I was also able to pull out the damaged ROM chip, inspect the socket, and re-bend the pins back into place.  I made a note of the location since this may require further inspection and repair, but at first glance, it looked like that socket had not been damaged, and none of the pins broke off.

At this point, I was able to give the system its first power up, a very exciting moment indeed.  Sadly, there was no video from the machine.  So, this sent me back to looking more closely at the board.  What I noticed was that because there had been so much dirt on the board, there was dirt on the legs of many ICs where they entered into the sockets on the board.  So, as time consuming as this would be, I felt it would be important to pull every IC out of the socket, inspect the IC, clean the legs if needed, and spray De-Oxit into every socket.  Given that there are more than 80 ICs, I divided this task up into a couple of parts.

During this part of the repair, I broke multiple legs off three different ICs.  Again, using another trick I’ve seen from Adrian Black, I was able to solder a small (28ga) solid copper wire back on in place of these legs and get the chips plugged back into their sockets.  I’m super happy that I didn’t have to order any additional chips. (Yet, knock on wood)

On completion of reseating all of the chips on the board, it was time for another power on test.  This time, there was Video, along with the Apple ][  logo at the top and the ] BASIC prompt, a very happy moment indeed!


At this point in the repair there remains a good deal more work to do; the keyboard is non functional, the RAM should be tested, I should add a Floppy Disk controller, but this article has gotten a bit long so I will leave off here for now.

Apple IIe Repair and Use

The Apple IIe was the first computer I spent a significant amount of time working on, because it’s the computer they had at my junior high and high school in rural Wisconsin.  I remember playing Oregon Trail and the original Castle Wolfenstein at school in the school library.  But these were also our workhorse computers that we used to learn BASIC programming and for word processing with AppleWorks.

So, it was with great excitement that I started in watching Adrian Black and various other vintage and retro tech YouTubers dig in on these Apple II computers, learning how they work, how to repair them, and work on cleaning and restoration.  Full schematics are avaliable, and really excellent troubleshooting material from back in the day is also up on the ‘Net.

Because I’m always trying to keep my hobby affordable, I didn’t rush out and buy the first Apple II computer I could find, I made several offers, and was finally able to land a nice-looking example from a family that was cleaning out their basement.  The lot of items for sale included the Apple IIe itself, an Apple Color Monitor, a single Floppy Disk drive, and many floppies and manuals.  I purchased this at the beginning of October, the seller “didn’t know if it works”, so I was prepared for the fact that it probably wouldn’t work.


So after getting the unit home, the first thing I did was to take the power supply out.  The RIFA cap had blow, I could still smell it. I wondered if they had tried to test it and let the smoke out of the cap recently.  I removed the RIFA cap and then tested the Power Supply voltages.  Those checked out good, so I tried to power up the monitor next.  The monitor powered up without incident.  Then, the moment of truth, I powered up the computer (without any cards in it), and it booted right to the BASIC prompt.  A very exciting moment!

After poking around for a few minutes, I realized that some of the keys on the keyboard were not working.  The keyboard was filthy.  It seems likely that this machine had been stored in the previous owners basement, perhaps for decades.  The next order of buisness was to clean the keyboard throughly.  I washed the keycaps, and did what I could to clean the keyboard from the top and bottom with liberal use of Isopropyl Alcohol.  I sprayed a liberal amount of DeOxit into each key and cycled each key a dozen times or more.  This brought back about 1/2 of the non-functioning keys, but there were still three keys that I had to remove.  I was able to take these three key switches (SKCC long stems) apart and clean the removable metal contacts, then replace them in the switch housing.  Try that with a computer that isn’t 30 years old!  This restored all the keys on the keyboard to full function, and it’s been working fine ever since.

The next set of repairs centered around the Floppy Disk drive.  I was excited about getting the Apple Disk II device up and running, there’s something so nostalgic for me about the sound that the Apple II drives make when the computer starts.  When I first received the drive, I heard something rattling around loose inside and so before powering the drive up, I needed to open the drive and determine what that rattling sound was all about.  It turns out that the lever on the bottom left floppy disk guide had broken off.  This lever must remain connected, yet flexible, so I used some strong Gaffers tape to get it back in place so that when a floppy was pushed in, that lever would sense the write protect notch and operate the micro switch inside the drive.  I don’t expect this repair to last forever, but it’s been OK so far.

After this, the Floppy Disk drive did work for some time. After going through about the first 20 disks in the collection, it stopped working, and I plugged in FloppyEmu and was back up and running.  Honestly FloppyEmu is such a great product that I’ll probably keep using it, if it wasn’t for that distinct sound, and wanting to check out the programs on these disks that came  with the computer.  So, eventually I opened the drive back up, an found this on the main drive circuit...


Look at the capacitor on the upper right hand corner.  The right end of the capacitor has completely blown out of the device and there’s literally nothing left inside.  I was able to replace all three electrolytic capacitors with caps that I had in my stock bins, and get the drive back up and running.  I hear that not much else can go wrong with these drives, so I expect this drive to be operating when when the last of the Double Density floppy disks wear out.

So, with the Apple Disk II drive as Drive 1 and the FloppyEmu as Drive 2, I was able to boot off of a disk copy program and copy various disk images back out to Floppy disk.  I was able to make ProDos disks this way, and some games like Flapple Bird.

Along the way I made some simple, silly mistakes, too, like accidentally pushing the color / monochrome button on the front of the monitor, then closing the door and forgetting that setting.  I spent almost an hour trying to figure out why the image was monochrome, then remembered the monitor setting, which I now understand is there to help reduce color fringing with text in 80 column mode.

Anyway, the Apple IIe is up and running and I just couldn’t be any happier with the result, what a classic machine!  It’s been my go to game machine for classics like Donkey Kong and Choplifter since it’s been running.  I’ve also been able to use it in testing a much more broken Apple II Plus machine, but more on that in a future article.

Do you have memories of Apple IIe?  If so let me know in the comments below, or send me an email.

Current State of the Lab Workbench

I thought I'd give a bit of an update about the current state of Steve's Digital Basement, as there have been quite a few upgrades over the last year.  Many of them inspired by Adrian's Digital Basement along with many other retro and vintage tech YouTubers out there.  I really appreciate their willingness to share the wins and the losses.  I share the belief that the more comfortable we can get with learning from failure and not being afraid to try stuff that we aren't good at, the more skilled we will become.  The perfect is truly the enemy of the good.

Since spending more time learning online about the surprisingly high quality of some of the Chinese devices out there, and since I've always wanted a Digital Storage Oscilloscope, I spent some time learning about the various low-cost brands out there.  I often shop the "Open Box" section of the online catalog at my local Microcenter.   They had this Silgent SDS 1052DL+ that sat in the store for quite a while, after the price dropped a second time, I picked it up.  I paid less for it than what I got by selling my old Tektronix analog scope.  I know that the Tek scope is likely to outlast this one, but in the meantime, I've got a really capable scope and I couldn't be any happier with this major upgrade at the bench.


I've also added a new Power Supply recently, it's a generic supply also from China, but has more current capacity than the BK Precision Model 1601.  I'll keep both for situations where I need dual voltages.

The other add from China is a component tester, it’s capable of doing ESR checks on capacitors, and that’s been very useful as I troubleshoot old devices.

The Hakko soldering station was one of my first upgrades when I started to get back into Electronics and repair, it has been a truly amazing tool.  I upgraded from a non-temperature controlled soldering pencil about 5 years back.  I no longer dread soldering, it's an absolute pleasure to use, and the results are significantly better.

In the upper left hand corner, you can see storage bins, I have a couple of sets of these with common electronic components.  I'm not stocked yet to do recaps and other repairs without ordering parts, but I do have some common components on hand, and I've been able to do some spur of the moment repairs without ordering parts, like recapping the control board on an Apple Disk II or recapping the Apple IIe card in my Mac LC.

Not shown in the picture, I have a tool box off to the side filled with hand tools.  This tool box holds; hand tools,  a Multimeter, and various magnifiers.

On the wish list, I'd love to get a really nice stereo microscope.  I previously had a powered Solder removal tool on my list, but I recently got the manual Soldapullt and this has been such a great hand tool that I'm not sure now that I need a powered desoldering gun.  If I start frequently removing ICs and connectors, I may change my mind about that.  I'd also like to get a hot air soldering gun, this would help with desoldering and resoldering Surface Mount components (at this point primarily to help with the ReCapping that I"m already doing).

How to open a Power Macintosh 61XX Series Case Without Breaking It

 Opening a Power Macintosh 6100 is dangerous.  These machines are of such an age that the plastic tabs on the back of the case break off frequently.  Sadly, I've just broken two more this weekend.

That being said, I was successful at opening to cover on one of these computers without breaking the tabs, I was so excited.

In hindsight, I really wish I'd have used my heat gun to soften the tabs a bit before trying to open the case, but I did come up with another hack that I thought might be worth sharing.  (Or maybe I saw this somewhere else and I'm just not remembering where.)

If you do manage to get the case open, you'll see a couple of hooks that face backwards at the back...


One hook just over the power supply, and one over the Expansion Bay.  A quick few minute with the Dremel and you can zip those right off, as shown below...

The cover is now loose, but gravity will hold the cover down, or whatever you put on top, and there's no longer any danger of breaking the tabs on the cover.

Minnesota Computer History - CPT Corporation

Minnesota has alot of computing history.  I've always enjoyed history and technology, and so it's no surprise that I have an interest in the history of technology.  Lately I've enjoyed digging back into that history and discovering a bit more about it as I dig into resources from the Charles Babbage Institute at University of Minnesota.

I started my Engineering Career with a brief stint at Computing Devices International.  This was one of the Control Data companies, which has ties all the way back to the Univac from Remington Rand.  This history is covered well by some interesting talks given here.  This computer company formed just after World War II, and was for quite some time more dominant in the market than IBM.  I hadn't thought much about my time at Computing Devices (now a part of General Dynamics) until my Retro Computing hobby brought me into contact with another piece of Minnesota computer history that I knew nothing about.

I was out purchasing another Macintosh Plus computer as a parts computer for my working Macintosh Plus and I asked the gentleman I was purchasing from if he had any other Retro Computer equipment he'd be willing to sell.  In this case, he did have another computer, and he was wiling to sell it to me.  

The latest member of the collection here is a CPT Corporation Model 9000...


The CPT 9000 is an IBM AT Compatible computer with a 286 processor and 1MB of RAM.  There are several interesting things about this computer, but the one that I've enjoyed the most is that this computer was made in Minnesota.

When I say made in Minnesota, I'm not talking about assembled from board level in Minnesota, I mean that CPT Corporation designed the computer from the component level up in Minnesota.  Here are some pictures I've taken of the boards.  First the CPU Board (This is a single board computer design with a passive backplane)...

You can see CPT Corp. on the Silkscreen.

In reading about this company, they developed high end Word Processing systems, and there appears to be custom hardware on the mainboard to support their proprietary portrait mode, one page at a time display monitor.   My examples does not include this monitor, or any proprietary display driver.

The RAM Board is here...

Also caries the CPT Corp. marks on the silkscreen, as does the Backplane...


The computer case is very heavy and well designed, I believe the Power Supply may be a custom design, as it is mounted as a loose board inside the chassis (no separate enclosure).

This particular computer appears to have been continuously updated till about the mid '90s.  The rest of the components were not made in Minnesota, a plain 16 Bit ISA VGA Card with a Trident Chipset, a working 1.2MB Floppy Drive,  a failed 1.44MB Floppy, a Super IO Card and HDD from the mid nineties.  Perhaps this is the timeframe when CPT Corporation finally closed their doors?

Is this the last computer that CPT Corporation designed and manufactured before their demise?  Is this the last (or only) IBM Compatible PC designed and manufactured in Minnesota?

None of the CPT Corporation software was on the computer, which is not surprising, but I must say I've been a bit disappointed.  I've posted about this on the Vintage Computer Forum here, but there's been alot less interest in the hobbyist community in archiving business software, so no luck locating that yet.  

Also, I have no idea what happened to the Intellectual Property and the remains of the company after the bankruptcy, perhaps the software has been lost to time, which would be a shame given the size of this company at its peak.

Please reach out via email (in my profile), or leave a comment below if you know any of the answers to my questions about CPT Corporation, this computer or the software it ran.  Thanks!

Retro Computing - Retrobrighting

 I’ve recently tried Retrobrighting for the first time.  This is the process of restoring yellowed plastic to its like-new appearance.  There are many videos online showing this, including The 8-Bit Guy and others.

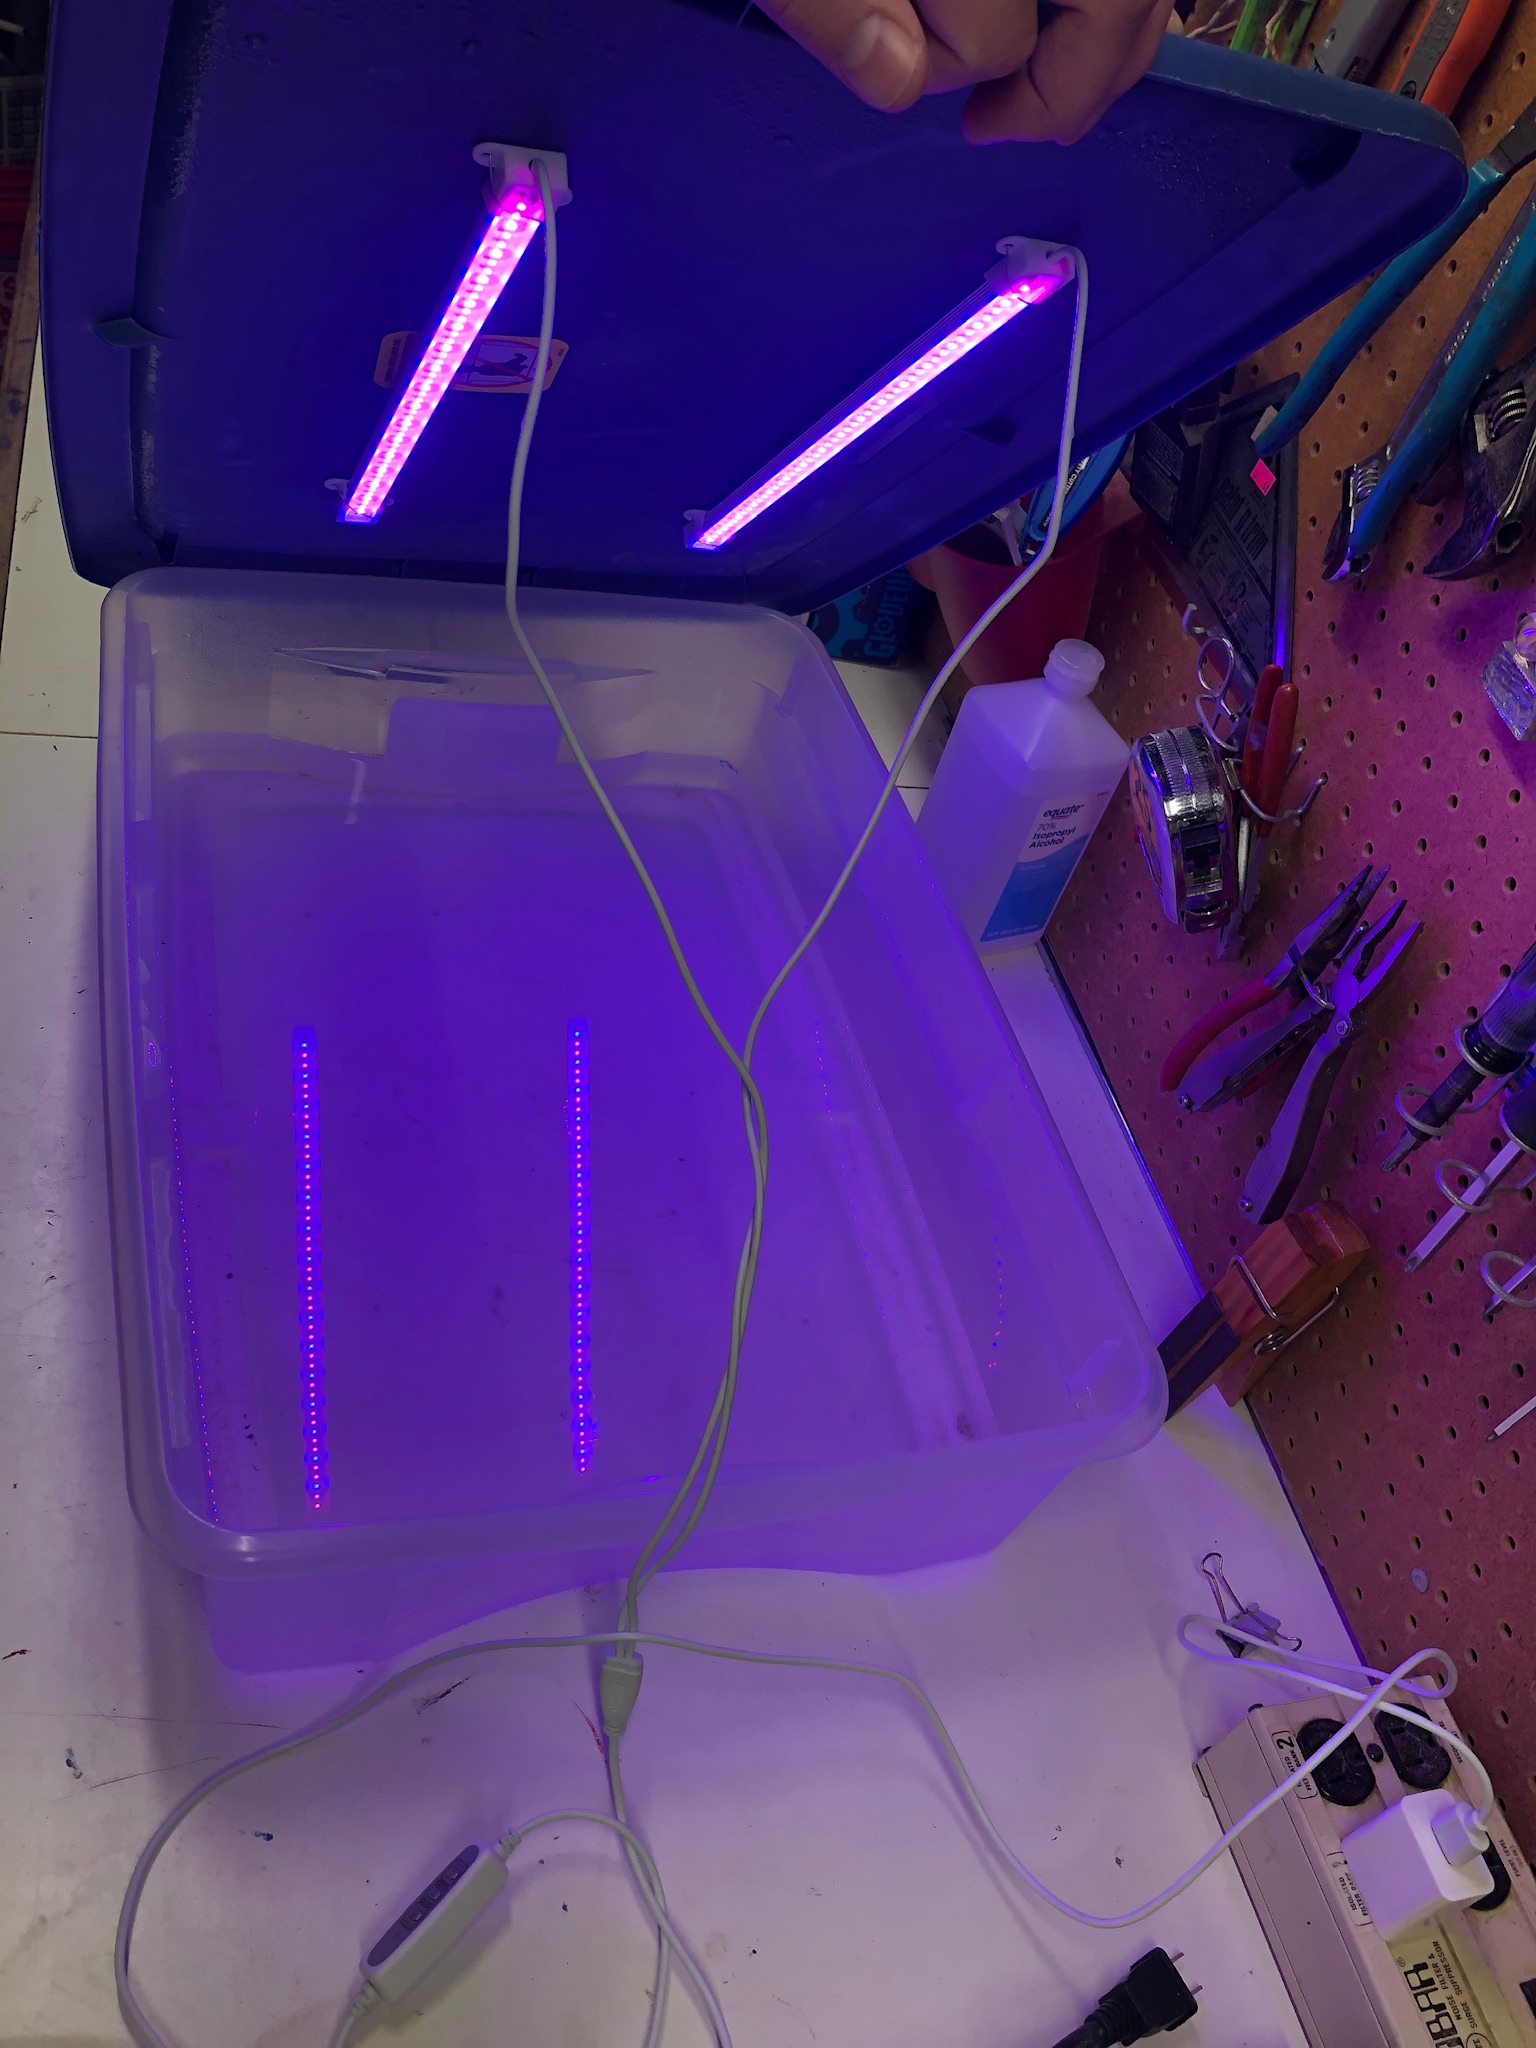
The technique relies on immersing yellowed plastic parts in Hydrogen Peroxide while exposing them to UV Light.

Finding Hydrogen Peroxide during the pandemic was a bit of a challenge, but the 8-Bit Guy recommended Sally Beauty supply for #40 Developer, that seems to work well, as it’s more concentrated than what you’d get from the pharmacy, which is normally 2% concentration.

I was able to re-use some LED based grow lamps that we had here already.  Since my first item was a Keyboard I was able to use a shallow tote for this first experiment, and installed the UV LED strip lights on the lid of the tote, as shown here...


The most yellowed item in my collection at this point is a classic Apple ADB keyboard M0116, with lovely Apls switches.  Here’s what the keyboard looked like before... 


And After...


This is very gratifying result, as the keyboard looks fantastic with the early 90s platinum macs, like this Classic II...


It looks like they were made to go together, I’m really happy with the result.

A few weeks later, I tried the Cream method on some larger items, the housing of an Apple Portrait Monitor and an Macintosh IIsi.  This was on a sunny summer Saturday, so this time I did the treatment outside.  It only took a couple of hours.

Unfortunately, the first time around the finish looked a bit splotchy.  I redid the treatment again a second time an it came out quite nicely...


So, the retrobright activities will continue.  I may need to find brighter lights and a bigger tank, as winter is coming in Minnesocold and the outdoor retrobrighting activities will have to come to an end.

Let me know in the comments if you’ve ever tried retrobrighting, and what has worked for you?


How to Price Vintage or Retro Computers for Sale on Craigslist and Facebook Marketplace

 Hi All,

As readers of my bLog will know, I buy and sell Retro computers on Craigslist and Facebook Marketplace in the Minneapolis / St. Paul Metro area.  I see a common mistake being made by people listing computers for sale on these sites, and I want to offer a bit of education.  I think an informed buyer and seller create better outcomes for both parties.

The most common error I see is people asking too much for their Vintage or Retro computers.  One common reason for this is not doing basic searches online to determine what type of computer you have.  Do not assume that all grey IBM PCs are the original IBM 5150 computer.  Do not assume that all beige all-in-one Macintosh computers are the original Macintosh computer, look for model numbers on the back of the computer and do some web searches to figure out what you are selling.  As with all antiques the value is related to the rarity, condition, and completeness.

Another common reason for overpricing comes from the practice of looking up items to sell on eBay first, then asking the same or slightly less than the “Buy it Now” price of the highest active auctions on eBay.  This is not a realistic price, you want to find out what eBay buyers are paying, not what hopeful sellers are asking.

As an example, I will describe the latest computer I have sold, a Macintosh Classic from 1991.  At the end, I will tell you what I got for the computer.

When I do a search on eBay for this computer, the first match for a currently eBay listing is asking $240 and another one is listed for $350.  However, if you look one level deeper, the real value of this computer, what eBay sellers have actually paid, is not hard to find.  This information is available by scrolling down the main eBay search results page and finding the “Sold Items” checkbox on the left side near the bottom, as shown here...

As we browse this, we see that one Macintosh Classic sold for $200, another for $96, and another for $80.  The difference in the price was mainly due to condition.  The highest price system looked really clean in the pictures, was in working condition, and was more complete included the keyboard, mouse, and cords.  The others were sold for parts / not working without a keyboard and mouse.

Once you know the value of the item on eBay, how does that apply to local market selling like Craigslist or Facebook Marketplace?  I believe that asking more than 50% of what the item could be sold for on eBay means that you may have to wait a long time to find a buyer, or may not find a buyer at all.   People expect the local market to be cheaper than eBay, and if you want to sell your item quickly, this price point is important.

Using the example of the Macintosh Classic, if we apply the below 50% rule, we should be asking below $100 at the top end and below $40 for this computer in less than ideal condition on Craigslist or Facebook Marketplace, again primarily based on condition and completeness.

I was able to sell my Macintosh Classic recently on Craiglist for $75 without a keyboard and mouse.  It was listed for about 1 week before it sold.

What do you think about this?  Do you have experience buying and selling Retro and Vintage Computers, or other antiques?  I’d love to hear if you have other thoughts or ideas about how to value these old machines, so leave a comment below, or send me an email.


Apple IIe Card for Macintosh LC Continued...

As I've mentioned in this previous post, I'd been able to acquire a Macintosh LC system on Craigslist that included an Apple IIe card.  The card was missing it’s Y-cable, Apple Part Number 590-0703-A.  This is a custom cable only used for this card so if you buy the card without the cable it’s quite hard too find.  There was someone building and selling replacements, but they haven’t been available for some time.

As I’ve already mentioned, I built some adapters using point to point wiring.  Since my use case is for the FloppyEmu, not an authentic Apple II drive (which I do not have to test) I have not connected the 12 volt supply lines.

After making this adapter...


I decided I really wanted a joystick connector, so I built this adapter...


Neihther of these adapters are very reliable, and honestly I’ve been a bit afraid of a short causing damage to the card, which is something I would not be able to replace, so the project continues.

I've never designed a PCB before, and I've always assumed that it would be difficult and that the software tools were out of reach but after seeing multiple YouTubers not only advertising for PCBWay, but also actively building little problem solving boards, I decided that I should not be afraid to try my hand at building a circuit board to solve this problem.  I started out by downloading and installing KiCad, and watching several of the. “Getting Started” Videos on YouTube.  With a few evenings of learning  and working on this, I was able to get a design created that was acceptable to PCBWay.  Finding the right angle connectors on DigiKey was a challenge, but finding the footprint files that KiCad needed for those connectors was surprisingly easy.

Waiting for the boards to arrive from China was the hard part, I live in Minnesota so order from DigiKey usually arrive in a couple of days.  I couldn’t wait to solder up the first one and do some testing.  Had I done it right, or would rework be required on the circuit board after?


Well, the circuit board worked, I was able to read the FloppyEmu, and I was able to play games with the Joystick.  All in all a very gratifying experience.

This is a simple circuit and a simple design, but I’ve decided to share it with the community.  The files are here...
I've decided to go Open Source Hardware on this as a way to give back.

I’ve so appreciated how generous people are with their time, and this is a way that I can give back a little bit too the very small portion of the retro computer community for which this board may be of use.

It’s my hope that every Apple IIe card that still exists out there will be able to be put back into service with FloppyEmu and a Joystick.

As always, I appreciate any and all feedback, leave a comment below.  Thanks!

Using Bootable Floppy Disk Images from the Internet to make Actual Floppy Disks

I’ve recently made some interesting discoveries that I thought may be valuable to other fans of the early Apple Macintosh Computers.

I had an interesting conversation about running some old Macintosh software that was pre System 6.  This era of Mac was before my time and so an interesting challenge.  Of all the early Mac system software disks out there, I think the best organized collection is currently on Winworld, here.  These files work great with the vMac Mini emulator running on a modern Mac, but when you move the files back onto a “Rosetta Stone” Mac in order to build boot floppies, the files are not associated with Disk Copy (the resource fork is missing, and Disk Copy does not recognize the files as disk images).

In the past, I have had some limited success in finding StuffIt (SIT) archives and bringing them onto the bridge machine before un compressing them, that way if the resource fork was intact it will be maintained, but unfortunately a lot of the files on Winworld are missing that information.  Up to this point I had been deleting these versions of the files and moving on to try to locate different sources of the files.

Today I learned that there is another good option.  The vMac Mini folks have created a set of utilities that can be used on OS9 and early versions of OSX to recreate the resource fork for a disk image if that information is missing.  The part of the tool that’s most relevant to vMac Mini is used to indicate that the file should be opened in vMac Mini, but they also created a tool too associate files with Disk Copy.  This utility is called SetFType and is avaliable here.

Normally I used OS 8 or OS 7 for disk imaging activities, but unfortunately this utility requires OS9, so the process I used was this:
Put the files I wanted to use on ZIP drive using the modern Mac, 
Boot my Bridge Mac up in OS9
Run the SetFType utility on the files on the Zip drive
Reboot to OS8 and copy the files over onto the Bridge Mac
Create Floppies using Disk Copy 6.3

Using this technique, I’ve been able to create boot floppies for System 3, the earliest version that will boot on the Macintosh Plus, and to get my Macintosh Plus running System 4, which is the earliest version that will support large 2GB SCSI partitions.

Other than running some very old versions of software that will crash on System 6, I’m not sure how much use I’ll get out of System 4, but it will be interesting too understand more of the history of these early systems.